A Divine Pleasure ⭐


A divine pleasure ⭐
More Posts from Yvonnestarr and Others
What's going on in the congo rn is one of many many reasons that the right to repair is a VITAL tenant in leftism imo
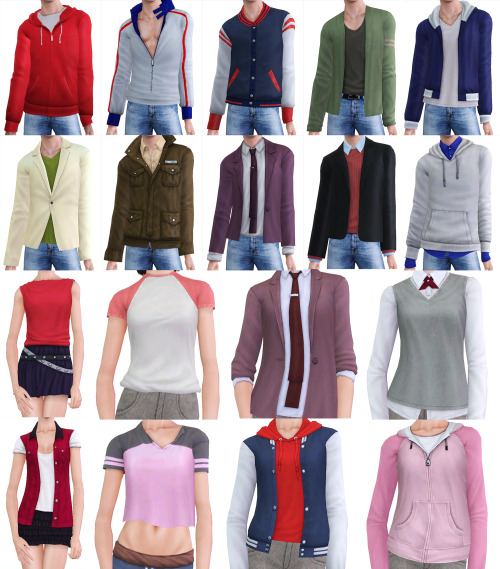
UL CLOTHING FIXES
I hate school spirit, and now your Sims can too! I removed most of the stencils from the UL clothing - not all. Because hey, maybe you want a LITTLE spirit. A few pieces of clothing are not pictured, but you get the idea. I removed the gnome logos mainly - but some have all the logos removed! YOU NEED UL FOR THESE TO WORK.
I suspect that deleting the CASThumbnails file will refresh the images in CAS!
ALSO, I fixed the shine on all clothing - some were just terrible. You may have both fixes.
DOWNLOAD - NO MORE MALE STENCILS
DOWNLOAD - NO MORE FEMALE STENCILS
DOWNLOAD - NO MORE SHINE
PUT THESE FILES IN YOUR OVERRIDES FOLDER.
How to convert CAP patterns into 100% working package files
(tutorial originally by @ohmysims, I just copied it, put the screenshots back, and wrote it without the “keep reading” cutaway that’s in every reblog I found. Click on images to enlarge them. See my notes at the end. Wayback Machine backup)
——————-
Thanks to this god-blessed tutorial, I’ve been able to convert some patterns made with CAP into 100% working package files. And I thought I should keep a record of the process here for future reference. I only rewrote the exact same tutorial with pictures and this tut is really simple.
I. Convert a pattern made with Create-a-Pattern tool into package format. (Read this tutorial if you don’t know how to convert.)
II. GIVE THE PATTERN A NEW RESOURCE NAME
The cause of the notorious Materializing Materials error is that ALL the patterns made with CAP has the SAME instance value (*). So, the solution is to give each pattern a unique instance value.

Open the file with S3PE. Double click on the _IMG tags with instance of 7edd20633162e6ce.
Click [Use resource name]
Write down any unique name
Click FNV64 button. It will regenerate new instance value.
The instance has changed to 0xAEE5CFA2DED89772. Copy the value except for the first two letters (0x).
III. EDIT XML TO HAVE THE NEW RESOURCE NAME


Right-click the _XML that has the type 0x0333406C and select [Notepad] so you can edit the xml file.
Replace 7edd20633162e6ce with the value you copied in Step II-5. In this case it is AEE5CFA2DED89772.
Save the XML file and close the notepad.
Select YES to commit change AND SAVE.
——————-
Notes by @sweetdevil-sims:
This tutorial applies to patterns that were converted from .sims3pack to .package format.
(*) this is NOT the reason for the Materializing Materials error. The issue described and fixed by @ohmysims. manifests as multiple patterns being replaced by the image of a single pattern. The MM error is caused by an extra space where there shouldn’t be one. For more info, check these resources:
MTS thread with several ways to fix the MM error
Tumblr post with a tutorial for fixing the MM error
The fix for the “Materializing Materials” error is independent of the one for the Create-a-Pattern conflicting resources error (which is described in the tutorial above).

It's the tutorial that no one asked for! And I blew my entire day on it, so you better appreciate it! :) No, seriously, this is as much for me as for anyone else. I don't do this process often, and when I do, I have to re-remember the steps, and sometimes I forget some of them and have to figure it out again. This will save future me from having to do that.
Even if you aren't me, if you're interested in being able to place diving lots in most any world you like and that has ocean, this will be relevant to your interests. Unfortunately, it is a sometimes fiddly process to get a working lot at the end, and I went into a lot of detail, so the tutorial is long, but please do follow it closely because if you skip a step or mess anything up, your lot will be wonky or it might not work at all, and I don't want to hear your whining. :)
Note that this is a tutorial for placing a new, empty diving lot, which is the first step in placing a downloaded diving lot or one that you yoinked from another world, but this tutorial doesn't cover how to get such lots working. This just shows you how to place an empty lot, which I'm assuming for this tutorial's purpose that you will then build/decorate yourself. Frankly, I've discovered that building your own is much easier than trying to ram square pegs into round holes, which is what placing downloaded dive lots often feels like, even if you know what you're doing. It can be as time-consuming, if not more time-consuming, to get a pre-made lot placed and working than it does to just build your own.
So, here we go.
Step 1: Pick Your Poison. Choose the world/save you'd like to plop a dive lot into, open it, and go into Edit Town. You can use any world you want, EA or custom, so long as it has accessible ocean in it. (More on that in Step 3.) I'm going to use Sunlit Tides, just because many people want to put dive lots in it yet can't always get them working.
Step 2: Cheats! You need some cheats, so open the cheat box by pressing Control+Shift+C and then enter these three:
testingcheatsenabled true buydebug on enablelotlocking on
Note that you need to enable testing cheats first because the other two aren't available otherwise.
Step 3: Placing the Lot. Go into World Editor and in the Lots submenu of it choose the lot size you want:

As far as I know, a dive lot can be any size you want from the minumum 10x10 to the maximum 64x64, any of the EA standard sizes or any custom size you might add using this mod. If you are bound and determined to try and place a downloaded/yoinked lot, then in my experience, it's best to make the new lot a little bigger than the lot you want to place, if possible, so that you have some wiggle room to get it to fit better. But, I'm assuming you're going to build your own here.
If you plan to do lots of terrain sculpting on your dive lot, bigger is better. That said, unless you're going to do something really elaborate, it doesn't have to be 64x64, the largest possible size, either. Smaller will mean that your prospective lot will fit in more places on the map. So, it's up to you. For this, I'm just going to place a 30x30 lot, because I'm not going to build/decorate it or anything.
Now, it needs to be said that not every world will be able to have diving lots. The world must have ocean, obviously, and that ocean must be routable or else sims won't be able to get to it. The ocean also has to be deep enough. Generally speaking, "deep enough" is if the water is dark blue. (Or green, or whatever color the lighting mod you use might make it.)
For instance, in Sunlit Tides here, it's pretty obvious where the deeper water is:

But you know what? I'm going to place a dive lot in some of the shallower water, anyway, because I/you actually can, within reason. And if you're interested in doing this in Sunlit Tides, I'll warn you that the deep spot in the pic above has a very uneven bottom. It's really not a good place to put a dive lot. And I'm not sure what the deep water on the outskirts of the map is like, but the good news is that much of the deeper and flat-bottomed shallows, as I've noted, work well.
So: With your chosen lot size selected, move your cursor around in the ocean where it seems to you that the water is "deep enough" until you come to a spot you like and where the lot grid is green. If the grid is never green, then the ocean likely isn't routable at all and you won't be able to place diving lots in that world. I have never run into that, myself, but I also haven't done this all that often, so it's certainly possible. Anyway, I'm picking here:

My advice would be to not make your lot too far off-shore even if you can do so, or else it will take sims a long time to get to it. Especially merfolk, because they always swim out to dive lots rather than take a water taxi, and they swim much more slowly than a water taxi moves. Once you find your spot, go ahead and place the lot. Doing so will create a square island, not a sunken lot. That's fine. We'll fix it in a moment.
Step 4: Change the Lot Type. Click the lot's icon and change the lot type to community and then choose "Diving Area" as the subtype:

Note that this option will only show if you've enabled lot locking. So if you didn't enter that cheat up in Step 2 or if you entered it incorrectly, rectify that situation now so that you can set the lot type.
Step 5: Sinking the Lot Enter the lot and flatten it with this tool in build mode:


This will submerge the lot so that it's level with the sea floor rather than being an island. You can now move the camera down under the water and have a look at your potential diving area, like so:

In particular, check the edges of the lot to see if there are any huge drop-offs or other great differences between the level of your lot and the surrounding terrain. Whether or not this will happen is world-dependent. Some worlds have very uneven/jagged underwater areas, which is what will make you end up with drop-offs, while others, like Sunlit Tides here, are (mostly) pretty flat.
You can see in the above pic that this lot is a little sunken along two of its sides. That's fine; that small amount of difference can easily be smoothed out with the terrain sculpting tools. If there are steep drop-offs or upward slopes, you can sculpt the lot to try to blend it with its surroundings, but be advised that 1) Interactable objects like dive caves can't be placed on uneven terrain and still be usable and 2) If you end up really deep down, the camera goes wonky and it's frustrating-to-impossible to build or play the lot. So, if you've got a huge drop-off and/or a steep upward slope on one or more of the edges of your lot, I'd recommend just trying a different spot. But, it's up to you. If you feel you can work with the uneven edges in some way, have at it. You are braver than me.
Step 6: Save that MFer. Once you have a lot you're satisfied with, this is a good time to save. So, go back to Edit Town and do that.
I recommend saving often during this entire process because, I don't know about your game, but sometimes mine will "hang" or even crash when moving between Edit Town and Build/Buy, especially if I do it a lot. And with this process, you will be doing it a lot, not to mention exiting out to the main menu and then going back into the save a few times. Since getting a dive lot placed can be a fiddly business, it sucks to lose a lot of progress to a hang/crash. So, in my opinion, you can't save too often, but in this tute I'll only prompt you to do it when you must.
Step 7: Exit Stage Right Remember long ago in the last step how I said you'll be exiting to the main menu a few times? Yeah, the first time is now. You do this because, for whatever reason, the game doesn't register changes made to the "structure" of dive lots without exiting and re-entering the save. So do that. Once it's reloaded go back into Edit Town and then back into the new diving lot. Because now it's time to place a dive buoy.
Step 8: Deploy Buoy The dive buoy is located in the debug items, so if you haven't turned on access to that yet, do so now. Then, go into the buy menu, sort it "by function," not the default "by room," and you should see this question mark here:

Click that, and then I recommend that you go to the filters on the right-hand side of the menu and choose just Island Paradise objects. Because you'll be going into the "Misc. Objects" tab and, especially if you have all EPs/SPs, there's a crap-ton of objects in there to sort through. So, filter, then choose the "Misc. Objects" tab, and you'll see this much-more-manageable selection:

Choose the dive buoy, as indicated, and place it anywhere on your dive lot. It doesn't matter where because (spoiler alert) this one's going to be deleted, anyway.
Step 9: Ogle That Shapely Buoy Once your buoy is placed, move your camera down to the ocean surface and have a closer look at it. Like so:

See how the ball part of it is just sitting on the surface of the ocean? That's bad. If you were to leave it like that, you'd have sims (and sharks, if you place a surface shark spawner) swimming/snorkeling in the air, if the lot would work at all. But don't panic! We can fix it. We just need to shift the entire lot down a l'il bit, so let's do it!
Step 10: Copy the Lot to the Library Go back out to Edit Town. Check to make sure that your lot designation is still "Diving Area." (Because during this process, it will sometimes change.) Then, save the lot to your library. The game will give you a warning about cancelling all sim interactions or something. That's fine. Just put a copy of the lot in the library. The thumbnail in the community lot catalog will look like a blue square.
Why are you doing this, you ask? Because now you're going to bulldoze the original. Why? Because we need to move the entire lot down a little bit, and you can only do that by placing a fresh copy of the lot. And you may need to do this several times until you get it at the right depth, so having a copy of the lot in your library is necessary. You can delete it out of the library once you've got your dive lot in the right place, if you want.
Step 11: I'm a Steamroller, Baby Once you've got a copy of the lot safely in your library, bulldoze the original lot you placed. Once bulldozed, the game will change the lot designation back to "No Visitors Allowed," so you'll need to change it back to "Diving Area."
Step 12: Go Down on That Lot To move the lot down when it's placed, you need this cheat activated:
setimportedterrainoffset -0.1
The value at the end can be whatever you want, as many decimal places as you want. A positive number will move the lot up, and a negative number will move it down. (You can use a larger negative number to make deeper a lot that's too shallow, and it can also be helpful if you're intending to try to place a downloaded diving lot on this lot so that it might better match the depth of the water in whatever world it came out of, but this won't always have the effect you want. For one, your lot will be down in a hole.) For the purposes of this tute, all I need to do is move the lot down a teeny bit so that the dive buoy on the lot is sitting IN and not ON the surface of the water. Hence, the -0.1 value.
(Now, I should mention that other tutes I've seen will have you just lower the terrain right under the buoy to sink it a little bit rather than doing this bulldoze-and-replace-with-a-whole-lowered-lot thing I do. This method can work, but I don't like it for various reasons that I won't go into for brevity's sake. I'm just telling you what I do, which has worked every time I've placed a dive lot, including shallow-water ones like this one.)
Step 13: Re-Placing the Lot Go into your library and place your saved lot back where it was. DO NOT ROTATE IT or else things will get screwed up. (Namely, your lot will become an island again and resinking it won't really work.) Just click "Accept." And then check its lot designation and change it to "Diving Area" again, if necessary, which it probably will be because stupid game.
Step 14: Ogle that Shapely Buoy 2, Electric Boogaloo Now, enter build mode and move the camera down to the ocean surface again to check the dive buoy. Ideally, it will now be sitting IN, not ON, the water, like so:

If it's still sitting on the surface, the lot needs to be deeper and therefore moved down farther, so go back to Edit Town, bulldoze the lot again, change the value of the imported terrain offset cheat to a larger negative number (Perhaps -0.5) and try again. Be aware that, as I said, once you get to larger numbers (as in greater than -5 or so) you start ending up with your diving lot down in a hole, which may or may not be workable.
Now, there is a marker on the buoy, the little black rectangle I outlined in the pic above. If the ball part of the buoy is at least partly in the water but that marker is still above the water, as in the above pic, the lot will still work, but there will be a "hop" (and sometimes a pause) when a water taxi or a swimming merperson crosses the boundary of the lot. The higher the marker is above the water line, the larger that "hop" will be. (Because, if you haven't figured it out yet, the dive buoy is what tells the game where sims can swim, vertically, on a dive lot.)
If such a hop doesn't bother you, you can leave the buoy as-is. If you're a perfectionist like me, you go back to Edit Town, bulldoze the lot, and change the value of the terrain offset cheat to try again. Do this as often and with as many decimal places as your level of perfectionism demands. :) I'm not that fussy, so I usually just move the lot down in increments of 0.1 until the marker is at or below the water line but the ball of the buoy is not completely underwater because you don't want the ball completely underwater, either. At least some of it needs to be above water. So, fiddle as much or as little as you feel you need to.
(For reference/scale, the gap between the marker and the water line in the above pic would probably be fixed by an offset of about -0.15 instead of -0.1. But it would also be fine as-is unless a little hop at the lot boundary will bother you.)
Step 15: Bye-Bye Buoy! Once you have the lot so that the buoy is where you want it, DELETE THE BUOY. I repeat: DELETE THE BUOY. Yes, DELETE THE BUOY. For whatever reason, dive lots drawn from your library that contain buoys won't work. I don't know why. They just don't. You need to place a fresh buoy. (I'm pretty sure this is why lots of people can't get downloaded dive lots or lots that they pulled from other worlds to work. Sometimes the answer is simply to delete the buoy, if the lot came with one, and place a fresh one.)
Step 16: Exit Stage Left Once you have DELETED THE BUOY and only once you have DELETED THE BUOY, go back to Edit Town, check to make sure the lot is still designated as a diving area (and change it back if necessary) and save. Why? Because now you need to exit to the main menu and reload the save again. So do that.
Step 17: Fresh Meat Buoy! Once the save is reloaded, go back into Edit Town, and check to make sure the dive lot is still designated as one. Redesignate, if necessary. Then, go into build/buy and place a fresh buoy, just as you did before. This one will be staying permanently, so place it where you actually want it to be. (Which really doesn't matter; aside from defining the vertical space of the diving lot, it just designates where your sim "enters" the lot.) If you want the lot to generate sharks on the surface, you can also place surface shark spawners now, too, as few or as many as you want, and because you have properly adjusted the height of the lot, the spawned sharks will not be swimming in the air. The spawners are also in debug mode, under the fish spawners. (There is also a spawner for underwater sharks. Do not put that one on the surface. Make sure you only put surface shark spawners on the surface.)
Step 18: Set the Lot's Skill Level You set the required skill level for the diving lot by going to buy mode (if you left it), making sure the hand tool is active, and then holding down control and shift while clicking on the dive buoy. Choose the option "Set Required Diving Level…" from the menu that comes up:

…and then from the resulting options under that choose a NON-ZERO number. For some bizarro reason, buoys default to level zero when placed, and a diving lot set to skill level zero is inaccessible even if a sim has level 10 scuba skill. (Good move, EA! Why is zero even an option if it doesn't work??) So, pick whatever skill level you'd like, so long as it ISN'T ZERO. (I suspect that this is another reason why people can't get downloaded dive lots that they place in a world to work.) Once you have the skill level set, go back to Edit Town and save.
Step 19: Test And now you're pretty much done. All that's left is to test the thing to make sure the lot works before you bother with building/decorating it. So, return to the game and send a victim to your new, empty lot and see if they successfully arrive (with or without a "hop" at the lot boundary) and successfully get themselves underwater. (My advice, for testing purposes, is to just give the sim you pick enough diving skill to use the lot. This can be done with NRAAS Master Controller.) Don't bother with doing anything further with the lot until you make sure it works.
Here is evidence that my lot, though shallow, works:

If your lot doesn't work, then something went wrong somewhere. Most likely, you missed a step or did a step wrong. I know there are a lot of words here, but they're all necessary to (more or less) guarantee a working lot in the end. So, try again. It's possible that you will have to pick a different location and start over, but I've been able to get a lot working wherever I've placed one, so long as it was in deep-enough routable ocean.
Step 20: PROFIT! Assuming that your lot works, "all" that's left is to build it! :D I'm not going to go into detail about that. It's all up to you. You can sculpt the terrain, paint it with whatever terrain paints you want, place objects, whatever. If you're in shallower water, any objects you place that are tall enough to stick out of the water will just be chopped off at the water line; you won't be able to see the rest above water. The corals and stuff are in debug mode under "Underwater Objects," but if you don't want the tropical look, so long as you have moveobjects turned on, you can place (almost) any object you want down there, aside from things like walls and fences and other build items that can't be drawn underwater. Rocks, plants, trees, columns, and anything from the buy and debug catalogs are all good. If such an object has a function, sims won't be able to use them, though. They'll just become deco. (So, no underwater basketweaving sculpting. Sorry.) So, go to town. Have fun. For this tute, I'll just mention a couple objects and their settings and we'll finally be done.
Miscellaneous Objects:
First, treasure chests. Like the dive buoy, they're located in the "Misc. Objects" of debug mode. There are two versions, one for land and one for water. Obviously, on a diving lot, you want the water one if you want any at all. If you do want to use them on your lot, place down as many as you want, and then set the diving skill level necessary to open each one and designate the treasure each one will hold. You do both by holding down control and shift while in buy mode with the hand tool active and clicking on a chest, just like setting the skill level of the lot on the buoy. This brings up this menu:

The "Assign Treasure" option gives you eight different treasures for the chest. You simply pick the one you want. The "Set Required Skill Level" option allows you to assign the diving skill necessary to open the selected chest. You can choose any number you like from 0 to 10. (Yes, zero is OK for this purpose, even though no one with zero skill can scuba dive, so…Yay EA.)
Then there's the dive caves. I think they are in the "Underwater Objects" section of the debug catalog; I'm not sure because a mod I use moves them to the regular rock section. Anyway, there are two styles, which you're probably familiar with, but they both function the same way. If you have more than one of them in the world, even if they're all on the same lot, your sims can travel between them, much like a subway. Unfortunately, I can't show you how to set this up because that mod I use to move the caves to the rock section also makes them recolorable, but it breaks setting up this functionality and I don't feel like hunting the mod down and taking it out. But it's pretty easy. You Control-Shift-Click on each one, give them a name, and then you can connect them by using the names you give them. Again, it works much like subways. It's pretty self-explanatory.
Finally, there's the fog emitter. If you're unfamiliar with this object, it's a base game object located in the "Misc. Objects" section of the debug catalog. The thumbnail in the catalog looks like this:

And it looks like this when it's placed:

They can be used on any lot, they disappear in live mode, and they can generate not just fog but many, many different effects. Literally thousands of different effects. You place the emitter where you want, and then control-shift-click on it and choose "Set Visual Effect" from the resulting menu:

When you click on it, you get this:

In that window, you type/paste the code for the effect you want. Of course, you will need to know the code for the effect you want. For your convenience, I've uploaded my list of effect codes, which is complete and includes the codes from all EPs, here. It's just a text file, and the codes are in alphabetical order. Since the list is all-EPs, some of them may not work if you don't have the EP the effect comes from, but if that's the case, then any such code you enter simply won't do anything.
The most relevant effects for a diving lot all start with "ep10," but there are others you could possibly use, too. Some of the names of the codes are more helpful than others in terms of knowing what it will do. Generally, you need to experiment. But, you can add schools of fish, single (but non-catchable) fish of all kinds (if you want catchable fish to spawn, you need to use the spawners, not the fog emitter), sharks (non-interactable), light rays, bubbles, glows, fog, all sorts of things, if you're patient enough to go through the list, look for interesting possibilities, and try them out to see if they will work for you. There are whole tutorials dedicated to the object, if you look for them. There's also a mod that makes them shiftable, which can be very useful, here.
One final suggestion: If you go through this process in a world that you know or even just suspect that you'll want to use again and you'll want the dive lot(s) you made in that future save, for the love of pie keep a copy of this save file somewhere. That way you won't have to go through all this crap again. Because even if you save a copy of your finished lot, unless you manage to place the empty initial lot in the new save in the exact spot you placed it when you built the lot, it's not likely to be quite right. So beware.
And with that, I think we're done here. If anyone has any questions, or if you decide to try to make your own diving lot and have questions along the way, feel free to hit me up and I'll do my best to help. Just keep in mind that I'm not an expert by any means.


ROCK FESTIVAL STAGE (MINIMAL CC)
It’s almost time for Simstock again! Horrendously-pricey tickets have been purchased, wellies have been packed, phones charged, and anxious parents’ questions eyerolled at. It’s time to rock out! \m/
This is a 64x64 lot with minimal CC. EA content may come from any EP or SP (I honestly didn’t note everything down, but there’s a lot of stuff from Showtime, Ambitions, Late Night, etc).
REQUIRED CC - This CC is NOT included with the build. You MUST download and install it prior to installing this lot.
Around The Sims - Stuff for Summer Festivals
Around The Sims - Guitar Player’s Den
HA2D - Microphone Set
CycloneSue - Flat Cement Roof Trim
CycloneSue - Barbed & Chickenwire Fences
There is one other item (a column by LunaSims) which I have included in the .zip file. This is mainly because Luna’s download locations move quite frequently, and I didn’t want to keep coming back to this post and updating it!
This lot has not been play-tested, as it was built primarily as a photoshoot location. Be warned: a lot of MOO was used! It should be mostly fine, though.
I’ve also included a notecard containing useful info for concert photoshoots, such as:
Where to get guitar, bass, and hand mic accessories
Suggested poses
Link to a crowd tutorial using the BuyDebug fog emitter
The lot has been optimised in CUSTARD and comes in at 3.38MB.
Download: Mediafire (no ad.fly)


1908 Queen Anne - The Master Bath
This is the final room. I would have loved to have shared the entire lot, but since I install cc as package files, uploading/installing would be a huge hassle. Anyway, this last room has a lot of goodies, so I hope everyone is able to find something to their liking. At some point, I may go back and list all the items used in each room (more than likely not! LOL), but wcif’s are welcome until then. On to the downloads…
Bathroom Art on Maxis Mesh ($50/Paintings, 60 Polys, CASTable) swatch
Two towel edit of Gosik’s Glass Bathroom Wall Towel - pics 1, 2, 4 & 6 ($55/Paintings, 816 Polys, CASTable)
2t3 conversion of Hulasims Round Ottoman, polys reduced and remapped ($100/Coffee Tables, 5029 Polys, CASTable)
LV Alma Bag deco - new mesh ($2000/Sculptures, 2712 Polys, CASTable) swatch
LV Tivoli Bag deco ($2000/Sculptures, 5859 Polys) swatch
Never-ending Camino Real Arches (pic 3) - new meshes, end and middle arches ($100/Arches, 934 & 452 Polys)
2t3 conversion of Pavli’s Condrus Armchair ($200/Living Chairs, 3380 Polys, CASTable 4 color channels & Pavli’s recolors) swatch
Serene Wall Lamp - pics 1 & 3, new mesh ($100/Wall Lamps, 572 Polys, CASTable)
4t3 conversion of Severinka’s Eco Living Tulips ($0/Plants, 1336 Polys, CASTable & SV’s recolors)
1 & 2-tile Glass Shelves - 1-tile in pics 1, 2, 4 & 6, new mesh ($20/Misc Surfaces, 1400 Polys, CASTable)
4t3 conversion of Starlord-sims deco conversion of SLYD’s Celine Trapeze bag ($2000/Sculptures, 2240 Polys, CASTable 4 color channels & SLYD’s snakeskin recolor)
DOWNLOAD
SFS | MF

How to use DXVK with The Sims 3
Have you seen this post about using DXVK by Criisolate? But felt intimidated by the sheer mass of facts and information?
@desiree-uk and I compiled a guide and the configuration file to make your life easier. It focuses on players not using the EA App, but it might work for those just the same. It’s definitely worth a try.
Adding this to your game installation will result in a better RAM usage. So your game is less likely to give you Error 12 or crash due to RAM issues. It does NOT give a huge performance boost, but more stability and allows for higher graphics settings in game.
The full guide behind the cut. Let me know if you also would like it as PDF.
Happy simming!
Disclaimer and Credits
Desiree and I are no tech experts and just wrote down how we did this. Our ability to help if you run into trouble is limited. So use at your own risk and back up your files!
We both are on Windows 10 and start the game via TS3W.exe, not the EA App. So your experience may differ.
This guide is based on our own experiments and of course criisolate’s post on tumblr: https://www.tumblr.com/criisolate/749374223346286592/ill-explain-what-i-did-below-before-making-any
This guide is brought to you by Desiree-UK and Norn.
Compatibility
Note: This will conflict with other programs that “inject” functionality into your game so they may stop working. Notably
Reshade
GShade
Nvidia Experience/Nvidia Inspector/Nvidia Shaders
RivaTuner Statistics Server
It does work seamlessly with LazyDuchess’ Smooth Patch.
LazyDuchess’ Launcher: unknown
Alder Lake patch: does conflict. One user got it working by starting the game by launching TS3.exe (also with admin rights) instead of TS3W.exe. This seemed to create the cache file for DXVK. After that, the game could be started from TS3W.exe again. That might not work for everyone though.
A word on FPS and V-Sync
With such an old game it’s crucial to cap framerate (FPS). This is done in the DXVK.conf file. Same with V-Sync.
You need
a text editor (easiest to use is Windows Notepad)
to download DXVK, version 2.3.1 from here: here: https://github.com/doitsujin/DXVK/releases/tag/v2.3.1 Extract the archive, you are going to need the file d3d9.dll from the x32 folder
the configuration file DXVK.conf from here: https://github.com/doitsujin/DXVK/blob/master/DXVK.conf. Optional: download the edited version with the required changes here.
administrator rights on your PC
to know your game’s installation path (bin folder) and where to find the user folder
a tiny bit of patience :)
First Step: Backup
Backup your original Bin folder in your Sims 3 installation path! The DXVK file may overwrite some files! The path should be something like this (for retail): \Program Files (x86)\Electronic Arts\The Sims 3\Game\Bin (This is the folder where also GraphicsRule.sgr and the TS3W.exe and TS3.exe are located.)
Backup your options.ini in your game’s user folder! Making the game use the DXVK file will count as a change in GPU driver, so the options.ini will reset once you start your game after installation. The path should be something like this: \Documents\Electronic Arts\The Sims 3 (This is the folder where your Mods folder is located).
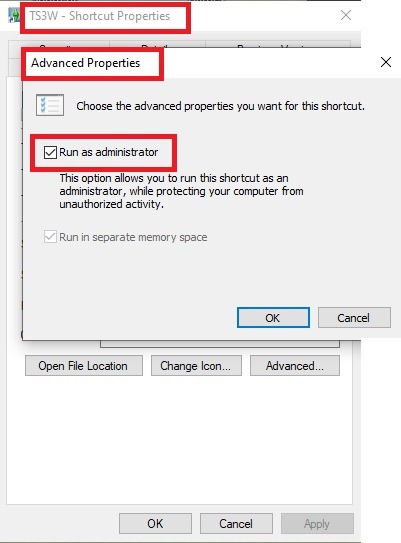
Preparations
Make sure you run the game as administrator. You can check that by right-clicking on the icon that starts your game. Go to Properties > Advanced and check the box “Run as administrator”. Note: This will result in a prompt each time you start your game, if you want to allow this application to make modifications to your system. Click “Yes” and the game will load.
2. Make sure you have the DEP settings from Windows applied to your game.
Open the Windows Control Panel.
Click System and Security > System > Advanced System Settings.
On the Advanced tab, next to the Performance heading, click Settings.
Click the Data Execution Prevention tab.
Select 'Turn on DEP for all programs and services except these”:
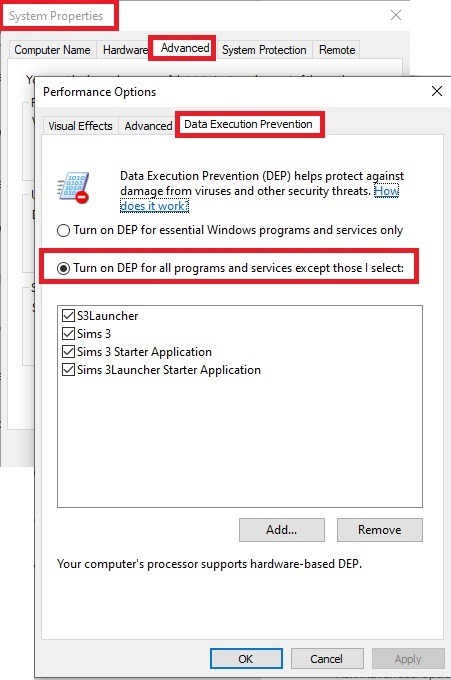
Click the Add button, a window to the file explorer opens. Navigate to your Sims 3 installation folder (the bin folder once again) and add TS3W.exe and TS3.exe.
Click OK. Then you can close all those dialog windows again.
Setting up the DXVK.conf file
Open the file with a text editor and delete everything in it. Then add these values:
d3d9.textureMemory = 1
d3d9.presentInterval = 1
d3d9.maxFrameRate = 60
d3d9.presentInterval enables V-Sync,d3d9.maxFrameRate sets the FrameRate. You can edit those values, but never change the first line (d3d9.textureMemory)!
The original DXVK.conf contains many more options in case you would like to add more settings.

A. no Reshade/GShade
Setting up DXVK
Copy the two files d3d9.dll and DXVK.conf into the Bin folder in your Sims 3 installation path. This is the folder where also GraphicsRule.sgr and the TS3W.exe and TS3.exe are located. If you are prompted to overwrite files, please choose yes (you DID backup your folder, right?)
And that’s basically all that is required to install.
Start your game now and let it run for a short while. Click around, open Buy mode or CAS, move the camera.
Now quit without saving. Once the game is closed fully, open your bin folder again and double check if a file “TS3W.DXVK-cache” was generated. If so – congrats! All done!
Things to note
Heads up, the game options will reset! So it will give you a “vanilla” start screen and options.
Don’t worry if the game seems to be frozen during loading. It may take a few minutes longer to load but it will load eventually.
The TS3W.DXVK-cache file is the actual cache DXVK is using. So don’t delete this! Just ignore it and leave it alone. When someone tells to clear cache files – this is not one of them!
Update Options.ini
Go to your user folder and open the options.ini file with a text editor like Notepad.
Find the line “lastdevice = “. It will have several values, separated by semicolons. Copy the last one, after the last semicolon, the digits only. Close the file.
Now go to your backup version of the Options.ini file, open it and find that line “lastdevice” again. Replace the last value with the one you just copied. Make sure to only replace those digits!
Save and close the file.
Copy this version of the file into your user folder, replacing the one that is there.
Things to note:
If your GPU driver is updated, you might have to do these steps again as it might reset your device ID again. Though it seems that the DXVK ID overrides the GPU ID, so it might not happen.
How do I know it’s working?
Open the task manager and look at RAM usage. Remember the game can only use 4 GB of RAM at maximum and starts crashing when usage goes up to somewhere between 3.2 – 3.8 GB (it’s a bit different for everybody).
So if you see values like 2.1456 for RAM usage in a large world and an ongoing save, it’s working. Generally the lower the value, the better for stability.
Also, DXVK will have generated its cache file called TS3W.DXVK-cache in the bin folder. The file size will grow with time as DXVK is adding stuff to it, e.g. from different worlds or savegames. Initially it might be something like 46 KB or 58 KB, so it’s really small.
Optional: changing MemCacheBudgetValue
MemCacheBudgetValue determines the size of the game's VRAM Cache. You can edit those values but the difference might not be noticeable in game. It also depends on your computer’s hardware how much you can allow here.
The two lines of seti MemCacheBudgetValue correspond to the high RAM level and low RAM level situations. Therefore, theoretically, the first line MemCacheBudgetValue should be set to a larger value, while the second line should be set to a value less than or equal to the first line.
The original values represent 200MB (209715200) and 160MB (167772160) respectively. They are calculated as 200x1024x1024=209175200 and 160x1024x1024=167772160.
Back up your GraphicsRules.sgr file! If you make a mistake here, your game won’t work anymore.
Go to your bin folder and open your GraphicsRules.sgr with a text editor.
Search and find two lines that set the variables for MemCacheBudgetValue.
Modify these two values to larger numbers. Make sure the value in the first line is higher or equals the value in the second line. Examples for values: 1073741824, which means 1GB 2147483648 which means 2 GB. -1 (minus 1) means no limit (but is highly experimental, use at own risk)
Save and close the file. It might prompt you to save the file to a different place and not allow you to save in the Bin folder. Just save it someplace else in this case and copy/paste it to the Bin folder afterwards. If asked to overwrite the existing file, click yes.
Now start your game and see if it makes a difference in smoothness or texture loading. Make sure to check RAM and VRAM usage to see how it works.
You might need to change the values back and forth to find the “sweet spot” for your game. Mine seems to work best with setting the first value to 2147483648 and the second to 1073741824.
Uninstallation
Delete these files from your bin folder (installation path):
d3d9.dll
DXVK.conf
TS3W.DXVK-cache
And if you have it, also TS3W_d3d9.log
if you changed the values in your GraphicsRule.sgr file, too, don’t forget to change them back or to replace the file with your backed up version.
OR
delete the bin folder and add it from your backup again.
B. with Reshade/GShade
Follow the steps from part A. no Reshade/Gshade to set up DXVK.
If you are already using Reshade (RS) or GShade (GS), you will be prompted to overwrite files, so choose YES. RS and GS may stop working, so you will need to reinstall them.
Whatever version you are using, the interface shows similar options of which API you can choose from (these screenshots are from the latest versions of RS and GS).
Please note:
Each time you install and uninstall DXVK, switching the game between Vulkan and d3d9, is essentially changing the graphics card ID again, which results in the settings in your options.ini file being repeatedly reset.
ReShade interface
Choose – Vulcan

Click next and choose your preferred shaders.
Hopefully this install method works and it won't install its own d3d9.dll file.
If it doesn't work, then choose DirectX9 in RS, but you must make sure to replace the d3d9.dll file with DXVK's d3d9.dll (the one from its 32bit folder, checking its size is 3.86mb.)
GShade interface
Choose –
Executable Architecture: 32bit
Graphics API: DXVK
Hooking: Normal Mode

GShade is very problematic, it won't work straight out of the box and the overlay doesn't show up, which defeats the purpose of using it if you can't add or edit the shaders you want to use.
Check the game's bin folder, making sure the d3d9.dll is still there and its size is 3.86mb - that is DXVK's dll file.
If installing using the DXVK method doesn't work, you can choose the DirectX method, but there is no guarantee it works either.
The game will not run with these files in the folder:
d3d10core.dll
d3d11.dll
dxgi.dll
If you delete them, the game will start but you can't access GShade! It might be better to use ReShade.
Some Vulcan and DirectX information, if you’re interested:
Vulcan is for rather high end graphic cards but is backward compatible with some older cards. Try this method with ReShade or GShade first.
DirectX is more stable and works best with older cards and systems. Try this method if Vulcan doesn't work with ReShade/GShade in your game – remember to replace the d3d9.dll with DXVK's d3d9.dll.
For more information on the difference between Vulcan and DirectX, see this article:
https://www.howtogeek.com/884042/vulkan-vs-DirectX-12/


Info and download under the cut
Keep reading
The Sims 1 ~ 2023 Setup Guide ft. my TS1 Starter Pack (Web Installer) ~ out now!
Effortlessly download, install and optimize TS1 Complete Collection to run well on modern systems!


Join TS2 Community for the fastest Starter Pack updates and more <3
Thank you to FaithBeam for the lovely widescreen patcher which is included!
Religion for Sims (v.1.0)

This is a collection of script and object mods that creates religions for Sims through the use of custom skills. There are two religions that Sims can practice: Peteran and Omiscan. Sims can pray/worship, make offerings, attend religious services and teach other Sims of their religion. The two religions are different and have different practices that you have to learn and can share. Peteran Sims can become priests which is a rabbithole career with active interactions where they can give live sermons, convert other Sims, ask for church donations and absolve Sims of their "sins".
This mod requires Battery's Script Utility, NRaaS Career (for the custom career), and CCLoader and the University EP for the custom herb to work.
Please read through all the documentation, there's a lot of information about the features and gameplay.
Download:
Necessary: olomaya_religion_Peteran.package, olomaya_religion_Omiscan.package, olomaya_banisteria_herb.package
Optional (but def recommended to get all the mod features): olomaya_PeteranReligion_Career.package, olomaya_PeteranBook.package, ATS3_object_sims4to3_jungle_amazoniteskull_Omiscan.package, ATS3_object_sims4to3_jungle_ancienttalkingstatue_Omiscan.package, Mspoodle_TSM_PeteranPrayerWood_Peteran.package, Mspoodle_TSM_PeteranPulpit_Peteran.package
The objects are courtesy of the very talented @mspoodle1 and ATS Sandy. You can basically just copy and paste the script into whatever objects you want to customize the aesthetics of the religions to your liking.
Thanks to: @misspats3 for all her testing, her work in putting together the extremely thorough documentation, and for pushing me to finally release this. I think this mod has been done for a year but I'm lazy. @zoeoe-sims for all her help with getting the custom skill to work with a custom career. SonjaA, @omedapixel, Alunn and others (again, this was so long ago I'm sure there's people I'm forgetting. forgive me!) for their testing and feedback. MsPoodle and Sandy for their generosity in letting me share new/alternate scripted versions of their work and for making cool stuff that makes me go "ooh, what if that were functional?"
Custom moodlets made with FlatIcons and GIMP and loaded using Battery's Script Template.
The mod has been tested with several players and I played with it for months but I'm sure me just saying that will produce a bug I've never come across so let me know if you find it!
Enjoy!
-
 kellylea1234 liked this · 1 year ago
 -
 izanami-night liked this · 1 year ago
 -
 emersims liked this · 1 year ago
 -
 blazienator liked this · 1 year ago
 -
 asiaplaysthsims liked this · 1 year ago
 -
 dhosowkdnckwl liked this · 1 year ago
 -
 berryuyu reblogged this · 1 year ago
 -
 murfeelee liked this · 1 year ago
 -
 breezysims3 liked this · 1 year ago
 -
 kacesspace liked this · 1 year ago
 -
 alonabean21 liked this · 1 year ago
 -
 satellite-sims liked this · 1 year ago
 -
 nonsimsical liked this · 1 year ago
 -
 silvakristiina liked this · 1 year ago
 -
 opalescenteffervescentsimblr reblogged this · 1 year ago
 -
 rennylurant liked this · 1 year ago
 -
 asimfamilystory liked this · 1 year ago
 -
that-1-user liked this · 1 year ago
-
 thesimperiuscurse liked this · 1 year ago
 -
 crownsofesha liked this · 1 year ago
 -
 nectar-cellar-reblogs reblogged this · 1 year ago
 -
 theseprettylittlepixels liked this · 1 year ago
 -
 unusualee liked this · 1 year ago
 -
 grimbunni liked this · 1 year ago
 -
 narunasims liked this · 1 year ago
 -
 bellasim liked this · 1 year ago
 -
 rorjr liked this · 1 year ago
 -
 ts3-ts4 liked this · 1 year ago
 -
 tsims liked this · 1 year ago
 -
 florydaax liked this · 1 year ago
 -
 kessakerise liked this · 1 year ago
 -
 yvonnestarr reblogged this · 1 year ago
 -
yvonnestarr liked this · 1 year ago
-
 ashante221 liked this · 1 year ago
 -
 1ovelysims liked this · 1 year ago
 -
 simplifiedsimi liked this · 1 year ago
 -
 simplysimpixels liked this · 1 year ago
 -
 trenchcoatthevegbian liked this · 1 year ago
 -
 leasiajack reblogged this · 1 year ago
 -
leasiajack liked this · 1 year ago
-
 plumbobem reblogged this · 1 year ago
 -
plumbobem liked this · 1 year ago
