What's Going On In The Congo Rn Is One Of Many Many Reasons That The Right To Repair Is A VITAL Tenant
What's going on in the congo rn is one of many many reasons that the right to repair is a VITAL tenant in leftism imo
More Posts from Yvonnestarr and Others
How to keep Sims from moving around when you’re photo-shooting, without resorting to poses (yes, it IS possible!)
Because I’m trying to shoot pics for a large wedding party, I figured I’d eventually run into the bane of every Simmer who attempts to put a lot of Sims into one location:
They won’t bloody well stay where you want them to!
Want them all sitting down? Soon enough, one or more of them will get out of their chairs, even if you have Sim Autonomy OFF.
I found something that fixes that, and it’s something so simple: the Movie Maker cheats.
Apparently, you need Generations for this (or you did when it was released; I’m not sure if a subsequent patch enabled it for everyone) but give it a try, regardless of whether you have Generations or not.
To access it, open up the cheat console (CTRL + SHIFT + C) and type:
TestingCheatsEnabled True
And then type:
MovieMakerCheatsEnabled True
Now, when you Shift-left-click on a Sim, you’ll get the following menu:

Disable Autonomy will make ALL the Sims on the lot do nothing, except what you tell them to do. Sit them all down, and they’ll stay put. THIS is the cheat you need to keep all those little wandering buggers in place!
Turn off Look Ats will stop their heads from moving (you probably want to keep this enabled for most things, as it looks more natural)
Animation lets you play almost any animation on any Sim, from the idles to the conversations, the solo dances (sadly no animations that require two people, so your Sims can’t slow-dance this way unless you switch on some music and tell them to slow dance). You can play them once or play them in a loop.
Remember to shift-left-click the mailbox and set all needs to static if you’re doing a day of shooting, or else you’ll have some Sims starving to death in puddles of pee ;)

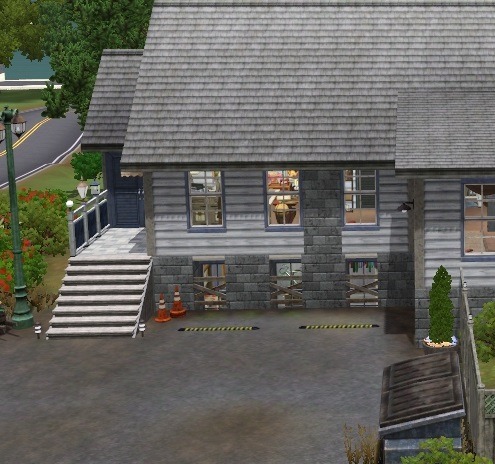
… a basement with windows
1) First build a foundation with the foundation tool (NOT the basement tool!).
Now make the foundation hollow where you want your basement to be leaving just the outer tile of it.

2) Make sure to switch off auto-roof and to remove all auto roofs.

3. On the ground, use the stair tool to lower the terrain. Hold shift to control the number of stair steps. I usually do it in 3 sets of 4 steps as I cannot count to 12 :P (A regular wall is 16 steps high, a foundation is 4 steps high per default, so you need to lower the terrain 12 steps).

4. Remove the stairs and use the terrain flatten tool to lower the ground in all of your basement. Start at the lowered tile and draw the tool towards the foundation walls. Lower it only to the inner walls of the foundation so that the terrain on the outside is not affected. The foundation will hide the slope.


If you did it correctly, you can now place walls without an error message or need of cfe.

5. Best make your floor plan now and place your stairs, they sometimes are a bit finicky.

6. Now use the foundation tool to remove the parts of the foundation, where you want to have your windows

and replace them with walls

Now you can place whatever windows you want. Just make sure that the green arrows point inwards (in direction of the lowered terrain), or the window might “jump” to adjust to regular terrain height.
You can decorate as you want, you can also place doors instead of windows and make a little “sunk patio” if you want to.


Did someone ask for more radio stations? XD Right, so let me tell you--I've not only added more radio stations, but I also updated a few of them as well as having made "add-on" versions to a few of the stations. Add-on stations are "added on" to the already existing stations in Sims 3: Soul, Disco, Spooky, Pop, Latin, and Electronica. Only three of these need base game, so you're fine there. However, 70's, 80's, & 90's Stuff is required for the Disco station (( I will leave 'NuDisco' up for those without it )), Ambitions is required for 'Soul', and Movie Stuff is required for 'Spooky' (( again, will leave the 'Harvest' station up for those without this pack )). And maybe it will work if you don't have the pack--can anyone confirm this? Also, if you want me to make a separate station for 'Soul', please let me know. New stations include: Alternative, University Rock, METAL, Romance, and Talk Radio. The "Romance" station is not pictured in the above because, for some reason, I never made it originally? Like... why didn't I ever do that? XP Honestly, I thought I had. Apparently not, and when I was testing the other stations out, I was in the middle of making the 'Romance' station. I broke down the massive University Station into other parts, adding them to other stations and then making it its own station, similar to the Geek Rock station, with less songs. Please note that while I'll most likely keep the University Station up for DL, I won't be updating it anymore. The Housemix station was updated to include some techno songs as well. Other changes include that none of the stations have the word "station" attached to it now. :D Alright, onto the music list~ Soul: I Will Survive Lean On Me Hello Sunshine Fwoob I'll Be Around Romance: Love In Your Eyes Love Is True Never Be Lonely Iffen Dona Bin Gau Zumbray Electronica: Feelin' Spline Briando Simlify Beautiful Now Bobolicious Mr. Boboto Monday Nite Cabin Fever METAL: Cassie Zomberribe Forastu Mordoo Bleed Into Me The Legend Of Mother Swan Man's Fire It Is Progression If A Cannibal Uses A Fork? Turgid Apocalypse Our Time Is Now (( I can't figure out why this is the metal section, but whatever. XD )) University Rock: Beautiful Life Black Shoes Very Very Rich Town Pretty People Not A Love Song Outsider Take Out The Trash This Conversation is Over Sway I Never Know Candles Cast Long Shadows Free Radicals New Age: (( new pieces added )) Cascade Bubble A Plangent Sough If You Really See Eurydice Celestial Bungalow Frolicking Wind Dancer Housemix: (( new pieces added )) Simtrance Simpatico Divebomb Battle Royale Banana Blaster Fancy Footwork Mad Pursuit Spooky: (( new pieces added )) Vwamplo Happy Face Praying Mantis Pop: Easy Girl Next Door About Work On The Dancefloor Good Times Don't Cha Run Away With Me Chemicals React Hot 'N Cold Love Me Dead Stop Desire Pocket Full Of Sunshine Smile What A Let Down Side Effects When It All Falls Apart Where Would We Be Now Wind It Up Practice Alternative: Explorers JEKYLL & HIDE Hungry Child Fawna Benna Slo Up We Go Thank You Pressure Devotion Charlie The Princess and The Clock Dirtbag Transformation (Still Dirty) Entropy Sad Disco Ragdoll Walking At A Downtown Pace Kool Shotgun Sims Disco: (( no changes made )) Talk Radio: *literally just talk* Credits: @twinsimming, mypantsfelldown, TS4 Sound Tool, and a friend of mine (( who didn't want their name mentioned )) for extracting music * The Broadacaster for making this even possible * Sims Fandom for the radio stations and songs names info * And to viewers like you Currently am looking for one song, which is Maiya Sykes ~ At Last, if anyone can locate it. It seems to be "missing" in game for some reason. Problems? Let me know!:D
Wedding at the Bluffs
Speaking about the wonderful sunsets at the bluffs some days ago, I like to share a lot I build for my story. It's a wedding place at the bluffs; I intigrated it in the original lot. More under the pictures ...


The lot is cc free and offers most of the needed things for a wedding. The little stone bench down in the first picture is my hot spot for romantic sunset pictures as shown before but you could take them nearly everywhere alongside the cliff.
EA ID:
LeyanasZoo
Object:
Wedding at the buffs
(yes sorry, lost the "l" somehow 😂 foreign language, you know 🙈)

It's the tutorial that no one asked for! And I blew my entire day on it, so you better appreciate it! :) No, seriously, this is as much for me as for anyone else. I don't do this process often, and when I do, I have to re-remember the steps, and sometimes I forget some of them and have to figure it out again. This will save future me from having to do that.
Even if you aren't me, if you're interested in being able to place diving lots in most any world you like and that has ocean, this will be relevant to your interests. Unfortunately, it is a sometimes fiddly process to get a working lot at the end, and I went into a lot of detail, so the tutorial is long, but please do follow it closely because if you skip a step or mess anything up, your lot will be wonky or it might not work at all, and I don't want to hear your whining. :)
Note that this is a tutorial for placing a new, empty diving lot, which is the first step in placing a downloaded diving lot or one that you yoinked from another world, but this tutorial doesn't cover how to get such lots working. This just shows you how to place an empty lot, which I'm assuming for this tutorial's purpose that you will then build/decorate yourself. Frankly, I've discovered that building your own is much easier than trying to ram square pegs into round holes, which is what placing downloaded dive lots often feels like, even if you know what you're doing. It can be as time-consuming, if not more time-consuming, to get a pre-made lot placed and working than it does to just build your own.
So, here we go.
Step 1: Pick Your Poison. Choose the world/save you'd like to plop a dive lot into, open it, and go into Edit Town. You can use any world you want, EA or custom, so long as it has accessible ocean in it. (More on that in Step 3.) I'm going to use Sunlit Tides, just because many people want to put dive lots in it yet can't always get them working.
Step 2: Cheats! You need some cheats, so open the cheat box by pressing Control+Shift+C and then enter these three:
testingcheatsenabled true debug on enablelotlocking on
Note that you need to enable testing cheats first because the other two aren't available otherwise.
Step 3: Placing the Lot. Go into World Editor and in the Lots submenu of it choose the lot size you want:

As far as I know, a dive lot can be any size you want from the minumum 10x10 to the maximum 64x64, any of the EA standard sizes or any custom size you might add using this mod. If you are bound and determined to try and place a downloaded/yoinked lot, then in my experience, it's best to make the new lot a little bigger than the lot you want to place, if possible, so that you have some wiggle room to get it to fit better. But, I'm assuming you're going to build your own here.
If you plan to do lots of terrain sculpting on your dive lot, bigger is better. That said, unless you're going to do something really elaborate, it doesn't have to be 64x64, the largest possible size, either. Smaller will mean that your prospective lot will fit in more places on the map. So, it's up to you. For this, I'm just going to place a 30x30 lot, because I'm not going to build/decorate it or anything.
Now, it needs to be said that not every world will be able to have diving lots. The world must have ocean, obviously, and that ocean must be routable or else sims won't be able to get to it. The ocean also has to be deep enough. Generally speaking, "deep enough" is if the water is dark blue. (Or green, or whatever color the lighting mod you use might make it.)
For instance, in Sunlit Tides here, it's pretty obvious where the deeper water is:

But you know what? I'm going to place a dive lot in some of the shallower water, anyway, because I/you actually can, within reason. And if you're interested in doing this in Sunlit Tides, I'll warn you that the deep spot in the pic above has a very uneven bottom. It's really not a good place to put a dive lot. And I'm not sure what the deep water on the outskirts of the map is like, but the good news is that much of the deeper and flat-bottomed shallows, as I've noted, work well.
So: With your chosen lot size selected, move your cursor around in the ocean where it seems to you that the water is "deep enough" until you come to a spot you like and where the lot grid is green. If the grid is never green, then the ocean likely isn't routable at all and you won't be able to place diving lots in that world. I have never run into that, myself, but I also haven't done this all that often, so it's certainly possible. Anyway, I'm picking here:

My advice would be to not make your lot too far off-shore even if you can do so, or else it will take sims a long time to get to it. Especially merfolk, because they always swim out to dive lots rather than take a water taxi, and they swim much more slowly than a water taxi moves. Once you find your spot, go ahead and place the lot. Doing so will create a square island, not a sunken lot. That's fine. We'll fix it in a moment.
Step 4: Change the Lot Type. Click the lot's icon and change the lot type to community and then choose "Diving Area" as the subtype:

Note that this option will only show if you've enabled lot locking. So if you didn't enter that cheat up in Step 2 or if you entered it incorrectly, rectify that situation now so that you can set the lot type.
Step 5: Sinking the Lot Enter the lot and flatten it with this tool in build mode:


This will submerge the lot so that it's level with the sea floor rather than being an island. You can now move the camera down under the water and have a look at your potential diving area, like so:

In particular, check the edges of the lot to see if there are any huge drop-offs or other great differences between the level of your lot and the surrounding terrain. Whether or not this will happen is world-dependent. Some worlds have very uneven/jagged underwater areas, which is what will make you end up with drop-offs, while others, like Sunlit Tides here, are (mostly) pretty flat.
You can see in the above pic that this lot is a little sunken along two of its sides. That's fine; that small amount of difference can easily be smoothed out with the terrain sculpting tools. If there are steep drop-offs or upward slopes, you can sculpt the lot to try to blend it with its surroundings, but be advised that 1) Interactable objects like dive caves can't be placed on uneven terrain and still be usable and 2) If you end up really deep down, the camera goes wonky and it's frustrating-to-impossible to build or play the lot. So, if you've got a huge drop-off and/or a steep upward slope on one or more of the edges of your lot, I'd recommend just trying a different spot. But, it's up to you. If you feel you can work with the uneven edges in some way, have at it. You are braver than me.
Step 6: Save that MFer. Once you have a lot you're satisfied with, this is a good time to save. So, go back to Edit Town and do that.
I recommend saving often during this entire process because, I don't know about your game, but sometimes mine will "hang" or even crash when moving between Edit Town and Build/Buy, especially if I do it a lot. And with this process, you will be doing it a lot, not to mention exiting out to the main menu and then going back into the save a few times. Since getting a dive lot placed can be a fiddly business, it sucks to lose a lot of progress to a hang/crash. So, in my opinion, you can't save too often, but in this tute I'll only prompt you to do it when you must.
Step 7: Exit Stage Right Remember long ago in the last step how I said you'll be exiting to the main menu a few times? Yeah, the first time is now. You do this because, for whatever reason, the game doesn't register changes made to the "structure" of dive lots without exiting and re-entering the save. So do that. Once it's reloaded go back into Edit Town and then back into the new diving lot. Because now it's time to place a dive buoy.
Step 8: Deploy Buoy The dive buoy is located in the debug items, so if you haven't turned on access to that yet, do so now. Then, go into the buy menu, sort it "by function," not the default "by room," and you should see this question mark here:

Click that, and then I recommend that you go to the filters on the right-hand side of the menu and choose just Island Paradise objects. Because you'll be going into the "Misc. Objects" tab and, especially if you have all EPs/SPs, there's a crap-ton of objects in there to sort through. So, filter, then choose the "Misc. Objects" tab, and you'll see this much-more-manageable selection:

Choose the dive buoy, as indicated, and place it anywhere on your dive lot. It doesn't matter where because (spoiler alert) this one's going to be deleted, anyway.
Step 9: Ogle That Shapely Buoy Once your buoy is placed, move your camera down to the ocean surface and have a closer look at it. Like so:

See how the ball part of it is just sitting on the surface of the ocean? That's bad. If you were to leave it like that, you'd have sims (and sharks, if you place a surface shark spawner) swimming/snorkeling in the air, if the lot would work at all. But don't panic! We can fix it. We just need to shift the entire lot down a l'il bit, so let's do it!
Step 10: Copy the Lot to the Library Go back out to Edit Town. Check to make sure that your lot designation is still "Diving Area." (Because during this process, it will sometimes change.) Then, save the lot to your library. The game will give you a warning about cancelling all sim interactions or something. That's fine. Just put a copy of the lot in the library. The thumbnail in the community lot catalog will look like a blue square.
Why are you doing this, you ask? Because now you're going to bulldoze the original. Why? Because we need to move the entire lot down a little bit, and you can only do that by placing a fresh copy of the lot. And you may need to do this several times until you get it at the right depth, so having a copy of the lot in your library is necessary. You can delete it out of the library once you've got your dive lot in the right place, if you want.
Step 11: I'm a Steamroller, Baby Once you've got a copy of the lot safely in your library, bulldoze the original lot you placed. Once bulldozed, the game will change the lot designation back to "No Visitors Allowed," so you'll need to change it back to "Diving Area."
Step 12: Go Down on That Lot To move the lot down when it's placed, you need this cheat activated:
setimportedterrainoffset -0.1
The value at the end can be whatever you want, as many decimal places as you want. A positive number will move the lot up, and a negative number will move it down. (You can use a larger negative number to make deeper a lot that's too shallow, and it can also be helpful if you're intending to try to place a downloaded diving lot on this lot so that it might better match the depth of the water in whatever world it came out of, but this won't always have the effect you want. For one, your lot will be down in a hole.) For the purposes of this tute, all I need to do is move the lot down a teeny bit so that the dive buoy on the lot is sitting IN and not ON the surface of the water. Hence, the -0.1 value.
(Now, I should mention that other tutes I've seen will have you just lower the terrain right under the buoy to sink it a little bit rather than doing this bulldoze-and-replace-with-a-whole-lowered-lot thing I do. This method can work, but I don't like it for various reasons that I won't go into for brevity's sake. I'm just telling you what I do, which has worked every time I've placed a dive lot, including shallow-water ones like this one.)
Step 13: Re-Placing the Lot Go into your library and place your saved lot back where it was. DO NOT ROTATE IT or else things will get screwed up. (Namely, your lot will become an island again and resinking it won't really work.) Just click "Accept." And then check its lot designation and change it to "Diving Area" again, if necessary, which it probably will be because stupid game.
Step 14: Ogle that Shapely Buoy 2, Electric Boogaloo Now, enter build mode and move the camera down to the ocean surface again to check the dive buoy. Ideally, it will now be sitting IN, not ON, the water, like so:

If it's still sitting on the surface, the lot needs to be deeper and therefore moved down farther, so go back to Edit Town, bulldoze the lot again, change the value of the imported terrain offset cheat to a larger negative number (Perhaps -0.5) and try again. Be aware that, as I said, once you get to larger numbers (as in greater than -5 or so) you start ending up with your diving lot down in a hole, which may or may not be workable.
Now, there is a marker on the buoy, the little black rectangle I outlined in the pic above. If the ball part of the buoy is at least partly in the water but that marker is still above the water, as in the above pic, the lot will still work, but there will be a "hop" (and sometimes a pause) when a water taxi or a swimming merperson crosses the boundary of the lot. The higher the marker is above the water line, the larger that "hop" will be. (Because, if you haven't figured it out yet, the dive buoy is what tells the game where sims can swim, vertically, on a dive lot.)
If such a hop doesn't bother you, you can leave the buoy as-is. If you're a perfectionist like me, you go back to Edit Town, bulldoze the lot, and change the value of the terrain offset cheat to try again. Do this as often and with as many decimal places as your level of perfectionism demands. :) I'm not that fussy, so I usually just move the lot down in increments of 0.1 until the marker is at or below the water line but the ball of the buoy is not completely underwater because you don't want the ball completely underwater, either. At least some of it needs to be above water. So, fiddle as much or as little as you feel you need to.
(For reference/scale, the gap between the marker and the water line in the above pic would probably be fixed by an offset of about -0.15 instead of -0.1. But it would also be fine as-is unless a little hop at the lot boundary will bother you.)
Step 15: Bye-Bye Buoy! Once you have the lot so that the buoy is where you want it, DELETE THE BUOY. I repeat: DELETE THE BUOY. Yes, DELETE THE BUOY. For whatever reason, dive lots drawn from your library that contain buoys won't work. I don't know why. They just don't. You need to place a fresh buoy. (I'm pretty sure this is why lots of people can't get downloaded dive lots or lots that they pulled from other worlds to work. Sometimes the answer is simply to delete the buoy, if the lot came with one, and place a fresh one.)
Step 16: Exit Stage Left Once you have DELETED THE BUOY and only once you have DELETED THE BUOY, go back to Edit Town, check to make sure the lot is still designated as a diving area (and change it back if necessary) and save. Why? Because now you need to exit to the main menu and reload the save again. So do that.
Step 17: Fresh Meat Buoy! Once the save is reloaded, go back into Edit Town, and check to make sure the dive lot is still designated as one. Redesignate, if necessary. Then, go into build/buy and place a fresh buoy, just as you did before. This one will be staying permanently, so place it where you actually want it to be. (Which really doesn't matter; aside from defining the vertical space of the diving lot, it just designates where your sim "enters" the lot.) If you want the lot to generate sharks on the surface, you can also place surface shark spawners now, too, as few or as many as you want, and because you have properly adjusted the height of the lot, the spawned sharks will not be swimming in the air. The spawners are also in debug mode, under the fish spawners. (There is also a spawner for underwater sharks. Do not put that one on the surface. Make sure you only put surface shark spawners on the surface.)
Step 18: Set the Lot's Skill Level You set the required skill level for the diving lot by going to buy mode (if you left it), making sure the hand tool is active, and then holding down control and shift while clicking on the dive buoy. Choose the option "Set Required Diving Level…" from the menu that comes up:

…and then from the resulting options under that choose a NON-ZERO number. For some bizarro reason, buoys default to level zero when placed, and a diving lot set to skill level zero is inaccessible even if a sim has level 10 scuba skill. (Good move, EA! Why is zero even an option if it doesn't work??) So, pick whatever skill level you'd like, so long as it ISN'T ZERO. (I suspect that this is another reason why people can't get downloaded dive lots that they place in a world to work.) Once you have the skill level set, go back to Edit Town and save.
Step 19: Test And now you're pretty much done. All that's left is to test the thing to make sure the lot works before you bother with building/decorating it. So, return to the game and send a victim to your new, empty lot and see if they successfully arrive (with or without a "hop" at the lot boundary) and successfully get themselves underwater. (My advice, for testing purposes, is to just give the sim you pick enough diving skill to use the lot. This can be done with NRAAS Master Controller.) Don't bother with doing anything further with the lot until you make sure it works.
Here is evidence that my lot, though shallow, works:

If your lot doesn't work, then something went wrong somewhere. Most likely, you missed a step or did a step wrong. I know there are a lot of words here, but they're all necessary to (more or less) guarantee a working lot in the end. So, try again. It's possible that you will have to pick a different location and start over, but I've been able to get a lot working wherever I've placed one, so long as it was in deep-enough routable ocean.
Step 20: PROFIT! Assuming that your lot works, "all" that's left is to build it! :D I'm not going to go into detail about that. It's all up to you. You can sculpt the terrain, paint it with whatever terrain paints you want, place objects, whatever. If you're in shallower water, any objects you place that are tall enough to stick out of the water will just be chopped off at the water line; you won't be able to see the rest above water. The corals and stuff are in debug mode under "Underwater Objects," but if you don't want the tropical look, so long as you have moveobjects turned on, you can place (almost) any object you want down there, aside from things like walls and fences and other build items that can't be drawn underwater. Rocks, plants, trees, columns, and anything from the buy and debug catalogs are all good. If such an object has a function, sims won't be able to use them, though. They'll just become deco. (So, no underwater basketweaving sculpting. Sorry.) So, go to town. Have fun. For this tute, I'll just mention a couple objects and their settings and we'll finally be done.
Miscellaneous Objects:
First, treasure chests. Like the dive buoy, they're located in the "Misc. Objects" of debug mode. There are two versions, one for land and one for water. Obviously, on a diving lot, you want the water one if you want any at all. If you do want to use them on your lot, place down as many as you want, and then set the diving skill level necessary to open each one and designate the treasure each one will hold. You do both by holding down control and shift while in buy mode with the hand tool active and clicking on a chest, just like setting the skill level of the lot on the buoy. This brings up this menu:

The "Assign Treasure" option gives you eight different treasures for the chest. You simply pick the one you want. The "Set Required Skill Level" option allows you to assign the diving skill necessary to open the selected chest. You can choose any number you like from 0 to 10. (Yes, zero is OK for this purpose, even though no one with zero skill can scuba dive, so…Yay EA.)
Then there's the dive caves. I think they are in the "Underwater Objects" section of the debug catalog; I'm not sure because a mod I use moves them to the regular rock section. Anyway, there are two styles, which you're probably familiar with, but they both function the same way. If you have more than one of them in the world, even if they're all on the same lot, your sims can travel between them, much like a subway. Unfortunately, I can't show you how to set this up because that mod I use to move the caves to the rock section also makes them recolorable, but it breaks setting up this functionality and I don't feel like hunting the mod down and taking it out. But it's pretty easy. You Control-Shift-Click on each one, give them a name, and then you can connect them by using the names you give them. Again, it works much like subways. It's pretty self-explanatory.
Finally, there's the fog emitter. If you're unfamiliar with this object, it's a base game object located in the "Misc. Objects" section of the debug catalog. The thumbnail in the catalog looks like this:

And it looks like this when it's placed:

They can be used on any lot, they disappear in live mode, and they can generate not just fog but many, many different effects. Literally thousands of different effects. You place the emitter where you want, and then control-shift-click on it and choose "Set Visual Effect" from the resulting menu:

When you click on it, you get this:

In that window, you type/paste the code for the effect you want. Of course, you will need to know the code for the effect you want. For your convenience, I've uploaded my list of effect codes, which is complete and includes the codes from all EPs, here. It's just a text file, and the codes are in alphabetical order. Since the list is all-EPs, some of them may not work if you don't have the EP the effect comes from, but if that's the case, then any such code you enter simply won't do anything.
The most relevant effects for a diving lot all start with "ep10," but there are others you could possibly use, too. Some of the names of the codes are more helpful than others in terms of knowing what it will do. Generally, you need to experiment. But, you can add schools of fish, single (but non-catchable) fish of all kinds (if you want catchable fish to spawn, you need to use the spawners, not the fog emitter), sharks (non-interactable), light rays, bubbles, glows, fog, all sorts of things, if you're patient enough to go through the list, look for interesting possibilities, and try them out to see if they will work for you. There are whole tutorials dedicated to the object, if you look for them. There's also a mod that makes them shiftable, which can be very useful, here.
One final suggestion: If you go through this process in a world that you know or even just suspect that you'll want to use again and you'll want the dive lot(s) you made in that future save, for the love of pie keep a copy of this save file somewhere. That way you won't have to go through all this crap again. Because even if you save a copy of your finished lot, unless you manage to place the empty initial lot in the new save in the exact spot you placed it when you built the lot, it's not likely to be quite right. So beware.
And with that, I think we're done here. If anyone has any questions, or if you decide to try to make your own diving lot and have questions along the way, feel free to hit me up and I'll do my best to help. Just keep in mind that I'm not an expert by any means.
why did white people stop assassinating their own presidents... nobody wants to work anymore
I think if you put someone from 2005 onto a website from 2025 without the slow creep we've lived through, they'd think they had malware


UPDATE CARAVAN FOODTRUCK
Hi, i’ve changed some little but important things: - eating on counter bar - Barrel with fire ea base (not cc) - recolor of caravan Download update
Gentle reminder that they almost definitely planted evidence on Luigi and arrested him to distract from the fact that the real UHC shooter got away with killing a billionaire. One of us successfully killed a billionaire and one of us could successfully do it again
(edit: Thompson was a millionaire but my point still stands billionaires and millionaires who make money through killing thousands gotta go)

Hi there, my name is Ella, and I have had a constant headache for 14 years. I am 26 years old. Painkillers do not work.
The pain is caused by a Pineal Cyst. Pineal cysts are relatively common, 1-2% of the population has one, but it is not common that they cause symptoms. Few doctors on this planet even believe they do cause symptoms.
I need Pineal Cyst Removal Surgery if I am ever to experience a pain free day again. The only hospital that offers this surgery in my country, England, is deciding whether it wants to bear the risk of offering this surgery after I was on the waiting list for 6 months. I have found two European surgeons who can perform this surgery and believe I am a good candidate for it.
Needless to say, I, being a disabled unemployed person, cannot afford the surgery. I should be able to have it free on the NHS but it is not routinely offered so they won't fund me getting it abroad.
I am suicidally depressed because of my chronic pain. Doctors don't care about this cyst because it's not a threat to my life. Anti-depressants can only dull the pain so much.
Can people please reblog this, no matter how small your blog is, so that it can get traction?
-
 playwrightongallifrey liked this · 1 month ago
 -
 malallory reblogged this · 1 month ago
 -
 courgetteteeth liked this · 1 month ago
 -
 sea-lark liked this · 1 month ago
 -
 nadireedperez reblogged this · 1 month ago
 -
nadireedperez liked this · 1 month ago
-
 theladygrey liked this · 1 month ago
 -
 cntarella reblogged this · 1 month ago
 -
 unmarrow reblogged this · 1 month ago
 -
 curlycorzetti liked this · 3 months ago
 -
 sniperbrucedog liked this · 4 months ago
 -
 anditry reblogged this · 5 months ago
 -
anditry liked this · 5 months ago
-
 colorfulsaccharinecalamity reblogged this · 5 months ago
 -
colorfulsaccharinecalamity liked this · 5 months ago
-
 lichtkrume reblogged this · 5 months ago
 -
 lozfan-and-knuckles reblogged this · 5 months ago
 -
 acrossnowhere liked this · 6 months ago
 -
 thehappyscavenger reblogged this · 6 months ago
 -
 batricity reblogged this · 7 months ago
 -
 samus-aran reblogged this · 7 months ago
 -
 shy-magpie reblogged this · 7 months ago
 -
 sillygoofygoobersstuff liked this · 7 months ago
 -
 foolinapril reblogged this · 7 months ago
 -
 friendddd reblogged this · 8 months ago
 -
 pumpkin-hotchocolate reblogged this · 8 months ago
 -
 thefuzzybat liked this · 8 months ago
 -
 inlovewithanathemadevice liked this · 8 months ago
 -
 theyre-beauty-and-theyre-ace reblogged this · 8 months ago
 -
 transbennysummerfield liked this · 8 months ago
 -
 nvzblgrrl reblogged this · 8 months ago
 -
 aspirateur-killeuse liked this · 8 months ago
 -
 of-monsters-and-werewolves reblogged this · 8 months ago
 -
 teetherzine liked this · 8 months ago
 -
 killjojo reblogged this · 8 months ago
 -
 idliketohaveworldpeace reblogged this · 9 months ago
 -
 rabbitprintart liked this · 9 months ago
 -
 call-me-bep liked this · 9 months ago
 -
 thegiantcookiemonster reblogged this · 9 months ago
 -
 abyssalsquiid reblogged this · 9 months ago
 -
 hazelcuttlefish reblogged this · 9 months ago
 -
 pseudosquilla reblogged this · 9 months ago
 -
 adrawrable reblogged this · 9 months ago
 -
 yugiohio reblogged this · 9 months ago
 -
 lightthegoat liked this · 10 months ago
 -
 pandafly53 reblogged this · 10 months ago
 -
 sock222 liked this · 10 months ago
 -
 okbutwhy-rebooted reblogged this · 10 months ago
