How To Take Notes: From A Textbook
How to Take Notes: from a Textbook
(Be sure to change the post type from link to text post when you reblog, if that’s what you want to do)
This method is best suited for textbook or article notes, and is a version of revised notes. It is also well suited for books you plan on returning to the bookstore or books you have rented, as it does not involve writing directly in the book itself.
First, you’ll need to find a notebook, and the pens you like the best. My favorite notebooks to work with for note-taking, especially for my “revised” notes, are the Moleskine, hard or soft cover, in size extra large. For this specific class (Intro to Gender and Women’s Studies), I decided that lined pages would suit my needs better. For my math, engineering, and science classes, I usually opt for squared paper, as I draw in lots of diagrams and graphs.
My favorite pens ever are Staedtler Triplus Fineliners, so even though they show through the pages a little bit, I still choose to use them. I just love the way they write. I usually write out my notes themselves with a Pilot G2 05 with black ink, as it writes with a finer line and doesn’t bleed through quite as much.
I usually try to set up my notebooks about a week or so before class starts, that way it’s ready to go on my first day of class.

You’ll want to start off by setting up your notebook. On my first page, I put my course code for my university, as well as the course title.

Next, and this is perfectly optional (I just like the way it makes the book look, especially at the end of the semester), I include some sort of related quote to the course. For my engineering courses (which are related to my major), I put a different quote at the beginning of each section. But as this is a two-month long course during the summer, I opted for one quote by Mohadesa Najumi at the beginning of my book.

Next I set up my table of contents and include a page with basic course information. As this course is all online, my course information just included the start and end dates of the course, what time content is posted and on what day, and the name of my professor. For my usual courses, I will include the days of the week the class meets on and where, TA names and contact info, as well as posted office hours for my professors and TAs and tutoring hours either in the library or in the College of Engineering.

Next is one of the things I’m most proud of.
While I religiously use my Erin Condren planner to map out my days, weeks, and months, I have found throughout my college experience that including monthly views for the months my class ranges has been helpful. This way, there’s no sifting through the multiple colors I have in my planner, and everything related to that class is in the same notebook.
On this calendar I include start dates of the class, the end date, the dates of exams or quizzes, assignment deadlines, office hours, etc.
For this course, as I just started a few days ago, I don’t have a lot of dates or information, so my calendars are still very empty.


Next up I go to my weekly overview. At the beginning of each week, I set up a weekly layout, and I include a list of assignments, tests, quizzes, tasks, projects, etc that need my attention throughout the week, and I place the days I plan on doing them or the days they need turned in onto the weekly layout.

Now you’re finally ready to get into taking the notes.
Gather your book, some sticky notes, and your favorite pen or pencil.
I color code my stickies so that the “revision” process later goes a bit smoother. In this case, I’m using blue to denote something interesting, intriguing, or thought provoking, greenish-yellow to represent the facts or important concepts, and pink for important vocabulary words and their definitions.

Read the selection once.
As you read along the second time, write notes on your stickies, and place them in a place of relevance directly on the page in the book. Just make sure you don’t cover up anything you need to keep reading.


Now, once you’ve read all the material in questions (you can choose to break it up however you want, but since Chapter 1 was assigned for the week, I’ve elected to break it into chapters), carefully remove your stickies one by one and lay them out on a flat surface. This is when having a separate color for vocab can be helpful, as I sometimes put all of my vocab at the beginning or end of a section, especially if the section of reading was particularly large.
Organize your stickies in an order that makes sense to you, and use this order as your basis for transferring those notes into your notebook. The order you choose can just be lumping them under similar headings. Some classes even lend themselves to a nice chronological order. Whatever you choose, just make sure it’s something that will make sense to you when you come back to it in the end.

Okay so up there I wasn’t following my own advice, I just thought I would include the picture because my handwriting looks nice…

Now organize the stickies!

Now you just start writing everything from the stickies into your notebook. I like to take each category or subgroup and put them in the book on the facing page, then put them back in my textbook as I finish with each post it.

Moving on to the next category.


Before you know it, you’ve written all of your stickies into your notebooks.

Now you’re revved up and ready to go. You can either keep going and make a note summary page (which I’ll show you next week), or you can leave it. These will also be helpful when reviewing for tests and quizzes. You can highlight or underline, or use even more stickies (which is what I usually do) as you review.
Well, that’s all I have for you right now. Happy studying!
(To view this post on wordpress, click here)
More Posts from Marathon-notasprint and Others
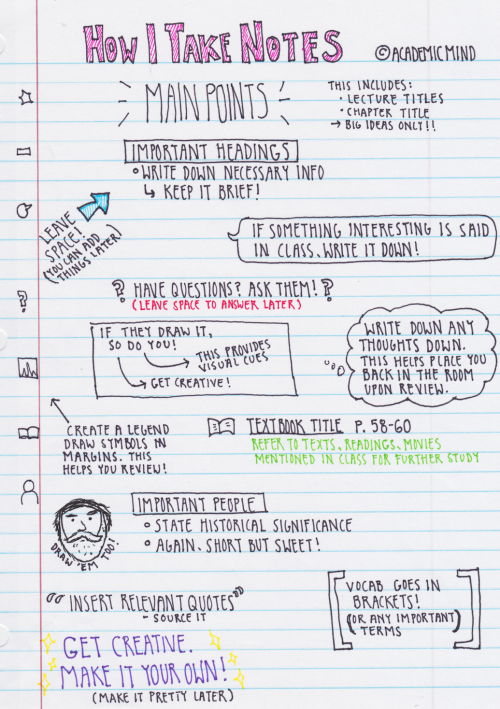
Some of you have requested that I show you my note taking technique. This is in no way a proven technique, but it really works for me and many of my professors have applauded my structure. So try it, and if you like it and it works for you, great! If not, I commend you on having a more structured system! These are my general rules when I take notes:
1. Leave space. A lot of space. While going through previous notes, whether it be right after class or a month later, I always found that I had information that I wanted to add, and cramped pages never allowed for that. Plus, it’s a bit less daunting on the eyes when there is some room between ideas. I do realize that this is not very eco-friendly, but hey!
2. Use the margins in a smart way. I have developed a “legend” of symbols to draw in the margins so that when I need a quick scan of what pages in the textbooks I referenced or vocab, I can find what I need easily. It might not seem useful on this one page, but when you have a whole 3″ binder full of notes, it’s a blessing.
3. Write on one side of the page. Again, not a eco-friendly option. However, I’m sure there are those of you (my past self included) who have wished you just had another page to write down book notes or additional thoughts without having to get a fresh paper. This solves that!
4. Make it pretty later. I know this page is visually appealing, but keep in mind that I was in my nice warm room by myself and listening to music while writing this. My notes straight out of class aren’t color coded and they definitely don’t have cute little decorations on them; just get the information down, worry about aesthetics later.
5. Put yourself in the classroom. You might think: “but I’m physically in the room what the hell are you talking about”. The concept is weird but it works. I always try everything I can to make sure I place as many visual cues in my notes as I can so that when I look back on them later I remember exactly where I was and what was happening. Are you not paying attention and thinking of food? Write it down. Did someone fart? Write it down. Placing yourself in the room is the most beneficial thing you can do for future you.
6. Keep it short. I can’t tell you how many times I freaked out when I first got to college because I was trying to write everything down. I was certain I was going to miss something. WELL HAVE I GOT NEWS FOR YOU. You aren’t going to miss anything if you keep your bullets to a minimum of one sentence. It’s proven that short phrases in your own words help memory better than full sentences that the professor gives you.
Finally, make it yours. This is a system that works for me because my brain is weird and can’t take notes the Cornell or outline way. The most important thing to learn in school is your own flow of things. Experiment, be creative! I hope I have helped those of you who aren’t traditional learners realize that there isn’t just one way to process information. If any of you have any questions or need specific examples, let me know! (I realize there is a typo on this but hey don’t worry about it) 🙈

My Study Method
My post 10 types of planners got way more notes than I expected. So today I will show you how I prepare for my exams. The method I’m going to explain is the one I’ve developed over the years and got me to get all A’s in high school. From taking notes, to nailing your exam.
1. HOW TO TAKE NOTES
1.1. Sit in the front of the classroom Don’t give a f**k if you look like a dork. Make sure you can see the blackboard clearly. You should be able to look at your teacher and the other way round. In case my experience is not enough: Studies show that those who “sit in the front and center (middle) of the classroom tend to achieve higher average exam scores”. Plus, your teacher will know who you are and will be aware that you pay attention in class.
1.2. Ask questions Don’t be afraid of asking questions. This took me years. Your teacher won’t think your question is stupid - in fact, it is their job to make sure everybody learns whatever they are supposed to teach. AND even if it looks as if the whole class has already understood the lesson, trust me, they haven’t.
1.3. Don’t write every word the teacher says There’s just no point in doing such thing. Contract words and use symbols and doodles. Once you get home, fair-copy your notes if they are not clear enough (or at least, re-read them). Otherwise, when you try to study with your notes a few weeks/months later, you won’t understand a thing.
1.4. Clarify your notes What did you just write down? Was it something that didn’t appear on the book? Was it an explaination of what the book says? Some info you should expand? Use a color code or symbols to clarify your notes. It doesn’t take time but will save you time in the future.
1.5. Compact notes Write with tiny (but legible) handwriting. It is quicker, tidier, and it saves paper. Also, write in two or three columns.
1.6. How to stay motivated to take good notes Last year I told one of my best friends (who is one grade bellow me) that I would give her all my notes at the end of the year. People normally dream of setting fire to their notes (and at least in Spain, people actually do that). But this other option (giving away my notes) was good for her and for me, since whenever I felt like writing carelessly, I’d think, “she won’t understand these notes, I have to do it better”.
2. PRE-STUDYING
Start pre-studying the very first day of class.
2.1. Active reading
Everytime I see someone whose book is entirely highlighted I’m like “why don’t you just dip it in a bucket of yellow paint?”. Seriously, stop.
Underline only the key words, not the whole sentence.
Use a different color (at least) for each paragraph.
When you read a paragraph, open a key in the margin and summarize what that paragraph is saying. Use between 1 and 10 words. Write as small as you can.
Right after you finish with a page, do an outline of the whole page in order to make sure that you have understood what you’ve just read. How? Scroll down.
2.2. Make it visual
Outlines, mindmaps, graphics… it really depends on the subject. All I know is that I just CAN’T study from a block of text.
Separate coordinated sentences and link them with symbols.
Use bullets or numbers and indent.
Color is not decorative. The same color links together different ideas.
Pink highlighters are cute but they don’t highlight at all.
Small handwriting and columns are your friends.
Highlight just the KEYWORDS. About 4-8 words per page.
Don’t use the same template or style on every page, unit or subject.
Number your pages.
Here you have a messy and a tidy example:


3. STUDYING
3.1. When should you start studying?
When I was in high school, I used to start studying one or two weeks before the exam. A few days before when I was too busy. The day before when I was about to jump out the window.
Divide whatever you have to study in equal parts to make it more approachable.
Try to organize yourself so that the day before the exam you don’t have to study because you already know everything (and you just need to revise a little bit).
3.2. Studying (and by studying, I mean memorizing) Once you have read it and understood it, you have to memorize it. My favourite quote is: “Don’t practice until you get it right. Practice until you can’t get it wrong.”
These are my methods. I also recommend reading this article for more. Use the method that works best for you or all of them to ensure you’ve got it.
Write your mind-map again and again and again. Don’t change the placement of each concept in your mind-map or you’ll become confused in the end.
Translate words into drawings. Translate your drawings into words. Repeat. Repeat!
Read a little bit, try to explain it out loud as if you were a teacher. Repeat endlessly.
Make a story that helps you fully understand what goes next and WHY.
3.3. Keywords list This is the spine of my whole studying method. So basically, reduce each sub-topic to ONE word. Then reduce each topic to ONE word. Study those words by heart.
In the exam, just write down your list of keywords and you will easily remember each topic and sub-topic.
4. EXTRA TIPS
4.1. When studying a list of words or names It is really important to know how many words there are.
Make a sentence with the first letter of each word.
Make a song. You can use a jingle you already know.
Picture a scene which contains all the words.
4.2. IMPORTANT!
Highlight, bookmark and make a list of those concepts that you usually forget or make mistakes, so it is the first thing you see (and revise) the next time you study.
The night before the exam, write in a little piece of paper that thing (an important formula, something that you always forget, your keywords list…) and that’s the only thing you should revise the following day.
Talk to older students and ask them for their old exams. Your exams will probably be different, but if the teacher is the same, they’ll be similar.
5. HOW TO NAIL AN EXAM
First of all, you should take a look to the Text Anxiety Booklet. It contains a lot of information for the ones who get really anxious.
5.1. Appearance matters My teachers always say that when they are correcting our exams, illegible handwriting really pisses them off. Since they are humans, that attitude towards your exam will be unconsciously reflected on your mark. On the other hand, when they get to a visually appealing exam, they are more compassionate. Conclussion: MAKE YOUR TEACHER’S WORK EASIER.
Use your best handwriting.
Write your name on every page (if you are asked to do so).
Leave margins.
Separate your paragraphs.
Indent when necessary.
Number your pages.
5.2. Don’t ever leave a question in blank Ever. Every little point adds up to you final mark, and a blank question means 0 points. If you write something and it is wrong, you simply made a mistake. But if you don’t answer, your teacher might think that you didn’t do it because you didn’t study. However, remember that your teacher is older and wiser than you, and will notice if you are trying to fool them.
In some tests, mistakes subtract points. In that case, you’d better leave the questions you don’t know in blank unless you like taking risks.
5.3. What if you go blank First of all, wait a minute and take a deep breath. This is not a waste of time because it will actually help you do better. Now, do the rest of the exam and come back later. Then, if you still can’t remember, try retracing not what you studied but what you were doing while you were studying. Maybe you were drinking tea, maybe your father came into your room or maybe you heard something on the street. And remember that you control your breathing, and your breathing controls your feelings.
5.4. An exam is not a race I guess some people believe they’ll receive a prize if they are the first one to hand in their exam. Those people have all of my disapproval. Use all the time your teacher gives you and always, I mean ALWAYS, revise your exam before handing in it. Revise. Your. Exam. Did you follow the instructions correctly? Did you answered all the questions? Are there spelling mistakes?
That’s it. I hope you found it helpful.
Superb Study Guides and Mini Moleskines
(A more concise version of this will be published in my college’s newspaper on Thursday. I will likely add or link diagrams and examples to this post, so you can check the original here.)
As a tutor, many students ask me for tips on making study guides. Generally, my response is that, “it depends”.
But hold on. Before we continue we should discuss what the purpose of a study guide really is.
Study guides fall into two main categories: study guides that prompt you to find/think about information and study guides that directly organize the information you need to know. Some professors provide you with study guides of the former kind (i.e., you’re not given the answers), and it’s essentially your job to create your own study guide of the latter type. Both categories serve the purpose of organizing information you already have in order to synthesize a study tool that best facilitates your comprehension and memorization of the information at hand, just at a different stage in the process.
Before you even start, it is helpful to be aware of the level at which you are required to know the information for your test. The most basic of these is recalling definitions, which can accomplished by use of flashcards. Other information you’ll have to know will require you to compare ideas or apply them. Think of your learning process as literal → interpretive → applicative, meaning you will need study guides that help you visualize, draw relationships, and understand material so you may memorize less in a way that helps you answer more, and better than straight memorization ever could.
–
Concept Map:
These can be anything from a basic branching diagram to a complex mind map. This type of study guide allows you to compare information in a more spatial manner than strictly linear. Let’s be honest; sometimes linear learning is unrealistic, because our world is not truly linear. This format allows you to start from the basic, bare bones of the topic you’re studying and expand into very specific details and examples. This way you can get a really solid overview of the information and delve deeper as necessary. At least for mind maps in specific, Mindly is a beautiful and highly functional mind mapping app for iOS. It’s worth the small price, I can tell you that.
Comparison Chart:
Another visually-oriented type of study guide, comparison charts are the easiest way to map out similarities and differences for various topics. The biggest advantage of this method is that you can easily find the important similarities and differences of the subjects in question without having to reread a chapter or search through your piles of notes. It won’t help you visually connect topics like a mind map would, but this very simple tool is important and useful in its own rite.
Index Cards:
Before you skip over this because you think you know what I’m talking about, this is not the same as a flashcard. Flashcards have the very basic purpose of helping you memorize information, and little else. Index cards, however, are like flashcards on steroids because they contain much more information and are used primarily to summarize key information in a portable way that allows you to easily locate more details if necessary. Allow me to break down how you might want to use this method.
Front:
Middle: Main idea [e.g. alveoli]
Upper Right: Organizational term [e.g. respiratory system]
Bottom Middle: Source of information [e.g. Chapter 17, pg. 479 or Notes from 11/26/2013]
Back:
In your own words, what’s most important to know about the concept.
Include examples, summaries, diagrams, definitions, etc.
Be detailed! Remember, this is not about strictly memorizing.
Make sure the content corresponds to level of understanding your professor excepts
Diagram:
This one is pretty self-explanatory, but is extremely dependent on the topic at hand. This could be anything from a chemical reaction scheme, a cycle, Venn diagram, etc. You may even consider making a timeline, which is great for chronological organization of ideas. This is not limited to history, though! You can also organize information from classes such as anthropology, psychology, biology, anatomy, physiology, ecology, etc. If it has a specific, linear order, it can be made into a timeline.
Question Prompts:
This method I find works very well if you use the Cornell note-taking method. If you’re using Cornell notes, you would write your prompts in the left hand column next to where the answers are located, then just cover up the answers when studying. For example, for something as simple as a definition you could write, “What is _____?” For something more complicated such as a comparison chart, you could write, “What are the key differences between _____ and _____?” If you want, you can even ask questions that aren’t directly answered in the adjacent text such as, “Why is [idea] important to [concept]?”
–
Now that you know what formats you might use for your study guides (remember you don’t have to stick with just one), you may wonder where you can put this information. The basic answer to that question: anywhere. Many people like to draw these things on computer paper. You may want to type some of these things. If you’re using Mindly then you would be inputting the information into an app. I would like to offer up the suggestion of little mini notebooks for each class. I personally make these study guide materials on paper or a computer first, then when I’m satisfied with the result, I copy it down into my pocket-sized Moleskine notebooks. I personally prefer the squared, dotted, or blank notebooks, but whatever suits your fancy. The benefit to these little notebooks is that you have all of the information you need to study for in a small, convenient little book that you can easily keep in your backpack all the time because of its size. (Ladies, it will even fit in a clutch!) Study on the bus, waiting for class to start, when eating at the cafeteria, while waiting for your laundry to finish, etc. Not to mention, this will help you avoid losing papers because they’re all in one place.
Just try not to lose the notebook.

Achieving your full academic potential: Things to Avoid Doing
Things you may want to avoid doing in the future.
Doing, wait, not doing these things always works for me.
Staying up late.
Sleep is yes. And as my speech coach puts it “there are only so many all nighters a person can pull before they just can’t”. Not only will staying up uber-late make the next day a battle between you an a surprisingly pillow-like desktop, if you’re tired, your work probably won’t be the your best.
Over-scheduling.
It’s easier to look at a schedule with 3-4 assignments than it is to look at one with 9-10. When scheduling, if you have a plethora of assignments, prioritize. Write down the most important assignments, and leave any others off the page or in the margins. You only have so many hours in the day and it’s better to complete the most important tasks than none at all.
Pro-tip: The Pareto Principle. The Pareto principle revolves around the 80%-20% ratio. Allow me to explain, if you have 10 pieces of work, there are probably only two of them that will take up 80% of the work. And 8 of them that will take up 20% of the work. The key to prioritizing is finding those two assignments (or however many = 20% in your workload) and doing them first
Working in bed or laying down.
NONONONONONONONONONO. This is how “cat-naps” happen. You swear that you’re going to get straight to work and then your phone on the bedside table lights up. It’s too hard to organize a book, a notebook, and a laptop on a bed without moving the laptop off of your lap. So why not check it?
Working in bed helps the boogeyman grow under it.
Over-working.
If you take on more than you can handle, you will not get the results you want. It’s perfectly alright to challenge yourself. In fact, it’s great. But, there is a difference between being ambitious and stressing yourself out. If it’s too much, go back to the Pareto principle and prioritize.
Drinking excessive amounts of coffee and energy drinks. (Especially in the afternoon.)
One (maybe two, if you ordered a tall) cups of coffee in the morning is fine. But in the afternoon or the evening, stick to exercise, healthy snacks, and naps. Sugary energy drinks as well as coffee that contain caffeine can speed up your heart rate, cause stress, and irregular breathing patterns. If you become addicted to caffeine these things will accelerate and can end up hurting you detrimentally.
Over-using productivity apps.
Productive apps are awesome, if used correctly, don’t abuse them. It was difficult for me to use productivity apps on my phone at first because the other things on my phone would distract me. If you plan to use productivity apps on you phone and computer make sure that you have the self-control needed o use them properly.
Tumblr. - I’m only half kidding
Those are the general ones, these are a bit more subject specific
Math/science
Falling behind.
In other classes falling behind is not recommended, but is usually fixable by reading a few chapters or asking a friend for notes. Because of arithmetic’s complex nature that relies not only on facts, but applying them it is very difficult to master one a concept while you’re supposed to be mastering another. Often, learning one key concept can help you with many other assignments, not learning key concepts can make those other assignments 10x harder.
Receiving low homework scores.
In all of the math classes I’ve been in, the homework scores were more of your grade than your test homework. Always turn in your homework, even if it feels impossible, try your best, and never leave your paper blank. Even if you got all of the answers wrong, many teachers will give you serious credit for trying and failing rather than just failing.
Learn everything from the teacher.
There are a plethora of online math resources that are awesome, and math teachers usually only teach one method of solving a problem. Try Khan Academy , For Dummies, or IXL. Or look around a bit, there are a lot of other great sites, those are just my favorites.
Learn everything. (This is usually for science.)
In science (especially in biology and Earth sciences.) you are introduced to a myriad of concepts and vocabulary words that might seem like too much to memorize. Don’t. Look at what your teacher puts emphasis on and memorize that. Also, if you are using a textbook, there is a good chance that the textbook is filled with notes on the ‘key concepts’ or learning requirements for each chapter. These are also things that you should attempt to memorize.
English/writing/history/ other humanities
Not develop an opinion. (Especially in history)
If there’s anything a english/ writing/ history teacher loves, it’s an opinionated student. Textbooks give you facts and figures, and you can interpret them however you want. So, do just that. This will show your teacher not only that you are interested in his or her subject, but that you are engaged in the material that they gave you.
Ignore teacher comments. (No matter how small.)
It isn’t fun to read nit-picky comments about your work. Especially on your writing. But look at them. Even if you receive a good grade on a paper, applying corrections on your next one will ensure that you get a better grade the next time.
Staying quiet in class.
I understand that for some people this one is hard, for some people this one is practically impossible. But teachers love it. If you can, voice your opinion and answer questions in class as frequently as possible. I’ve even received extra credit for being verbally engaged in class more than other students.
Not trying to learn everything.
This one is a lot like the ‘not ignoring teacher comments’. A lot of information slips through the cracks (especially in english) that pops back up on exams. Because most of what is learned in an english class is not drilled into you like it would be in a math or science class, to do well, you have to drill yourself. I’ve been told the difference between ‘affect’ and ‘effect’ plenty of times, but I didn’t truly learn it until this year when I had to study it for an exam.
Pro-tip: Don’t challenge your teachers. They determine your grades. Momentary satisfaction is not worth a bad grade.
Hope this was useful!

There are three major approaches to note taking, each of which will be outlined and described in this post:
Outlining:
Outlining is an effective way to capture the hierarchical relationships between ideas. In a history class, you might write the name of an important leader, and under it the key events they were involved in. Outlining is a great way to take notes from books, because the author has usually organized the material in a fairly effective way, and you can go from start to end of a chapter and simply reproduce the same structure in your notes. Place major points farthest to the left. Indent each more specific point farther to the right.
The advantage of this is that level of importance is indicated by distance away from left margin.
For lectures, outlining has limitations. The relationship between ideas isn’t always hierarchical, and the instructor might jump around a lot.
Requires more thought for accurate, understandable organization and, therefore, cannot be used during lectures that move too quickly.
Mind-mapping:
For lectures, a mind-map might be a more appropriate way of keeping track of the relationships between ideas.
In the centre of a blank sheet of paper, you write the lecture’s main topic. As new sub-topics are introduced, you draw a branch outward from the centre and write the sub-topic along the branch. Then each point under that heading gets its own, smaller branch off the main one. When another new sub-topic is mentioned, you draw a new main branch from the centre.
The thing is, if a point should go under the first heading but you’re on the fourth heading, you can easily just draw it in on the first branch. Likewise, if a point connects to two different ideas, you can connect it to two different branches.
If you want to neaten things up later, you can re-draw the map or type it up using a program like FreeMind, a free mind-mapping program.
If you want to make your mind-maps memorable, and visually appealing, consider using different colours, and incorporating images/diagrams.
Mind maps can be used for just about anything in your degree! A mind map can help you:
Outline your ideas on a subject
Organise your thoughts
Visualise a whole concept
Take and review notes
Plan an essay
Revise for your exams
Here are some advantages and disadvantages to mindmaps:
Mindmaps are adaptable - they can be used for lectures; note-making from books; essay plans etc. as well as less structured tasks.
They are easy to add ideas later, at any time.
They can help you focus on the links and relationships between ideas so you don’t just have disconnected facts.
They can be personalised with pictures and symbols to make things more memorable.
They are a useful tool for condensing lots of information – e.g. a whole topic into a mind map poster, to aid revision.
You can’t incorporate large chunks of text.
You have to stick to the rules of mind mapping to get the optimum benefit from the tool.
Creating the map may take time. However, this will help you to review or recall information and will check your understanding.
When you’ve personalised your map, it can be difficult for others to understand.
Cornell Notes:
About a quarter of the way from the bottom of a sheet of paper, draw a line across the width of the page. Draw another line from that line to the top, about 2 inches (5 cm) from the right-hand edge of the sheet. You’ve divided your page into three sections. In the largest section, you take notes normally — you can outline or mind-map or whatever.
After the lecture, write a series of “cues” into the skinny column on the right, questions about the material you’ve just taken notes on. This will help you process the information from the lecture or reading. In the bottom section, write a short summary of the material you’ve covered.
Typing Your Notes:
Set up folders for each topic. Create these folders before lectures/class and save your notes into the correct ones. It will keep all of your notes organised and easy to find. You might want to have different folders for lecture and reading notes. Develop a system which is intuitive for you.
Know the program. Choose which program you’re going to use to take your notes. There are lots of options available, including Microsoft Office. If you can’t afford Office, then you can look into (illegal) free downloads of it. If you have Office, you could also use Onenote. Alternatives include free programmes like Evernote which allow you to access your notes from anywhere on any device.
Get a template (M Office only). On Microsoft word, you can download different templates. See if there is a template that you can use for taking your notes. Alternatively, you can create your own template by adjusting the margins, font, size, etc. and saving your preferences. If you don’t want to use a template, you can just use the default settings.
Name the notes. Make sure that you name the notes so that you know what’s inside. On Microsoft word, when saving documents you can add tags. Then you can search these tags for any documents with that specific tag. I’ve found this to be a really useful organisational tool.
Do you need anything to take your notes? If you’re using a tablet, you can buy Bluetooth keyboards which will connect and can be quicker than typing on the screen. You can also buy a stylus which will let you write like you would with a normal pen; some devices also have the option to convert your handwriting to typed notes.
Get to know your keyboard. If you’re using a keyboard, then I suggest looking at this website which will teach you how to touch type.
Become familiar with keyboard shortcuts. Especially for things like bold, italicise, underline, highlight.
Downloads. If the teacher/lecturer puts up any material for the lecture download it. These are typically powerpoint slides. When I take notes next year, I will download these and split screen between word and powerpoint. Then I’ll be able to copy and paste material and diagrams straight from the actual powerpoint, speeding up my process.
Back up. Please, back up your notes on google docs. If your computer crashes you will have a backup of your notes that will be essential to studying! Again, for the people in the back, back up your notes!
Creating your notes. Use the technology to your advantage.
Use bold/highlight/italic. Make your heading and subheadings stand out from the rest of your text.
Use bullet points.
You can even make sub bullet points (like this) using the tab key to follow your line of thought/reason.
Highlight the important things; you could even use different colours for different things. E.g. yellow for important dates, blue for important quotes.
Develop an annotation style. For example, sometimes you might fall behind a bit, and miss a detail. When this happens to me I insert a series of dots into my notes, like this (……..) and I know that means I missed something so I can return to the recordings to find out what I missed. You could use question marks (?) to indicate something that confuses you that you need to do more reading on. There are lots of different symbols so you can develop your own system.
This also works with words. If you have certain words which you’re typing a lot then you can make them shorter and easier to type. For example, the word “participants” comes up a lot in my course, but I use “ps” because it’s shorter and quicker to type.
Choosing between typing and handwriting:
Handwriting Notes:
Is creative; colour/ highlight/draw
Can help memory
Lots of experience using the technique
Can revent distraction
Same format as exams
Lots of paper; bulky
No back up
Environmenta
Difficult to transport
Can be a slow, ling progress
Typing Notes:
Quick; can keep up with teacher
Easy to transport; all ntoes on a single memory stick
Can create back up copes
Can be printed to have a digital and paper copy
Paper doesn’t have to be used; environmentall friendly
Add coliur/highlithg/etc.
Easily shared with other people
Different fonts can make it easier for people with dyslexia
Laptop may be too heavy to take to class
Not everyone has a laptop; expensive
Battery life might not be a suitable for a full day of classes
Can be less memorable


Hi I’m really indecisive and I’m trying to create an effective note making system for this year. Do you have any tips on how you take notes or use colours, post it notes or anything else? I'm hoping to do maths, science or language subjects if that makes a difference. Thank you! x
Hello!
Personally during high school I kept two notebooks per subject. In general, I used one of them (notebook A) to take notes during lessons, and the other (notebook B) to rewrite them at home adding information from textbooks and making sure I understood everything.
For maths I followed the lessons on my book and did most of the notes at home. I kept a notebook to write the theorems and explanations I had to study, and an other one to do all the exercises and problems.
For science I had lessons very full of information, so on one notebook (A) I would write really fast everything I could, and on the other (B) I would rewrite everything checking the textbook. When I saw the teacher was following my textbook pretty closely, I just underlined the parts she explained during the lesson and added the extra information she gave in the margins. Then I would write the notes assembling the underlined parts and the margin notes in a notebook (B). If there were any graphs I had to write, I would do that in a different color.
For language subject I’m n to sure what you mean… But if it’s literature, I took notes during lessons on sheets of paper and combined them at home with the information on the textbook in a notebook. If it’s a foreign language, I personally studied latin, and I had a notebook for grammar and one for exercise.
I used highlighters in my textbooks, and even though I didn’t exactly color-code, I did use different colors to underline concepts of different importance. For example, I would use a more visible color such as a green/blue/pink for the most important concepts, and a more subtle one, like yellow, for less important (but still important) things. If there were textbooks that I did not want to ruin, I underlined with a pencil and a ruler, using a double line or a zigzag line for more important things.
In my notes I use colors to write important words or concepts. It doesn’t really matter to me which color I use, but to keep my notes very clean I tend to use black and blue. I use a lot of colors when I condense a lot of information in a small amount of place, like on one sheet of paper. In that case I use different colors for different topics. For example if I want to condense information about macromolecules, I would use a color for carbohydrates, a color for proteins, a color for fats etc.
I only use post-its in my textbooks to find easily where certain topics are, but I don’t really use them in note taking.
I hope I was helpful!
-
 hunnycowry liked this · 2 weeks ago
 -
 oldvampyre reblogged this · 1 month ago
 -
oldvampyre liked this · 1 month ago
-
 alovespandas liked this · 1 month ago
 -
 wrens-studies reblogged this · 2 months ago
 -
 loveandhopeandalltherest reblogged this · 2 months ago
 -
 studythings reblogged this · 3 months ago
 -
 lost-yourmind liked this · 4 months ago
 -
 peanutbutterarcaneclutter reblogged this · 5 months ago
 -
peanutbutterarcaneclutter liked this · 5 months ago
-
 waterloosunrise liked this · 6 months ago
 -
 vanillamidnight-us liked this · 7 months ago
 -
 lepapillotage liked this · 7 months ago
 -
vanillamidnight-us reblogged this · 8 months ago
-
 lilywolf liked this · 9 months ago
 -
 secret-syzygy liked this · 9 months ago
 -
 magicsoccs liked this · 10 months ago
 -
 admitit liked this · 10 months ago
 -
 nelyastudies liked this · 10 months ago
 -
 pghage liked this · 10 months ago
 -
 loonfull-sonnetzz liked this · 11 months ago
 -
 greattyphoontimemachine liked this · 11 months ago
 -
 h0neyletters liked this · 11 months ago
 -
 librarian-daydreams reblogged this · 11 months ago
 -
 cute-ish-notes reblogged this · 1 year ago
 -
 mothermaryibegthyforgiveness liked this · 1 year ago
 -
 sweetsyzygy reblogged this · 1 year ago
 -
 arrtemos liked this · 1 year ago
 -
 inaccuratefandomhell reblogged this · 1 year ago
 -
inaccuratefandomhell liked this · 1 year ago
-
 jaero liked this · 1 year ago
 -
 nuriiuii liked this · 1 year ago
 -
 neuro-lab liked this · 1 year ago
 -
 ltotheinda reblogged this · 1 year ago
 -
ltotheinda liked this · 1 year ago
-
 jjuniebb liked this · 1 year ago
 -
 amoral-angel liked this · 1 year ago
 -
 sirensscrapss reblogged this · 1 year ago
 -
 ladamelou liked this · 1 year ago
 -
 aristotleatnight liked this · 1 year ago
 -
 letsmeetatmidnights liked this · 1 year ago