Superb Study Guides And Mini Moleskines
Superb Study Guides and Mini Moleskines
(A more concise version of this will be published in my college’s newspaper on Thursday. I will likely add or link diagrams and examples to this post, so you can check the original here.)
As a tutor, many students ask me for tips on making study guides. Generally, my response is that, “it depends”.
But hold on. Before we continue we should discuss what the purpose of a study guide really is.
Study guides fall into two main categories: study guides that prompt you to find/think about information and study guides that directly organize the information you need to know. Some professors provide you with study guides of the former kind (i.e., you’re not given the answers), and it’s essentially your job to create your own study guide of the latter type. Both categories serve the purpose of organizing information you already have in order to synthesize a study tool that best facilitates your comprehension and memorization of the information at hand, just at a different stage in the process.
Before you even start, it is helpful to be aware of the level at which you are required to know the information for your test. The most basic of these is recalling definitions, which can accomplished by use of flashcards. Other information you’ll have to know will require you to compare ideas or apply them. Think of your learning process as literal → interpretive → applicative, meaning you will need study guides that help you visualize, draw relationships, and understand material so you may memorize less in a way that helps you answer more, and better than straight memorization ever could.
–
Concept Map:
These can be anything from a basic branching diagram to a complex mind map. This type of study guide allows you to compare information in a more spatial manner than strictly linear. Let’s be honest; sometimes linear learning is unrealistic, because our world is not truly linear. This format allows you to start from the basic, bare bones of the topic you’re studying and expand into very specific details and examples. This way you can get a really solid overview of the information and delve deeper as necessary. At least for mind maps in specific, Mindly is a beautiful and highly functional mind mapping app for iOS. It’s worth the small price, I can tell you that.
Comparison Chart:
Another visually-oriented type of study guide, comparison charts are the easiest way to map out similarities and differences for various topics. The biggest advantage of this method is that you can easily find the important similarities and differences of the subjects in question without having to reread a chapter or search through your piles of notes. It won’t help you visually connect topics like a mind map would, but this very simple tool is important and useful in its own rite.
Index Cards:
Before you skip over this because you think you know what I’m talking about, this is not the same as a flashcard. Flashcards have the very basic purpose of helping you memorize information, and little else. Index cards, however, are like flashcards on steroids because they contain much more information and are used primarily to summarize key information in a portable way that allows you to easily locate more details if necessary. Allow me to break down how you might want to use this method.
Front:
Middle: Main idea [e.g. alveoli]
Upper Right: Organizational term [e.g. respiratory system]
Bottom Middle: Source of information [e.g. Chapter 17, pg. 479 or Notes from 11/26/2013]
Back:
In your own words, what’s most important to know about the concept.
Include examples, summaries, diagrams, definitions, etc.
Be detailed! Remember, this is not about strictly memorizing.
Make sure the content corresponds to level of understanding your professor excepts
Diagram:
This one is pretty self-explanatory, but is extremely dependent on the topic at hand. This could be anything from a chemical reaction scheme, a cycle, Venn diagram, etc. You may even consider making a timeline, which is great for chronological organization of ideas. This is not limited to history, though! You can also organize information from classes such as anthropology, psychology, biology, anatomy, physiology, ecology, etc. If it has a specific, linear order, it can be made into a timeline.
Question Prompts:
This method I find works very well if you use the Cornell note-taking method. If you’re using Cornell notes, you would write your prompts in the left hand column next to where the answers are located, then just cover up the answers when studying. For example, for something as simple as a definition you could write, “What is _____?” For something more complicated such as a comparison chart, you could write, “What are the key differences between _____ and _____?” If you want, you can even ask questions that aren’t directly answered in the adjacent text such as, “Why is [idea] important to [concept]?”
–
Now that you know what formats you might use for your study guides (remember you don’t have to stick with just one), you may wonder where you can put this information. The basic answer to that question: anywhere. Many people like to draw these things on computer paper. You may want to type some of these things. If you’re using Mindly then you would be inputting the information into an app. I would like to offer up the suggestion of little mini notebooks for each class. I personally make these study guide materials on paper or a computer first, then when I’m satisfied with the result, I copy it down into my pocket-sized Moleskine notebooks. I personally prefer the squared, dotted, or blank notebooks, but whatever suits your fancy. The benefit to these little notebooks is that you have all of the information you need to study for in a small, convenient little book that you can easily keep in your backpack all the time because of its size. (Ladies, it will even fit in a clutch!) Study on the bus, waiting for class to start, when eating at the cafeteria, while waiting for your laundry to finish, etc. Not to mention, this will help you avoid losing papers because they’re all in one place.
Just try not to lose the notebook.
More Posts from Marathon-notasprint and Others


04:10 PM // Hello! I made these mind maps a few days ago. I’m really proud of them considering I never made one before.
A lot of people are turning to using tablets or laptops to take their notes, for reasons that I won’t go into in this post. But, while there are lots of posts about taking handwritten notes, there don’t seem to be very many about taking notes using a laptop/tablet (I’ll refer to as digital notes from now on).
Set up folders for each topic. Create these folders before lectures/class and save your notes into the correct ones. It will keep all of your notes organised and easy to find. You might want to have different folders for lecture and reading notes. Develop a system which is intuitive for you.
Know the program. Choose which program you’re going to use to take your notes. There are lots of options available, including Microsoft Office. If you can’t afford Office, then you can look into (illegal) free downloads of it. If you have Office, you could also use Onenote. Alternatives include free programmes like Evernote which allow you to access your notes from anywhere on any device.
Get a template (M Office only). On Microsoft word, you can download different templates. See if there is a template that you can use for taking your notes. Alternatively, you can create your own template by adjusting the margins, font, size, etc. and saving your preferences. If you don’t want to use a template, you can just use the default settings.
Name the notes. Make sure that you name the notes so that you know what’s inside. On Microsoft word, when saving documents you can add tags. Then you can search these tags for any documents with that specific tag. I’ve found this to be a really useful organisational tool.
Do you need anything to take your notes? If you’re using a tablet, you can buy Bluetooth keyboards which will connect and can be quicker than typing on the screen. You can also buy a stylus which will let you write like you would with a normal pen; some devices also have the option to convert your handwriting to typed notes.
Get to know your keyboard. If you’re using a keyboard, then I suggest looking at this website which will teach you how to touch type.
Become familiar with keyboard shortcuts. Especially for things like bold, italicise, underline, highlight.
Downloads. If the teacher/lecturer puts up any material for the lecture download it. These are typically powerpoint slides. When I take notes next year, I will download these and split screen between word and powerpoint. Then I’ll be able to copy and paste material and diagrams straight from the actual powerpoint, speeding up my process.
Back up. Please, back up your notes on google docs. If your computer crashes you will have a backup of your notes that will be essential to studying! Again, for the people in the back, back up your notes!
Creating your notes. Use the technology to your advantage.
Use bold/highlight/italic. Make your heading and subheadings stand out from the rest of your text.
Use bullet points.
You can even make sub bullet points (like this) using the tab key to follow your line of thought/reason.
Highlight the important things; you could even use different colours for different things. E.g. yellow for important dates, blue for important quotes.
Develop an annotation style. For example, sometimes you might fall behind a bit, and miss a detail. When this happens to me I insert a series of dots into my notes, like this (……..) and I know that means I missed something so I can return to the recordings to find out what I missed. You could use question marks (?) to indicate something that confuses you that you need to do more reading on. There are lots of different symbols so you can develop your own system.
This also works with words. If you have certain words which you’re typing a lot then you can make them shorter and easier to type. For example, the word “participants” comes up a lot in my course, but I use “ps” because it’s shorter and quicker to type.
PLEASE MAKE A REAL COLLEGE TIPS POST BC I WAS TRUSTING THE ONE FROM THE FIRST YEAR UNTIL NOW
minimize gaps in your schedule if you’re commuting unless you work better on campus, in which case schedule large gaps and stay on campus all day
use academic advising services as early as possible to formulate your post-grad plan. don’t leave it until third or fourth year and risk missing prereqs, work/volunteer experience or references
networking sucks ass but guess what? you have to do it. figure out what your classmates are doing, who they’re speaking to, etc
make sure your profs know you. sit near the front, see them during office hours (make up questions if you have to), attend events, pick their brains. you might get an academic reference out of it or even a grad student position
you most likely have an online portal. visit it hourly. leave it for even a day and you will miss something
find out what textbooks you need before the semester starts and download the e-book, buy it used, whatever. just don’t fuck yourself over within the first couple weeks waiting for your book to arrive
read your syllabus very carefully. set all dates in your phone with an alarm days prior
get credit audits every year to make sure you’re on track to graduating when you anticipate
don’t take evening classes. you’ll never get anything done prior to class like you planned. ever.


Ladies and gentlemen, new guest post on the blog
5 Proved Tips for Witing a Fresh Book Review
“Do you know how to write a fresh book review? You may have already faced with this unordinary task but we have some tips for you to do it at your best. Some basic things you should know is that a book review is intended to describe, analyze and evaluate. It also should…” Read More>>
The author of the post is http://youreasystudy.tumblr.com/!
Masterpost
I’ve seen a lot of masterposts lately, but this one is the first I’ve ever done. Feel free to add to it, or make suggests for things I should add. Links will be under certain categories, so feel free to skip to the one you feel like you need. If you see something you posted and you’d like me to take it off, please let me know.
Study Tricks/Tips/Advice
1. Tips from A+ students
2. Find Your Study Style And Methods That Work For You
3. How To Study When You Don’t Feel Like It
4. Science Backed Study Tips
5. More Learning/Studying Techniques
6. Whole Page Dedicated To Studying/Organizing
7. Homework Help
8. Tips For Effective Studying
9. How To Study Like A Straight A Student
Note Taking
1. Tips For The Lazy Student
2. Info On Cornell Notes
3. Note Taking Masterpost
4. Good Note Taking Summary/Tips
Test Prep
1. How To Prepare For A Test
2. Free SAT/AP Prep Resources
Health Related
1. How To Avoid A Breakdown
2. Books Dealing With Mental Illnesses
When You Need To Read
1. How To Read Shakespeare/Old English Texts {1} {2} {3}
2. Assigned Reading Tips
3. How To Read Difficult Books
Course Specific Help- Math
1. Square Root Calculator
2. Cube Root Calculator
3. Solve Any Equation {1} {2}
4. How To Multiply Big Numbers
Course Specific Help- Chemisty
1. Chemical Equation Balancer
2. Chemistry Help Motherload (Textbooks/Resources/Help/ETC)
3. Tips For Studying Chemistry
Websites/Apps
1. Final Grades Calculator
2. Feed Hungry People And Improve Your Vocabulary At The Same Time
3. Legal Textbook Websites/Help
4. Editor That I Use For All Writing/Typing (And it’s wonderful)
5. Note Taking Website (With App)
Language Learning
1. Duolingo (I use this personally and it’s awesome)
2. German Colors List
3. Language Learning Masterpost
4. Learn 8 Chinese Words In The Cutest Way
5. Language Learning Websites
6. Tips For Self Teaching Japanese
7. Sign Language People Commonly Use
8. A Faster Way To Learn A Language
Sleep
1. Sleep Tips
2. How Long Should You Sleep For?
3. Successful Sleep Habits (Infographic)
Motivation
1. 100 Reasons To Study
2. Motivation Masterpost
3. Motivation Quotes (Via Google)
Time Management
1. Advice Graphic/Comic
2. The Pomodoro Technique
3. Time Management Masterpost
4. How To Manage Your Time Effectively
Music
1. Classical Study Playlist
2. Hit The Books Playlist {1} {2}
3. Playlists Masterpost
4. Mini Masterpost Of Playlists
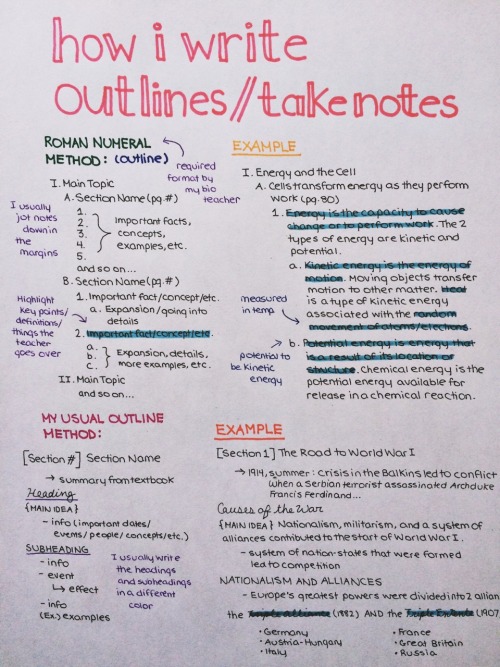
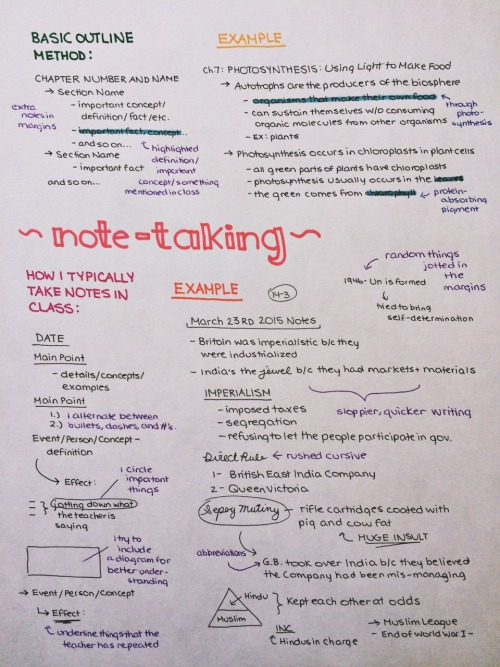
How I write outlines/take notes, for those of you that were asking :)
Giving Amazing Presentations!
These are my tips for giving really good presentations in class! It will be slightly more geared towards history, english, etc. and some of the tips might not apply to science classes, but hopefully this helps.!
Presenting Well:
Know what you are talking about. When you are giving a presentation, you should be an expert in what you are talking about. Study the topic like it’s your job.
If you are working with a partner, still make sure you know it all! When I do partner presentations, this is what I do. Decide who is going to do each part of the presentation. This is the part that you should know backwards and forwards. But! You should also have a good amount of knowledge about your partner’s topics. If one of you falters or forgets something, the other can back them up. Also, this helps to make you look more cohesive and less like you just split it in half.
Be able to answer questions. This ties into my last point. If a classmate or a teacher asks you a question and you have no idea, it doesn’t look good. You should know more information than just what you’re presenting.
Don’t read from notes. If you stand up and just read from a page, your class might as well be reading this information from a textbook. If you can, don’t use any notes at all. If you absolutely need them, make them super short jot notes, not full sentence pages of notes.
Organize your slides in a way that makes sense. Start with background information, then state your thesis, then get into your arguments and more detailed information. Don’t put your thesis at the end, or skip over the background information.
Include a conclusion at the end of your presentation. A presentation is basically a verbal essay, so you should be including all of these parts. Restate your thesis and quickly sum up the reasons that you talked about in the presentation. This will help everyone in your audience to understand what you discussed.
Dress up a bit and try to look really good. I personally believe that a lot of confidence can come from the outside. Looking good and being comfortable with what you’re wearing will make you more confident. Also, a lot of teachers want to see that you made an effort to look professional for a presentation.
Talk to the class like you’re having a conversation. Obviously, you don’t want to be too relaxed and seem like you don’t know what you’re talking about. But it is really helpful to use your normal language and tone, throw in a couple jokes, and just act normal! It’s always really weird when someone turns into a robot when they are giving a presentation, so try to avoid that if possible.
Practice in front of someone! This will help you avoid looking awkward and help you go at a normal speed. Also, they can tell you if there was a part that they didn’t understand or anything like that. Try to choose someone objective, that won’t lie to make you feel better.
Time out your presentation. You have to time out your presentations before you do them. It’s not fair to other presenters and to your class if you go way over the time limit. Time yourself reading through the presentation, then again when you present in front of someone. Maybe leave a bit of time at the end for questions, too.
Making Good Visuals:
Use something simple. Unless your teacher suggests otherwise, just use slides or something simple like slides. Unless you are really good with these kinds of programs, when you try and do something like a video or a Prezi, its way more likely that it will look unfinished or crazy. I personally hate Prezi, because it’s way too hard to follow.
Use a built in slides theme. Again, this might not apply to you if you’re really into graphic design, but for the most part, stick to this rule. When you try and mix your own colours and patterns and fonts, it can tend to look really busy. Try to stick with a preset theme.
Do not have full sentences. You should not have more than 10 words on your entire slide, if that. A really good photo, political cartoon, graph, or other graphic says way more than an exact copy of the words you’re already saying. Your slides are a visual to back you up, not the main focus. If your class has to take notes on your presentation, this might not apply.
Don’t use a white background. Pure white makes your eyes hurt. Change the background colour to a really pale grey, one shade lower than white. This will help your audience focus on the slides better.
Make sure your visuals are working. Ask your teacher if you can double check that your slides are compatible with their computer, or at least check it on a computer at your school. Especially if your school uses Mac and you use Windows (or vice versa). Also, check that your videos and audio work!

firstly, some general tips from me:
don’t use spark notes/schmoop/other reference sites until AFTER you have read your book and formed your own opinions, because it makes your essays a lot more interesting, which your teacher will appreciate, if everyone is doing the same essay on something! (However, don’t do this if you don’t have time, rely on those sites when you are racing a deadline or juggling tons of stuff ofc)
do the in-class reading beforehand! this sounds so silly, but doing the reading beforehand can help so much if there is an in-class discussion on it after
highlighters (or other writing utensils in various colors) are your best friend when there is an in-class essay! while obviously in general they are great, if you have a few different colors you can quickly mark up the text to find recurring elements and structure essays around that!
look up the social-cultural-historical context of a book! this is super great for reading nonfiction, but also great for most fiction because it allows you to understand the lens the author was writing through and their motive for doing so, which gives you great fodder for discussion if you need to discuss purpose
other useful tips + guides:
mla official formatting
general essay help (basically recipe for a good essay)
SOAPSTone method
words that connote tone
standard themes in literature
i know this isn’t a comprehensive list, but i hope it helps with untangling the mess that is understanding some lit classes!
My exams are rapidly approaching (just 9 days left!!) and amongst all the study tips posts that are popping up, I wanted to do a post about those days when things don’t go as planned. Be it that you walk out of an exam and feel like you bombed it, or that you get back a disappointing score. We all know the feeling. So here are some things that I like to do to make the day suck a little less!
Have some chocolate (light/dark/milk, hot/cold/whatever as preferred)
Have a bath, or a long shower
Go for a walk or a jog, preferably surrounded by nature
Find someone/something to cuddle
Even if you have things to do, give yourself a break
Tidy your room/flat/whatever to get a fresh perspective
Open all windows and air out your room
If you have things that need to be done, make a to do list and sort your brain out
Organise your clutter/notes/room/whatever
Do come colouring in a colouring book (these are awesome)
Try your hand at painting, even if you’re terrible at it
Make yourself some tea
Bake something (and eat it without feeling guilty afterwards)
Light a nice-smelling candle
Spend time with the positive forces in your life, be it parents, friends or pets
Watch your favourite movie (preferably with someone who loves it as much as you)
Go on spotify, pandora, soundcloud, 8tracks or wherever and look for new music
If you find some really good music, have a dance party
Put on your favourite outfit (+ makeup look if you’re into that)
Paint your nails, shave, moisturize, wash your face and pamper yourself
Check out universityandme‘s “You are a force of nature” tag
If you need someone to talk to, send me an ask, either here or on my main blog, saturdaystudying
-
 fogandfireflies liked this · 4 months ago
 -
 gingk0 liked this · 4 years ago
 -
 valelavanguard liked this · 4 years ago
 -
 nerorgasmo liked this · 5 years ago
 -
 ardnaxelak liked this · 5 years ago
 -
 studyingwithsagal reblogged this · 5 years ago
 -
 energyandmatter liked this · 5 years ago
 -
 studdybuggy reblogged this · 5 years ago
 -
 edittheworldaway liked this · 5 years ago
 -
 struggling22 liked this · 5 years ago
 -
 raecharm08 liked this · 6 years ago
 -
 ceciliaaaa liked this · 6 years ago
 -
 solarineart liked this · 6 years ago
 -
 blob-chan liked this · 6 years ago
 -
 kvrenai liked this · 6 years ago
 -
 studyblrforbeginners reblogged this · 6 years ago
 -
 danaesdesk reblogged this · 6 years ago
 -
 desnimucra reblogged this · 6 years ago
 -
desnimucra liked this · 6 years ago
-
 aspen-studiez reblogged this · 6 years ago
 -
 donaldstudies reblogged this · 6 years ago
 -
 fightingeirestrong liked this · 7 years ago