HOW TO GET A 5 ON AN AP EXAM!!! #studytube
HOW TO GET A 5 ON AN AP EXAM!!! #studytube
its literally 11:59 but i made my wednesday deadline for my weekly vid!!!!
here are my tips for succeeding in ap classes and getting a 5 on the exam :] hope u guys like it!
subscribe // request a video // more
More Posts from Marathon-notasprint and Others
🌠Guide to Study Guides
Hi, so I make study guides when I revise as referenced to in this post/ask here. So in this post I’m gonna try and show you guys how I go about making a study guide like I did for sociology or philosophy, both of which are shown in that link there. This is my method so it probably is really complicated and stuff, I know for sure that my guides are overly “fancy” and whatnot, but it makes me happy and I guess the extra effort does pay off, at least aesthetically.

Okay, yes, let’s begin…
1. Visit colourlovers.com to choose a colour scheme for your guide!
I’ve provided the link to the most loved palette page which is where I choose my colour scheme. In Word, you change your colour scheme by choosing Page Layout > Colour > Create New Theme Colours and you go from there!! I basically started making my own colour schemes after I went through all the ones already provided by Word, but to be honest you can start with those since they’re really nice too. I recommend: Apex, Composite, Foundry, Metro, Module, Slipstream and Solstice.
If you do want to make your own colour scheme, you should get ready to do some fiddling around because I still don’t get this really. Making a colour scheme on Word requires at least 10 colours, that’s okay because on colourlovers, palettes are usually made up of 5 so just choose 2 that you think suit each other :) After this you need to input the hex codes manually into the popup window of “Create New Theme Colours” starting from Text/Background - Dark 2 to Accent 6. The hex codes are provided by individually clicking on the colours.

So that’s what one of my self-made colour schemes look like, you should be aware that Word usually randomises these? I don’t really know how it works but basically sometimes the colours won’t necessarily be in that order when you go to select it to specifically colour a word, if that’s the case you’ll just have to fiddle and change it around to choose your preferred colour in the scheme. Also not all the colours will go into the textbox options so be aware of that too!
2. Font shopping
Next if I haven’t updated the font collection for a while I’ll go to dafont.com because I just…really like jazzy fonts. From here I’ll either check out “All The New Fonts” (option is at the bottom of the front page) or go to the menu titled Script, and check out Handwritten, Fancy or Various. Here are some links to asks about fonts that I’ve used in my shown study guides or just fonts I like in general!! 1 and 2.
Okay so as you can see in the Disney Princess Document/Sociology Study Guide I used at least five fonts, I usually average around 4? Once downloaded choosing fonts that you like for your guide is basically a trial and error process, I choose any fonts that I like or haven’t recently used or just recently downloaded that I want to try out and I match them with what I think would look nice! Here I’ll show you why I use around four or more fonts:

In order to make the process of typing up your guide with these fonts easier, highlight one, so for example the Big Title, right click > Styles > Save Selection as New Quick Style…and it’ll be available to you in the Quick Styles menu underneath a heading like Style1. After this to easily change a font to that particular font, just highlight, go to Quick Styles, choose that particular font and bam! I try to make my fonts match, so if one is bold, I aim for at least a thick-ish font in the rest of my choices. Now to go through what they’re for.
So obviously the Big Title is for your BIG TITLE that could be your subject or your main topic, so if it was sociology (like in the first pic) I would use it for Key Concepts and Methods, I might later reuse the font for another BIG TOPIC, but really…it’s your choice.
The Subtitle is what I would use for well…your subtitle, so following my first pic it would be the subtitle of Positivism versus Interpretivism…Three Key Concepts, etc. The heading is therefore for the headings under the subtitle (this is only if you’re making a guide for something that is like intensely sectioned, like sociology), so I’d use that font for where it says Reliability etc.

It just brings something extra on top of all the later colour you’ll probably use, although I only use it for like a set theme, so dates, names etc. and only either a word or a phrase, if it gets too long it’ll just mess up the format of your sentence.
3. Okay, so you’re happily typing away but now you wanna add the speech bubbles, you wanna add the textboxes and the Disney princesses! Don’t worry my friend, I got you.
Basically I add textboxes or speech bubbles for 2 reasons, either to highlight a particular point or differentiate a piece of information from the rest OR to fill up space because of some particular study guide pet peeves.
Pet peeve, when a particular sentence ends like this:

I know it might seem like a bit much, but to be honest, it throws the whole format of a block of text if a bit of it ends with like this huge expanse of space. So in this instance I either will insert a photo or I’ll try and delete a word or add a word until I’m satisfied. THIS IS JUST ME, IF YOU DON’T CARE OBVIOUSLY IT DOESN’T MATTER 👌
You can insert speech bubbles by going to Insert > Shapes > Callouts (you’ll find it there) and textboxes by going to Insert > Textbox > Draw Textbox (I draw mine since I don’t tend to use the ones provided by Word. With the speech bubbles they actually act as textboxes, but I’ve found that using it in that way takes up a lot of space as in your words won’t necessarily take up the whole of the speech bubble so it simply expands and it’s all messy. Therefore, I put a textbox on the top of it, make the background and outline transparent and type there to save space.
Here are some examples of when I’ve used photos or speech bubbles to fill up space or solve the annoying sentence problem.


I generally tend to have themes around what photos I use, so for example my sociology guide was largely based on Disney/Cartoon Network depending on how I felt and I’d use particular photos to emphasise a point and make it more entertaining I guess… As you can see the speech bubbles with LSP are for filler purposes but also to differentiate information, it just adds something extra really. Also because I continuously indent my guides (since I type with bullet points) as they get further and further in they’ll leave gaps that can be filled with photos, seen here with what I’ve done with LSP. Also with the photos that I choose, I search for the ones with a grey, checkered background which means that they’ll be transparent, allowing me to put them in front of a textbox or just makes overall design easier, it means that I can have the Gangreen Gang in front of that textbox like that :)
4. Final step, going over your guide when it’s done.
I then go through the guide again and highlight, underline, italicise, bold, colour etc. particular points of a sentence/paragraph that I want to remember! I do this in order of the colour scheme that appears in the menu when you click to change the colour of a font, so I’ll highlight particular words for a portion of a paragraph before changing, achieving a sort of a rainbow effect, like so:

These are from my history study guide, where I made front covers (which I don’t usually do…I feel like all my guides really depend on how I feel and my subject). This is what they looked like if you wanted an idea for something you could do too!!

Um..so that’s pretty much it! I’ve tried to make this as extensive and as in-depth as I can, I’m sorry it ended up SO LONG, I’ve never made a post this long before so I’m really sorry. I would put it under a read more but I feel like the font on my blog is too tiny for when it’s redirected and I’d much rather not have everyone straining their eyes. If you guys have any more questions, please feel free to ask. If you want any more examples or screen shots of my guides, just hit up my ask box!! Sorry for this taking so long and being so long once again and I really hope it helps you all in at least some way!
***As an addition, those washi tapes you see are digital washi tapes which you can get just by googling! I use the free ones which only require a lil’ searching for. Also please tag me in whatever study guides you make and upload, I’d love to see them!!
Organising a Notebook:
I was looking at methods of keeping notebooks organised and I came across a really interesting blog post (source) that I want to share with you all. All of the pictures in this post come directly from the original blog post.
Make your entry into your notebook. In the example photographs, they have recorded a Chinese recipe.

Go to the back of the notebook and add a tag or title, e.g. “Chinese” on the left edge of the page.

Go back to the first page where the entry was, and on the same line number as you wrote “Chinese” make a black mark on the edge. You make this mark so that even when the notebook is closed, the mark is visible. After repeating this for various recipes, you now have various tags visible on the notebooks edge.

If you ever wanted to find a Chinese recipe, you simply look at the index, locate the label, and look along the visible edge which has been tagged as Chinese. Then just flick to each marked page.

You’re not limited to one tag per page. You could tag a page 2 or 3 times. So if you jot down a chicken stir fry you could tag it as “Chicken” and “Chinese”.
child handling for the childless nurse
My current job has me working with children, which is kind of a weird shock after years in environments where a “young” patient is 40 years old. Here’s my impressions so far:
Birth - 1 year: Essentially a small cute animal. Handle accordingly; gently and affectionately, but relying heavily on the caregivers and with no real expectation of cooperation.
Age 1 - 2: Hates you. Hates you so much. You can smile, you can coo, you can attempt to soothe; they hate you anyway, because you’re a stranger and you’re scary and you’re touching them. There’s no winning this so just get it over with as quickly and non-traumatically as possible.
Age 3 - 5: Nervous around medical things, but possible to soothe. Easily upset, but also easily distracted from the thing that upset them. Smartphone cartoons and “who wants a sticker?!!?!?” are key management techniques.
Age 6 - 10: Really cool, actually. I did not realize kids were this cool. Around this age they tend to be fairly outgoing, and super curious and eager to learn. Absolutely do not babytalk; instead, flatter them with how grown-up they are, teach them some Fun Gross Medical Facts, and introduce potentially frightening experiences with “hey, you want to see something really cool?”
Age 11 - 14: Extremely variable. Can be very childish or very mature, or rapidly switch from one mode to the other. At this point you can almost treat them as an adult, just… a really sensitive and unpredictable adult. Do not, under any circumstances, offer stickers. (But they might grab one out of the bin anyway.)
Age 15 - 18: Basically an adult with severely limited life experience. Treat as an adult who needs a little extra education with their care. Keep parents out of the room as much as possible, unless the kid wants them there. At this point you can go ahead and offer stickers again, because they’ll probably think it’s funny. And they’ll want one. Deep down, everyone wants a sticker.
For anyone who thinks all studyblrs are perfect, just a reminder that I failed my first year of med school. I’m trying to turn it around though!

My Study Method
by futurecomposer
Notes and processing info:
i write my notes with Google Drive / Docs (android / itunes)
before the lecture: First of all I write the textbook notes and maybe articles about the subject, that way, when I go to the lecture, I already understand the topic. If there’s available slides, print them, so you can annotate on them later.
during the lecture: Take as many notes as you can, but also write about the most important stuff. For this I use paper. I feel like It’s easier to link stuff, draw diagrams, etc. … It doesn’t matter if your notes are messy, you’ll rewrite them later. Remember: if it’s in the blackboard, it’s because it’s important.
after the lecture: After the lecture I write my lecture notes in the previous document. Now it’s time to get fancy: use bold, italic,, both of them to indicate keywords and/or important phrases. But be careful: don’t overuse them, or they will become useless.
At this point you should have all the information you need for the exam perfectly summarised in a doc.
Summarising and flashcards
bullet points: It’s time to make another doc. This time we’ll resume the information in bullet points. The goal is to have clear, concise, brief facts.
summary cards: Here comes the most important part. Summarise one topic in one flashcard. The point is to really condense the information and see what’s most important. Fill the flashcard with info, don’t get cut back by aesthetics. The previous doc is your guide.
This system’s point is to manage and work the information, get familiar with it, then find the most important concepts. This way, you have actively worked with it, and have more tendency to remember it.
German vocabulary list: Colors
rot (red)
rosa/pink (pink)
blau (blue)
hellblau (light blue)
dunkelblau (dark blue)
grün (green)
gelb (yellow)
orange (orange)
braun (brown)
beige (beige)
violett (violet)
lila (purple)
weiß (white)
grau (grey)
schwarz (black)
this school year will go successfully, and we will figure things out
this school year will go successfully, and we will figure things out
this school year will go successfully, and we will figure things out
this school year will go successfully, and we will figure things out
this school year will go successfully, and we will figure things out
this school year will go successfully, and we will figure things out
this school year will go successfully, and we will figure things out
this school year will go successfully, and we will figure things out
this school year will go successfully, and we will figure things out
this school year will go successfully, and we will figure things out
OKAY GUYS LISTEN UP so there’s this website called slader.com and it has EVERY FUCKING ANSWER TO EVERY TEXTBOOK EVER. It has answers AND shows you ALL the work so you can understand it (or be a slacker). This website has literately saved my calculus grade. It even has free tutors if you need the extra help. Guys, it’s free to register and it will save your life
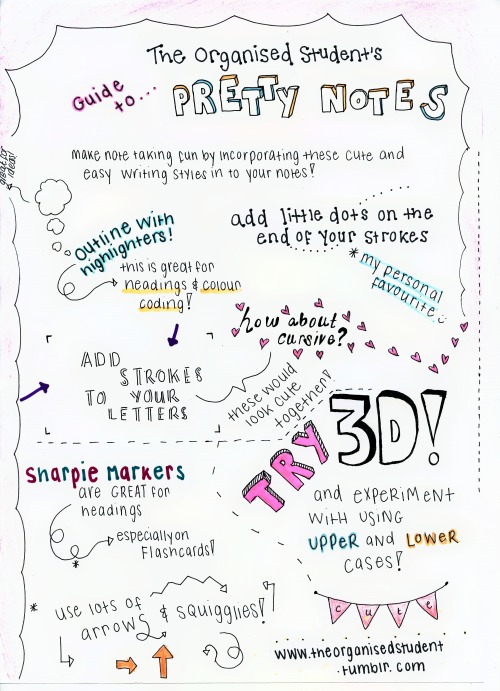
2/4/2015 // I love experimenting with pretty, new hand writing styles for my study notes! I made this info-graphic and scanned it in to show you some of the styles I am loving right now.
-
 jihanestudies-blog reblogged this · 5 years ago
 -
jihanestudies-blog liked this · 5 years ago
-
 a1studyblr reblogged this · 8 years ago
 -
 coacuhnutgoddess liked this · 8 years ago
 -
 andiesanatomy liked this · 8 years ago
 -
 coolcoelacanth liked this · 8 years ago
 -
 hiyishai liked this · 8 years ago
 -
 deanspeach liked this · 8 years ago
 -
 mystudycenter reblogged this · 8 years ago
 -
 altmegan liked this · 8 years ago
 -
 butchmime liked this · 9 years ago
 -
 chunliiii liked this · 9 years ago
 -
 andersfluff liked this · 9 years ago
 -
 icedclementine-blog liked this · 9 years ago
 -
 bodaciamorose-blog reblogged this · 9 years ago
 -
 phanteise-blog liked this · 9 years ago
 -
 naaraevelyn01 reblogged this · 9 years ago
 -
 lapizlazulii reblogged this · 9 years ago
 -
 angeloils liked this · 9 years ago
 -
 studyingjill-blog liked this · 9 years ago
 -
 redhead-rants liked this · 9 years ago
 -
 studytyler reblogged this · 9 years ago
 -
 afleaa liked this · 9 years ago
 -
 sr412 liked this · 9 years ago
 -
 highschool2medschool reblogged this · 9 years ago
 -
highschool2medschool reblogged this · 9 years ago
-
 blacklotusz liked this · 9 years ago
 -
 palmtreezandparadise liked this · 9 years ago
 -
 undestined liked this · 9 years ago
 -
 awkwardheroes liked this · 9 years ago
 -
 posistudying-blog reblogged this · 9 years ago
 -
 hono-lilo liked this · 9 years ago
 -
 skin liked this · 9 years ago
 -
 lovclub liked this · 9 years ago
 -
 sojinsfw liked this · 9 years ago