The Imperial Palace (Download)
The Imperial Palace (Download)
Early follower’s gift to celebrate my first anniversary on tumblr…

Have you ever dreamed of being not just an ordinary monarch but an emperor? Well, during Middle Ages that title mostly went to a German. But this comfortable residence allows you to catch the feeling of imperial power:
Imperial Palace
It’s no castle because medieval Emperors did not settle at a permanent residence. Instead, they travelled across their gigantic realm and used so called palatia (sg. Palatium or Pfalz in German). This lot is modelled after these great residences (especially from the 10th century). I tried to stay faithful to Romanesque architecture (excuse the Gothic windows) and because this is set in an early period you won’t find too much lavish decoration.

The great Hall with the royal apartments…

The chancery where books and diplomata are produced…

The Emperor’s throne in the cathedral…

Inside the Cathedral…

Queen’s apartments…

…

Great Hall…

Medieval Pit-houses behind the palace…

Inside those houses…

Royal chimney…

Courtyard for training…

Monastery’s courtyard…
DETAILS:
Lot Size: 64x64
EPs used:
World Adventures, Ambitions, Late Night, Generations, Seasons and Pets
Store content:
Midnight Hollow
Dragon Valley
Indulgent Living (only Candles)
Castle Interior Set
CC used:
Medieval Chimney from Khanysims
Medieval Bassinets by Omega Star
Medieval Benches by Omega Star
Medieval Chairs by Omega Star
Medieval Bathtub by OmegaStar
Medieval Tapestry (first one) by Mackat
Medieval Concersions I by Jennisims
Medieval Conversions II by Jennisims
Castle Lore III by Cyclonesue
Castle Lore II by Cyclonesue
>>DOWNLOAD (at Mediafire)
Please tag me, if you use it in your story. I’m curious to see what you come up with. Hope you like it!
More Posts from Yvonnestarr and Others


Secret Build Techniques
Two uncommonly-known build exploits for your use- to get an extra floor, and to create a one-level open-air basement! Read more under the cut.
Sixth Floor
This allows you to create an extra sixth floor. Mainly useful for decorative use!
Build up to the five-floor limit.
Create a mansard roof large enough to show a floor tile.
Delete roof
Using ‘placefriezes on’, you can now place a frieze where you couldn’t before.
You can then use CFE to shape the floor to your liking.
Of note: It’s best to keep the extra floor decorative or lightly-built, as there are restrictions. You can’t build walls, roofs, nor stairs, but ladders (place beforehand), fences, and elevators work. Use ‘moveobjects on’ to place objects, doors, and windows. You can use the sledgehammer to delete the extra floor.
Open-air Basements
This allows you to create a one-level open-air basement, as teased by Sims Uni’s gym.
Create basement on a completely flat piece of ground.
Create stair in basement where you want the opening to be.
Create a foundation at the end of the staircase, one tile away.
Copy the stair and place a new stair leading from the foundation to the top of the stair to the basement.
Delete the stair to the basement.
Delete basement stair.
You can repeat this as many times as you want to create large open areas! Beyond that, it functions as a normal basement.
Of note: To delete the open-air areas, place basement stairs where you don’t want the effect, and then delete those stairs. You can then delete the basement. It’s best to keep the open-air area lightly decorated, as I believe that objects beyond doors and windows will not show above-ground even if you have object hiding disabled. The game will also only render the first basement level below ground.
Hope this helps!


DEBUG OBJECTS - Base Game
This is a bunch of OBJD/OBJK overrides to make various props and other objects available in the Debug > Misc catalog. Objects can also be placed on slots! I didn't add strings for them, so some objects simply don't have names or have incorrect names in the catalog.
As this does not change the script of functional objects, sims may try to clean up plates/food/glasses etc. I recomment using NRaas DebugEnabler to disable interactions. The child stool also sometimes will not let you pick it up once placed, but can be deleted by shift + clicking.
If you have any default replacements for these objects, they will show up as the default instead!!
Note: Some objects I wanted to include simply refused to show up in the catalog. For example the hammer, wrench and screwdriver. But if there are other objects you would like me to add, send me a message!
Note #2: There were 3 game controllers in the game files and i'm not 100% sure which one belongs to which pack. i think this is the base game one, but if it's not showing up for me please let me know!
DOWNLOAD HERE

![[CW]NewYearCollection2023(MermaidDress)TS3](https://64.media.tumblr.com/fb4601255e7318810dc61cc567f290ff/203bbc31f9ce5131-24/s540x810/33dbdc2916ce60b7253216e6262a728cf6213880.jpg)
[CW]NewYearCollection2023(MermaidDress)TS3
Original mesh by me.
Compatible with any body type.
if you want to post my cc on other sites, please include source.
Do not convert to other games without my permission.
DL (early access 18/01/2023)
My tumblr with edit screenshots @chamomilewine
@emilyccfinds @sssvitlanz @smfinds
Leave the house, get into the water, enjoy every moment and take more risks in an open world that never keeps you behind a loading screen! Find out more on October 31st on the Boring Bones tv channel. Share the post below to be notified the day before and receive your passport!


What’s in my Game:
GRAPHIC TWEAKS
The Sims 3 GPU Add-on Support
Tweaked my GraphicRules.sgr Shadows Quality to 8k
Step 5 - Limiting FPS (Essential)
MODS:
NRAAS: Master Controller with MC Integration, Overwatch, Errortrap + Saver
simler90’s Gameplay Core Mod WITH Nraas Overwatch Compatability File (found in step 4)
The Sims 3 Smooth Patch 1.2.1
[TS3] Catalog Search Mod
No Intro
No “Mod Scripts Found”
No Drift/Lower Level Free Cam Camera Mod
Subtle Build Grid Active Level Only
Annoyances Disabler
No More Gloves with Outerwear Mod
Twoftmama Route Fix Flavor 3 v9
No (or fewer) automatic memories
xiasimla Higher Quality Default Replacements for TS3 Headline Effects
Sims 3 Decorating Tools mod (or S3DT)
Get to Know Fix+
Interaction on sloped terrain enabler
No Mutated Hair/Eye Colour
Replaced CAS animations - three flavours
Pick Up Toddler Fixes
New UI Poses (3 Flavours)
User-Directed Scolding + Other Punishment Tweaks
University Life Visual Fixes (Send Insulting Text, Texting Idle, Heat of the Moment Kiss)
No Autonomous Pet Toy Cleanup
Let Me Take a Selfie (Update 9/3/23) - Pets Fix
University Student Union / Library Shell Overrides to help with Crowding Issues
ENVIRONMENTAL/LIGHTING:
Improved Environmental Shadows
[TS3] Shadow Extender
Reworked & Improved EA Lights
TWEAKS:
Welcome Matt Deshined Rug
University Life Alpha Omega Door Fix
No more ugly snowprints
Hanging Lantern Fix
Tileable Items Shader FIX
Base Game Halfwalls FIXED!!!
Pet Tombstone Shadow Fix
Wonderfully Woven Hanging Chair Fix
Bonehilda Coffin Default.
Chillgood Fridge Re-Masked
CAS:
CAS Monotone: additional colors + Replacement CAS for single color
CAS Sim Bin Genetics as Presets
40 New Face Presets (CC Slider Free)
NRAAS: MasterController ExpandedTattoo + cmar_XCAS_TattooLocations_V2.zip
DECOR + MORE
Sims 3 Hidden Stencils Unlocked
ISLA PARADISO
Reduce/Remove Lag caused by Houseboats
Isla Paradiso Fixed World by ellacharmed
EA DEFAULTS
SATELLITES - A SKINBLEND BY SIMAREX
cute feet for children and toddlers
Default Feet Replacement by Bloomsbase
missy harries Face Overlay Lips Lip Overlay Only
Default Replacement Wildflowers
[Chisami] BLUSH BABY (default) Baby Skin
oneeuromutt’s maternity defaults
NOT QUITE EA DEFAULTS
Memories Mirror from Generations Default Replacement 4-in-1
Season’s wall hook de-starified
2 Supernatural’s rugs - DR preset addition
STORE ITEMS & COLLECTION FILES
Phantom__99 EA Store Content
Collection Icons and Files
Store Collection Filests
cc in my game: pleyita, TSR+David Mont, dewofthesea+bioniczombie, teekapoa+HYDRA, tots+tiny, omsp+omsp resizers, skin defaults+hairs
![[cw]SexyOutfit](https://64.media.tumblr.com/0628d281bc59415433fe4364e6ca68c0/658bfefc9fb3e9f7-91/s500x750/2540fc9ab155ce1a903ae6bd43c4eee1c105e8dd.jpg)
[cw]SexyOutfit
THE SIMS 3
Original mesh by me.
Compatible with any body type.
if you want to post my cc on other sites, please include source.
Do not convert to other games without my permission.
THE SIMS 4
Original mesh by me.
If you want to post my cc on other sites, please include source.
Сompatible with HQ mod.
DL (FREE ACCESS 02/08/2023)
Buy Me Coffee
My tumblr with edit screenshots @chamomilewine
@katsujiiccfinds @pis3update @kpccfinds @ts3ccmp @cas-ccfinds @ispys3cc @gifappels-stuff @coffeeccfindsts3

How to use DXVK with The Sims 3
Have you seen this post about using DXVK by Criisolate? But felt intimidated by the sheer mass of facts and information?
@desiree-uk and I compiled a guide and the configuration file to make your life easier. It focuses on players not using the EA App, but it might work for those just the same. It’s definitely worth a try.
Adding this to your game installation will result in a better RAM usage. So your game is less likely to give you Error 12 or crash due to RAM issues. It does NOT give a huge performance boost, but more stability and allows for higher graphics settings in game.
The full guide behind the cut. Let me know if you also would like it as PDF.
Happy simming!
Disclaimer and Credits
Desiree and I are no tech experts and just wrote down how we did this. Our ability to help if you run into trouble is limited. So use at your own risk and back up your files!
We both are on Windows 10 and start the game via TS3W.exe, not the EA App. So your experience may differ.
This guide is based on our own experiments and of course criisolate’s post on tumblr: https://www.tumblr.com/criisolate/749374223346286592/ill-explain-what-i-did-below-before-making-any
This guide is brought to you by Desiree-UK and Norn.
Compatibility
Note: This will conflict with other programs that “inject” functionality into your game so they may stop working. Notably
Reshade
GShade
Nvidia Experience/Nvidia Inspector/Nvidia Shaders
RivaTuner Statistics Server
It does work seamlessly with LazyDuchess’ Smooth Patch.
LazyDuchess’ Launcher: unknown
Alder Lake patch: does conflict. One user got it working by starting the game by launching TS3.exe (also with admin rights) instead of TS3W.exe. This seemed to create the cache file for DXVK. After that, the game could be started from TS3W.exe again. That might not work for everyone though.
A word on FPS and V-Sync
With such an old game it’s crucial to cap framerate (FPS). This is done in the DXVK.conf file. Same with V-Sync.
You need
a text editor (easiest to use is Windows Notepad)
to download DXVK, version 2.3.1 from here: here: https://github.com/doitsujin/DXVK/releases/tag/v2.3.1 Extract the archive, you are going to need the file d3d9.dll from the x32 folder
the configuration file DXVK.conf from here: https://github.com/doitsujin/DXVK/blob/master/DXVK.conf. Optional: download the edited version with the required changes here.
administrator rights on your PC
to know your game’s installation path (bin folder) and where to find the user folder
a tiny bit of patience :)
First Step: Backup
Backup your original Bin folder in your Sims 3 installation path! The DXVK file may overwrite some files! The path should be something like this (for retail): \Program Files (x86)\Electronic Arts\The Sims 3\Game\Bin (This is the folder where also GraphicsRule.sgr and the TS3W.exe and TS3.exe are located.)
Backup your options.ini in your game’s user folder! Making the game use the DXVK file will count as a change in GPU driver, so the options.ini will reset once you start your game after installation. The path should be something like this: \Documents\Electronic Arts\The Sims 3 (This is the folder where your Mods folder is located).
Preparations
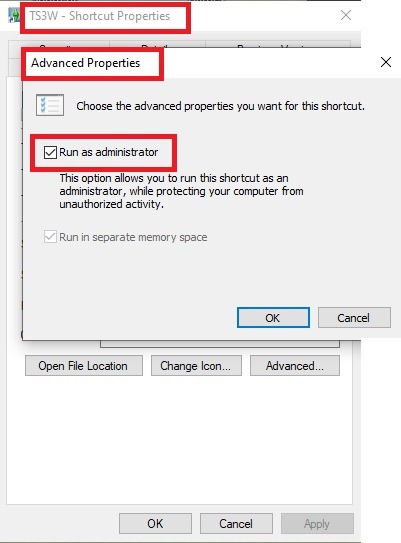
Make sure you run the game as administrator. You can check that by right-clicking on the icon that starts your game. Go to Properties > Advanced and check the box “Run as administrator”. Note: This will result in a prompt each time you start your game, if you want to allow this application to make modifications to your system. Click “Yes” and the game will load.
2. Make sure you have the DEP settings from Windows applied to your game.
Open the Windows Control Panel.
Click System and Security > System > Advanced System Settings.
On the Advanced tab, next to the Performance heading, click Settings.
Click the Data Execution Prevention tab.
Select 'Turn on DEP for all programs and services except these”:
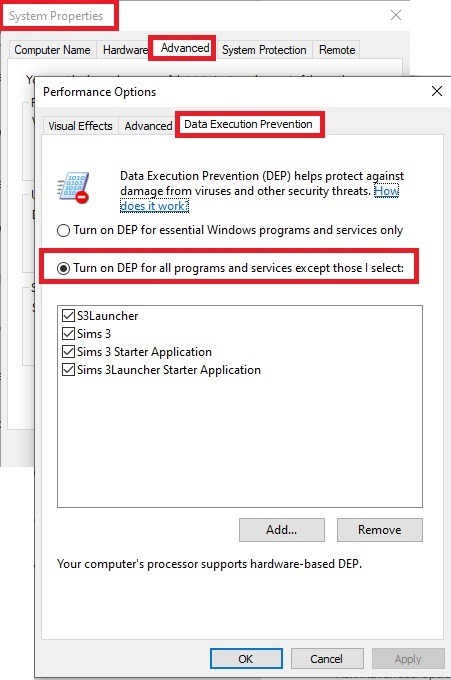
Click the Add button, a window to the file explorer opens. Navigate to your Sims 3 installation folder (the bin folder once again) and add TS3W.exe and TS3.exe.
Click OK. Then you can close all those dialog windows again.
Setting up the DXVK.conf file
Open the file with a text editor and delete everything in it. Then add these values:
d3d9.textureMemory = 1
d3d9.presentInterval = 1
d3d9.maxFrameRate = 60
d3d9.presentInterval enables V-Sync,d3d9.maxFrameRate sets the FrameRate. You can edit those values, but never change the first line (d3d9.textureMemory)!
The original DXVK.conf contains many more options in case you would like to add more settings.

A. no Reshade/GShade
Setting up DXVK
Copy the two files d3d9.dll and DXVK.conf into the Bin folder in your Sims 3 installation path. This is the folder where also GraphicsRule.sgr and the TS3W.exe and TS3.exe are located. If you are prompted to overwrite files, please choose yes (you DID backup your folder, right?)
And that’s basically all that is required to install.
Start your game now and let it run for a short while. Click around, open Buy mode or CAS, move the camera.
Now quit without saving. Once the game is closed fully, open your bin folder again and double check if a file “TS3W.DXVK-cache” was generated. If so – congrats! All done!
Things to note
Heads up, the game options will reset! So it will give you a “vanilla” start screen and options.
Don’t worry if the game seems to be frozen during loading. It may take a few minutes longer to load but it will load eventually.
The TS3W.DXVK-cache file is the actual cache DXVK is using. So don’t delete this! Just ignore it and leave it alone. When someone tells to clear cache files – this is not one of them!
Update Options.ini
Go to your user folder and open the options.ini file with a text editor like Notepad.
Find the line “lastdevice = “. It will have several values, separated by semicolons. Copy the last one, after the last semicolon, the digits only. Close the file.
Now go to your backup version of the Options.ini file, open it and find that line “lastdevice” again. Replace the last value with the one you just copied. Make sure to only replace those digits!
Save and close the file.
Copy this version of the file into your user folder, replacing the one that is there.
Things to note:
If your GPU driver is updated, you might have to do these steps again as it might reset your device ID again. Though it seems that the DXVK ID overrides the GPU ID, so it might not happen.
How do I know it’s working?
Open the task manager and look at RAM usage. Remember the game can only use 4 GB of RAM at maximum and starts crashing when usage goes up to somewhere between 3.2 – 3.8 GB (it’s a bit different for everybody).
So if you see values like 2.1456 for RAM usage in a large world and an ongoing save, it’s working. Generally the lower the value, the better for stability.
Also, DXVK will have generated its cache file called TS3W.DXVK-cache in the bin folder. The file size will grow with time as DXVK is adding stuff to it, e.g. from different worlds or savegames. Initially it might be something like 46 KB or 58 KB, so it’s really small.
Optional: changing MemCacheBudgetValue
MemCacheBudgetValue determines the size of the game's VRAM Cache. You can edit those values but the difference might not be noticeable in game. It also depends on your computer’s hardware how much you can allow here.
The two lines of seti MemCacheBudgetValue correspond to the high RAM level and low RAM level situations. Therefore, theoretically, the first line MemCacheBudgetValue should be set to a larger value, while the second line should be set to a value less than or equal to the first line.
The original values represent 200MB (209715200) and 160MB (167772160) respectively. They are calculated as 200x1024x1024=209175200 and 160x1024x1024=167772160.
Back up your GraphicsRules.sgr file! If you make a mistake here, your game won’t work anymore.
Go to your bin folder and open your GraphicsRules.sgr with a text editor.
Search and find two lines that set the variables for MemCacheBudgetValue.
Modify these two values to larger numbers. Make sure the value in the first line is higher or equals the value in the second line. Examples for values: 1073741824, which means 1GB 2147483648 which means 2 GB. -1 (minus 1) means no limit (but is highly experimental, use at own risk)
Save and close the file. It might prompt you to save the file to a different place and not allow you to save in the Bin folder. Just save it someplace else in this case and copy/paste it to the Bin folder afterwards. If asked to overwrite the existing file, click yes.
Now start your game and see if it makes a difference in smoothness or texture loading. Make sure to check RAM and VRAM usage to see how it works.
You might need to change the values back and forth to find the “sweet spot” for your game. Mine seems to work best with setting the first value to 2147483648 and the second to 1073741824.
Uninstallation
Delete these files from your bin folder (installation path):
d3d9.dll
DXVK.conf
TS3W.DXVK-cache
And if you have it, also TS3W_d3d9.log
if you changed the values in your GraphicsRule.sgr file, too, don’t forget to change them back or to replace the file with your backed up version.
OR
delete the bin folder and add it from your backup again.
B. with Reshade/GShade
Follow the steps from part A. no Reshade/Gshade to set up DXVK.
If you are already using Reshade (RS) or GShade (GS), you will be prompted to overwrite files, so choose YES. RS and GS may stop working, so you will need to reinstall them.
Whatever version you are using, the interface shows similar options of which API you can choose from (these screenshots are from the latest versions of RS and GS).
Please note:
Each time you install and uninstall DXVK, switching the game between Vulkan and d3d9, is essentially changing the graphics card ID again, which results in the settings in your options.ini file being repeatedly reset.
ReShade interface
Choose – Vulcan

Click next and choose your preferred shaders.
Hopefully this install method works and it won't install its own d3d9.dll file.
If it doesn't work, then choose DirectX9 in RS, but you must make sure to replace the d3d9.dll file with DXVK's d3d9.dll (the one from its 32bit folder, checking its size is 3.86mb.)
GShade interface
Choose –
Executable Architecture: 32bit
Graphics API: DXVK
Hooking: Normal Mode

GShade is very problematic, it won't work straight out of the box and the overlay doesn't show up, which defeats the purpose of using it if you can't add or edit the shaders you want to use.
Check the game's bin folder, making sure the d3d9.dll is still there and its size is 3.86mb - that is DXVK's dll file.
If installing using the DXVK method doesn't work, you can choose the DirectX method, but there is no guarantee it works either.
The game will not run with these files in the folder:
d3d10core.dll
d3d11.dll
dxgi.dll
If you delete them, the game will start but you can't access GShade! It might be better to use ReShade.
Some Vulcan and DirectX information, if you’re interested:
Vulcan is for rather high end graphic cards but is backward compatible with some older cards. Try this method with ReShade or GShade first.
DirectX is more stable and works best with older cards and systems. Try this method if Vulcan doesn't work with ReShade/GShade in your game – remember to replace the d3d9.dll with DXVK's d3d9.dll.
For more information on the difference between Vulcan and DirectX, see this article:
https://www.howtogeek.com/884042/vulkan-vs-DirectX-12/
Fruit Trees - Download!
Round 4 -
Cherries!

Peaches!

Pears!

Plums!

Y'all enjoy having more trees in your game! Sorry for the quick download dump, I'm on a trip and didn't have much time. Love all of y'all! <3


(~ ̄³ ̄)~
-
 jkwrldz liked this · 4 weeks ago
 -
 idkwhattonamemeself liked this · 2 months ago
 -
 mangatasims27 liked this · 1 year ago
 -
 simpatheticlife liked this · 1 year ago
 -
 yvonnestarr reblogged this · 1 year ago
 -
yvonnestarr liked this · 1 year ago
-
 sims-and-antiques liked this · 1 year ago
 -
 hanna-lorena liked this · 2 years ago
 -
 samccreblog liked this · 2 years ago
 -
samccreblog reblogged this · 2 years ago
-
 deliciousporpoise liked this · 2 years ago
 -
 apfel-strudelz liked this · 2 years ago
 -
 mels-ts3ccfinds liked this · 2 years ago
 -
mels-ts3ccfinds reblogged this · 2 years ago
-
 sunlit-simmies reblogged this · 2 years ago
 -
 evangeline-codes liked this · 2 years ago
 -
 simmerwithmysticaltendensies liked this · 3 years ago
 -
xxpeechy liked this · 3 years ago
-
 toadsims3cc reblogged this · 3 years ago
 -
 thewolfamongsims liked this · 3 years ago
 -
 nyansea liked this · 3 years ago
 -
 velvetcupcake33 liked this · 3 years ago
 -
 akkerdistel liked this · 3 years ago
 -
 rosielucifer liked this · 3 years ago
 -
 a-straw-hat-pirate liked this · 3 years ago
 -
 ninonimo liked this · 3 years ago
 -
 puppysaurus liked this · 4 years ago
 -
 phoenixsorceress liked this · 4 years ago
 -
 enjoji101 liked this · 4 years ago
 -
 opalescenteffervescentsimblr reblogged this · 4 years ago
 -
 windermeresimblr liked this · 4 years ago
 -
opalescenteffervescentsimblr reblogged this · 4 years ago
-
 rennylurant reblogged this · 4 years ago
 -
 ersthea liked this · 4 years ago
 -
 primarymuse-sims reblogged this · 4 years ago
 -
clasonhelena reblogged this · 4 years ago
-
 creeper-with-a-heart-of-gold liked this · 4 years ago
 -
 miss-may-i liked this · 4 years ago
 -
 juliusk123 liked this · 4 years ago
 -
 spookysims3animalscookie liked this · 4 years ago
 -
 sims3cult liked this · 4 years ago
 -
 darkccfinds reblogged this · 4 years ago
 -
simuvoid liked this · 4 years ago
-
 alyciaskory liked this · 4 years ago
 -
 itsalexiss liked this · 5 years ago
 -
 elizasims3 liked this · 5 years ago
 -
sayhno reblogged this · 5 years ago
-
 navissetpmocia liked this · 5 years ago
 -
rennylurant reblogged this · 5 years ago
