Hi!

Hi!
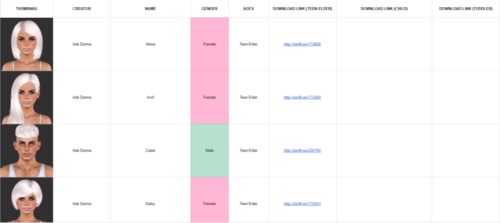
Yesterday an anon asked me if I had a list of my hair retextures so you can better see which hair is which.
I didn’t, but I know it’s been a pain in the ass to download any of my hairs without pictures, so I’ve compiled every single hair I’ve done into this google spreadsheet.
The hairs have been sorted alphabetically by creator and color coded according to gender.
I hope this is useful!
► View: GOOGLE DOCS
More Posts from Yvonnestarr and Others
![[cw]sittingpose](https://64.media.tumblr.com/90a754c312cd3816c384c90b5acadd7a/abbdf4bff9616f05-96/s500x750/f73d29bf586b751f2153a242495bbe272f2c4dd2.jpg)
[cw]sittingpose
5 poses.
non poselist.
codes a_sittingpose_1-5
Please, if you upload my work to other sites, indicate the source.
DL (FREE ACCESS 06/02/2023)
My tumblr with edit screenshots @chamomilewine
@emilyccfinds @sssvitlanz @smfinds
Yan was having a mostly lovely conversation with this lady, when some rude ass made it awkward.
Aurora

House with two double bedrooms, two bathrooms, a TV room, a living room, a kitchen, an outdoor area with a swimming pool, and a garage for one car. I hope you have fun!
Lunasims_
Price Unfurnished: 90000
Price Furnished: 180000
Furnished: Fully
Decorated: Throughout
Bedrooms: 2
Bathrooms: 2
Stories: 2
Lot Size (z): 30
Expansion packs: Late Night,Seasons,University,Into the Future
TSR Sims 3 Download


I thought I’d post a little guide to removing messed up content that was installed along with something else accidentally. There were a few files in my game that weren’t package files, and I hadn’t installed them as .sims3packs either.
With Nraas MasterController installed, I went into CAS and right-clicked the offending item. Doing that produces a yellow pop-up on the right side of the screen. In the pop-up, you should see the instance number of the item in question. Take a screenshot for reference. Close your game.
Open the first .dbc file from C:\Users\[yourUsername]\Documents\Electronic Arts\The Sims 3\DCCache in S3pe. Type in the instance number that you took the screenshot of into the Instance Number text box (in the lower right of S3pe). Then check the ‘filter active’ checkbox, and click ‘set’. If the offending item is in the .dbc file you’re checking, all other sub-files will disappear and you’ll see just that one (or two if there’s an accompanying thumbnail image). If all disappear, you’ll need to open the next .dbc file and check there. Right-click the filtered sub-item when you find it, and select ‘Deleted’. Save the .dbc. The bad item should be gone.
Please consider reblogging this for others’ benefit - it was driving me crazy until I discovered this solution, so hopefully it will alleviate someone else’s pain. ;)
<3
Do y'all use the Transmogrifier mod? If not, you really should. I consider it one of the top 10 "can't live without" mods in my game.
This is something I talked about on r/sims3 a lot back when I was insane enough to still post there and I was surprised how few people knew about it despite how useful it is.
Basically what it does is let you copy the functionality of one object to another object in two clicks. Turn your cheap bed into an expensive bed at no extra cost to your Sims. Turn your toilet into a bookcase. Turn a rug into a car. Turn your washing machine into a washing machine-shaped sculpture so your Sims will leave it alone. The possibilities are (almost) endless. Seriously! It looks like it's a super complicated mod and I'm sure under the hood it is, but it's so easy to use.
Open buy mode.
Ctrl shift click the object you want to copy the script of.
Click "copy script" and a little box will pop up at the top right to let you know it was successful.
Ctrl shift click the object you want to copy it to.
Click "change script" and the mod will automatically paste the script you just copied into the box.
Click "accept".


That's it! That's all there is to it! Anyone can do this!
But let me show you what you can do with it as a storyteller. 😏

I have the Pose Player sitting right in the middle of this picture. You know what it looks like by now. Little black movie clapboard with white stripes. Says "Pose Player" on it. Do you see it in this shot?
No.
You don't.
Do you know why?

Because it's this random pile of rocks now.
If you don't have this mod, you need to get this mod. I promise you that you will find more uses for it than you ever could have imagined.

so true

I decided to put together some gameplay mods and overrides I use primarily for storytelling! I recently had someone ask if I had a resources page on my blog, and while I don't (yet), I hope you and others find this cool list helpful. Full disclosure: there are several lists out there of must-have-mods, these are just ones that I use in my game that allow me to tell stories the way I'd like.
Overrides:
Food Textures - Utopia Sims (this creator stopped retexturing foods awhile ago, however all of their links are still active. I will get into actual food mods later, however I find these to be boss).
Stereo Dance Override - This overrides the basic stereo dances that come with the game. I believe there are 35 different dances (preview).
Earbuds Override - I use these which replace the one that came with the Fitness Pack.
Coffee Art (works with tea, too!) - Overrides the default black coffee or tea. Only choose one.
Kitchen Sponge - Just a cuter version of that yellow blob they use to wash dishes.
Cutting Board - Overrides the default cutting board in game, choose only one (I use version 1) its the little things, you know?
Knife Override - Same as above except just a cleaner version of the knife your sims are always flipping up in the air whilst prepping food. Again, the little things.
Billboard Overrides - Just a cool replacement for billboards that make for pretty cool pics.
Illness Blush Override - Gets rid of the spots and stripes that come with a sick sim and replaces it with a body blush. Realistic touch for storytelling when your pixels catch a cold or another nasty virus.
Dirty Plate Override - Because who leaves a clean plate behind after they eat?
Ceiling Override - Replaces the in game ceilings indoors with a variety of pretty cool swatches. Choose one but keep the folder somewhere so you can switch out when you want.
No gloves while boxing - I use this for realism. One of my OCs used boxing as a way to relieve stress. But he was a beast so, gloves? Nah.
Natural Knitting - If you're tired of the rainbow yarn, this override changes that to a neutral color.
EA Default Teeth Override - exactly what it says.
Beer instead of juice for coolers - This one I made myself lol. In my story, my OC's mom lived in a trailer park and was always outside watching TV next to a cooler. Well my OC had a drinking problem so I recolored the "juice" into a heineken. The things we do for our stories... anyway, you might get some use out of it.

Randoms:
No Bike Helmet (there are several of these, I use one by Scarlet but their website is giving me virus warnings now. Check lilmisssam and the guy I linked)
No ZZZs while sleeping
No Mosaic
No Music Notes
Toddler No Sparkle
Hide Lot Trait Head FX
I'll do a list of essential mods later!! Hope these come in clutch, friends!
Hi I'm wondering what you mean when you say you clean your cc? Thank you!
Oh Lordy, this is a long one but I will try to get it all in:
General points:
Once I download CC I rename it using ReNamer to remove any special sighs like &/%([ etc, as reading those can slow down the game
Then I will give each object a code before it like “Obj_kid_” or “CAS_top_af” so I know what it is
I don’t rename the actual file name, cause if I redownload it forgetting I already have it, then if it keeps the file name I will realize its a duplicate
Then I run all my new CC through s3rc to compress it
Then it goes in a “test” folder under mods first to make sure its not corrupt
If its okay, a copy goes into a Backup folder, where like the codes I have a file for everything, so CAS>Hair>AF, Build>Walls etc. This means I always know where to find my CC
Then I put it into CC Magic where again I have the same folder set-up. I NEVER manually merge, its a pain and you cannot undo it.
I NEVERRRRRRRRR install sims3packs, I always convert to .package using s3ce
Specific Points:
Patterns: I convert them to packages then fix them following this tutorial
Houses: I convert them to packages using s3ce, then I usually use dashboard to find the lot file and put that into my Library Folder, and IF (usually not the case) I want the CC from the houses I may look through the other package files. Usually I don’t as I will get a million duplicates, shit loads of clutter. Installing a house as sims3pack can mean up to 600 files installed! And if you install 2 houses you probably have like 200 duplicate files that are in both. Again, NEVER install sims3packs!
Clothing/Accesories: Now often creators don’t know about this method of keeping their file sizes down, so I open each bit of clothing in s3pe, delete ALL duplicate images. This will mess it up, so I then open them in TSRW, make sure to replace the missing images using “Browse” while also deleting any presets I don’t want or any stencils I dislike. This usually likes halves the file size! I will also make sure it is in all the categories I want and not for any silly categories or valid for random.
AF Clothes: So I made my own preg morph (EA’s bump is too small) so in addition to the above I actually remorph all my AF clothes to have a bigger bump ;)
Hair: Again, just check for correct categories
Makeup: I sort my makeup, so all nosemasks go into Eyeliner, all eyebags go into Eyeshadow, all babyhairs go into Lipstick. Then, as creators often forget, I enable makeup for teens and elders too. For Blush, I also enable it for toddlers and kids.
Contacts: I enable them for kids and toddlers if creators have forgotten
Poses: I have a special folder for poses, and if they are not poselist enabled I will save the preview picture online and rename it to the pose code, so I have a sorted folder with photos of all my poses
Skins: Each skin is opened in Skininator and given my ramps and a special icon with the name of the skin (I hate berry ramps and don’t need 5 ramps per skin). In this way my skin panel is very organized. In addition, I use “COMPACT SAVE” in skiniator. I dunno why creators don’t but it drastically reduced the file size. I saved 3GB of CC just by resaving my skins….
Objects: Just make sure they are categorized the way I want. I also remove half the stuff from “Misc Decor” and stick it somewhere else. Aka, pillows/blankets go into “sculpture” for me and are also sorted into “beds” if they are for beds.
My mods folder used to be a mess, with merged packages, duplicates and a lot of CC I didn’t use. It had 36GB. Now I am down to 10GB literally just by cleaning my CC. I lost 6GB alone just by removing duplicate _IMG files and compressing my CC and skins….
Obviously most people don’t have the patience to do all the above, but hey, I load my game fully in super speed, I don’t have any lag whatsoever and in build/buy mode my categories load faster cause I don’t have loads of CC I don’t need.
Oh yeah, my FAQ page also tells you ways to get your game to run faster ;)
Hope this helps you Nonny!

How to convert CAP patterns into 100% working package files
(tutorial originally by @ohmysims, I just copied it, put the screenshots back, and wrote it without the “keep reading” cutaway that’s in every reblog I found. Click on images to enlarge them. See my notes at the end. Wayback Machine backup)
——————-
Thanks to this god-blessed tutorial, I’ve been able to convert some patterns made with CAP into 100% working package files. And I thought I should keep a record of the process here for future reference. I only rewrote the exact same tutorial with pictures and this tut is really simple.
I. Convert a pattern made with Create-a-Pattern tool into package format. (Read this tutorial if you don’t know how to convert.)
II. GIVE THE PATTERN A NEW RESOURCE NAME
The cause of the notorious Materializing Materials error is that ALL the patterns made with CAP has the SAME instance value (*). So, the solution is to give each pattern a unique instance value.

Open the file with S3PE. Double click on the _IMG tags with instance of 7edd20633162e6ce.
Click [Use resource name]
Write down any unique name
Click FNV64 button. It will regenerate new instance value.
The instance has changed to 0xAEE5CFA2DED89772. Copy the value except for the first two letters (0x).
III. EDIT XML TO HAVE THE NEW RESOURCE NAME


Right-click the _XML that has the type 0x0333406C and select [Notepad] so you can edit the xml file.
Replace 7edd20633162e6ce with the value you copied in Step II-5. In this case it is AEE5CFA2DED89772.
Save the XML file and close the notepad.
Select YES to commit change AND SAVE.
——————-
Notes by @sweetdevil-sims:
This tutorial applies to patterns that were converted from .sims3pack to .package format.
(*) this is NOT the reason for the Materializing Materials error. The issue described and fixed by @ohmysims. manifests as multiple patterns being replaced by the image of a single pattern. The MM error is caused by an extra space where there shouldn’t be one. For more info, check these resources:
MTS thread with several ways to fix the MM error
Tumblr post with a tutorial for fixing the MM error
The fix for the “Materializing Materials” error is independent of the one for the Create-a-Pattern conflicting resources error (which is described in the tutorial above).


TS3 “cannot change style” glitch: A SOLUTION
I was very happily trying jools-simming’s nice tutorial when the dreaded “cannot change style” occured. Saying that I was extremely frustrated is an understatement, but as I discovered by the usual trial-and-error method, there’s a way to fix it!
Make sure you have Nraas’ Debug Enabler installed.
In Live Mode, click on the not-recolorable counter/island/object and select Nraas > Debug Enabler > Options: [object name].
Then select Object > Reset Textures > This object.
Et voilà, you can now use CAST again and change the style of the object as you wish.
Publishing this because who knows, it could be useful to someone else experiencing the same (annoying) glitch :)
-
 barbieccfinds liked this · 1 month ago
 -
 magicfinds reblogged this · 2 months ago
 -
 officialmkentertainment liked this · 2 months ago
 -
 alaskansimsfavoritecc reblogged this · 3 months ago
 -
 boneangel777 liked this · 4 months ago
 -
 ightcools liked this · 6 months ago
 -
 aiikrstn-arkive reblogged this · 7 months ago
 -
 garushialaah liked this · 7 months ago
 -
 lovefromwisteria liked this · 9 months ago
 -
 yslvanille liked this · 9 months ago
 -
 pixeltraash reblogged this · 9 months ago
 -
pixeltraash liked this · 9 months ago
-
 lynnfinds reblogged this · 9 months ago
 -
 moonlynn liked this · 9 months ago
 -
 queenlova101 liked this · 10 months ago
 -
 lrdkk99 liked this · 10 months ago
 -
 eggcio reblogged this · 10 months ago
 -
 m00n-ch11d liked this · 1 year ago
 -
 simmmmms4 reblogged this · 1 year ago
 -
 youngqueencrusade liked this · 1 year ago
 -
 suteflower liked this · 1 year ago
 -
 mediocresimmerofoz liked this · 1 year ago
 -
 thesirensims liked this · 1 year ago
 -
 saashaam liked this · 1 year ago
 -
 melonkneesimblr liked this · 1 year ago
 -
 smiles-frowns-laughs-tears liked this · 1 year ago
 -
 monsterslover49 liked this · 1 year ago
 -
 grimattic liked this · 1 year ago
 -
 harborcove liked this · 1 year ago
 -
 lunarrru reblogged this · 1 year ago
 -
lunarrru liked this · 1 year ago
-
 cterasitryte liked this · 1 year ago
 -
 lenas2s3finds reblogged this · 1 year ago
 -
 attradanoghau liked this · 1 year ago
 -
 simergy liked this · 1 year ago
 -
 s3stuff reblogged this · 1 year ago
 -
 bella1050 reblogged this · 1 year ago
 -
aiikrstn-arkive reblogged this · 1 year ago
-
 mels-ts3ccfinds liked this · 1 year ago
 -
 emoccfinds liked this · 1 year ago
 -
 lost-meadow liked this · 1 year ago
 -
 eternalccfinds reblogged this · 1 year ago
