I Decided To Put Together Some Gameplay Mods And Overrides I Use Primarily For Storytelling! I Recently

I decided to put together some gameplay mods and overrides I use primarily for storytelling! I recently had someone ask if I had a resources page on my blog, and while I don't (yet), I hope you and others find this cool list helpful. Full disclosure: there are several lists out there of must-have-mods, these are just ones that I use in my game that allow me to tell stories the way I'd like.
Overrides:
Food Textures - Utopia Sims (this creator stopped retexturing foods awhile ago, however all of their links are still active. I will get into actual food mods later, however I find these to be boss).
Stereo Dance Override - This overrides the basic stereo dances that come with the game. I believe there are 35 different dances (preview).
Earbuds Override - I use these which replace the one that came with the Fitness Pack.
Coffee Art (works with tea, too!) - Overrides the default black coffee or tea. Only choose one.
Kitchen Sponge - Just a cuter version of that yellow blob they use to wash dishes.
Cutting Board - Overrides the default cutting board in game, choose only one (I use version 1) its the little things, you know?
Knife Override - Same as above except just a cleaner version of the knife your sims are always flipping up in the air whilst prepping food. Again, the little things.
Billboard Overrides - Just a cool replacement for billboards that make for pretty cool pics.
Illness Blush Override - Gets rid of the spots and stripes that come with a sick sim and replaces it with a body blush. Realistic touch for storytelling when your pixels catch a cold or another nasty virus.
Dirty Plate Override - Because who leaves a clean plate behind after they eat?
Ceiling Override - Replaces the in game ceilings indoors with a variety of pretty cool swatches. Choose one but keep the folder somewhere so you can switch out when you want.
No gloves while boxing - I use this for realism. One of my OCs used boxing as a way to relieve stress. But he was a beast so, gloves? Nah.
Natural Knitting - If you're tired of the rainbow yarn, this override changes that to a neutral color.
EA Default Teeth Override - exactly what it says.
Beer instead of juice for coolers - This one I made myself lol. In my story, my OC's mom lived in a trailer park and was always outside watching TV next to a cooler. Well my OC had a drinking problem so I recolored the "juice" into a heineken. The things we do for our stories... anyway, you might get some use out of it.

Randoms:
No Bike Helmet (there are several of these, I use one by Scarlet but their website is giving me virus warnings now. Check lilmisssam and the guy I linked)
No ZZZs while sleeping
No Mosaic
No Music Notes
Toddler No Sparkle
Hide Lot Trait Head FX
I'll do a list of essential mods later!! Hope these come in clutch, friends!
More Posts from Yvonnestarr and Others

… a basement with windows
1) First build a foundation with the foundation tool (NOT the basement tool!).
Now make the foundation hollow where you want your basement to be leaving just the outer tile of it.

2) Make sure to switch off auto-roof and to remove all auto roofs.

3. On the ground, use the stair tool to lower the terrain. Hold shift to control the number of stair steps. I usually do it in 3 sets of 4 steps as I cannot count to 12 :P (A regular wall is 16 steps high, a foundation is 4 steps high per default, so you need to lower the terrain 12 steps).

4. Remove the stairs and use the terrain flatten tool to lower the ground in all of your basement. Start at the lowered tile and draw the tool towards the foundation walls. Lower it only to the inner walls of the foundation so that the terrain on the outside is not affected. The foundation will hide the slope.


If you did it correctly, you can now place walls without an error message or need of cfe.

5. Best make your floor plan now and place your stairs, they sometimes are a bit finicky.

6. Now use the foundation tool to remove the parts of the foundation, where you want to have your windows

and replace them with walls

Now you can place whatever windows you want. Just make sure that the green arrows point inwards (in direction of the lowered terrain), or the window might “jump” to adjust to regular terrain height.
You can decorate as you want, you can also place doors instead of windows and make a little “sunk patio” if you want to.

Into The Future Soil Rugs With Additional Invisible Presets - default replacement

This was requested by @echoweaver (sorry it took me so long to upload!). I added a second invisible preset to all five ITF soil rugs so they are a bit more versatile. I decided against replacing the original texture with an empty one because I didn't want it to mess up pre-built houses in Oasis Landing, so instead I added a new preset. Because of that, I had to edit the .OBJD resources along with the textures, so if you're using these hiders by @bioniczombie, make sure to delete the hiders for these rugs!
Download (google drive)
Alternative download (dropbox)
Requires Into The Future. Credits to EA for the textures and meshes.


146 conversions from some of kativip’s legend series sets. In sculptures for §0.
They were made for my legacy so they’re lazy and a bit shit, the main issue being that half of them have a redundant menu for lighting options ingame 🤷 I figured someone might get some use of them so they’re being uploaded as is, feel free to change/edit what you need.
You can download everything merged or separately with shitty previews, or I’ve split them into two styles if you’re just into half.
eta: gamergirlbones has kindly made a collection file which has been added to the main downloads folder.
Download (SFS)


TF can use AF clothes neck sliders
Be warned, these sliders are NOT perfect, I have yet to find a way to do this. Using Master Controller you can enable AF clothing for TF. They have a very similar neck shape anyway (bottom pic). The remaining issue is the shading seam (which could only be fixed by making a default replacement teen head). However, I feel you can edit this out pretty easily in photoshop. The biggest issue was that the fat slider was very different (top left pic) so you got a massive gap. So I made a slider that kinda fixes this gap (top right), so for your slightly more curvy teens you can use AF clothes without a massive neck gap. Found under general head sliders.
Simfileshare
Do y'all use the Transmogrifier mod? If not, you really should. I consider it one of the top 10 "can't live without" mods in my game.
This is something I talked about on r/sims3 a lot back when I was insane enough to still post there and I was surprised how few people knew about it despite how useful it is.
Basically what it does is let you copy the functionality of one object to another object in two clicks. Turn your cheap bed into an expensive bed at no extra cost to your Sims. Turn your toilet into a bookcase. Turn a rug into a car. Turn your washing machine into a washing machine-shaped sculpture so your Sims will leave it alone. The possibilities are (almost) endless. Seriously! It looks like it's a super complicated mod and I'm sure under the hood it is, but it's so easy to use.
Open buy mode.
Ctrl shift click the object you want to copy the script of.
Click "copy script" and a little box will pop up at the top right to let you know it was successful.
Ctrl shift click the object you want to copy it to.
Click "change script" and the mod will automatically paste the script you just copied into the box.
Click "accept".


That's it! That's all there is to it! Anyone can do this!
But let me show you what you can do with it as a storyteller. 😏

I have the Pose Player sitting right in the middle of this picture. You know what it looks like by now. Little black movie clapboard with white stripes. Says "Pose Player" on it. Do you see it in this shot?
No.
You don't.
Do you know why?

Because it's this random pile of rocks now.
If you don't have this mod, you need to get this mod. I promise you that you will find more uses for it than you ever could have imagined.

How to use DXVK with The Sims 3
Have you seen this post about using DXVK by Criisolate? But felt intimidated by the sheer mass of facts and information?
@desiree-uk and I compiled a guide and the configuration file to make your life easier. It focuses on players not using the EA App, but it might work for those just the same. It’s definitely worth a try.
Adding this to your game installation will result in a better RAM usage. So your game is less likely to give you Error 12 or crash due to RAM issues. It does NOT give a huge performance boost, but more stability and allows for higher graphics settings in game.
The full guide behind the cut. Let me know if you also would like it as PDF.
Happy simming!
Disclaimer and Credits
Desiree and I are no tech experts and just wrote down how we did this. Our ability to help if you run into trouble is limited. So use at your own risk and back up your files!
We both are on Windows 10 and start the game via TS3W.exe, not the EA App. So your experience may differ.
This guide is based on our own experiments and of course criisolate’s post on tumblr: https://www.tumblr.com/criisolate/749374223346286592/ill-explain-what-i-did-below-before-making-any
This guide is brought to you by Desiree-UK and Norn.
Compatibility
Note: This will conflict with other programs that “inject” functionality into your game so they may stop working. Notably
Reshade
GShade
Nvidia Experience/Nvidia Inspector/Nvidia Shaders
RivaTuner Statistics Server
It does work seamlessly with LazyDuchess’ Smooth Patch.
LazyDuchess’ Launcher: unknown
Alder Lake patch: does conflict. One user got it working by starting the game by launching TS3.exe (also with admin rights) instead of TS3W.exe. This seemed to create the cache file for DXVK. After that, the game could be started from TS3W.exe again. That might not work for everyone though.
A word on FPS and V-Sync
With such an old game it’s crucial to cap framerate (FPS). This is done in the DXVK.conf file. Same with V-Sync.
You need
a text editor (easiest to use is Windows Notepad)
to download DXVK, version 2.3.1 from here: here: https://github.com/doitsujin/DXVK/releases/tag/v2.3.1 Extract the archive, you are going to need the file d3d9.dll from the x32 folder
the configuration file DXVK.conf from here: https://github.com/doitsujin/DXVK/blob/master/DXVK.conf. Optional: download the edited version with the required changes here.
administrator rights on your PC
to know your game’s installation path (bin folder) and where to find the user folder
a tiny bit of patience :)
First Step: Backup
Backup your original Bin folder in your Sims 3 installation path! The DXVK file may overwrite some files! The path should be something like this (for retail): \Program Files (x86)\Electronic Arts\The Sims 3\Game\Bin (This is the folder where also GraphicsRule.sgr and the TS3W.exe and TS3.exe are located.)
Backup your options.ini in your game’s user folder! Making the game use the DXVK file will count as a change in GPU driver, so the options.ini will reset once you start your game after installation. The path should be something like this: \Documents\Electronic Arts\The Sims 3 (This is the folder where your Mods folder is located).
Preparations
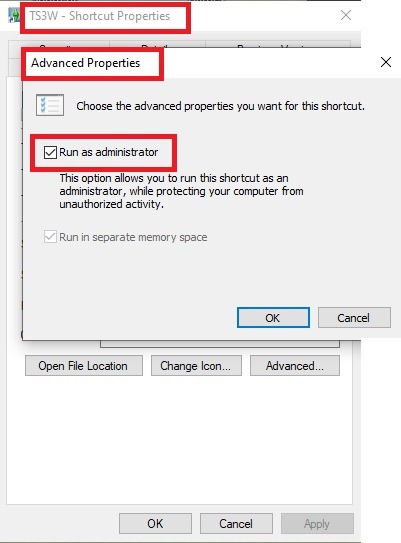
Make sure you run the game as administrator. You can check that by right-clicking on the icon that starts your game. Go to Properties > Advanced and check the box “Run as administrator”. Note: This will result in a prompt each time you start your game, if you want to allow this application to make modifications to your system. Click “Yes” and the game will load.
2. Make sure you have the DEP settings from Windows applied to your game.
Open the Windows Control Panel.
Click System and Security > System > Advanced System Settings.
On the Advanced tab, next to the Performance heading, click Settings.
Click the Data Execution Prevention tab.
Select 'Turn on DEP for all programs and services except these”:
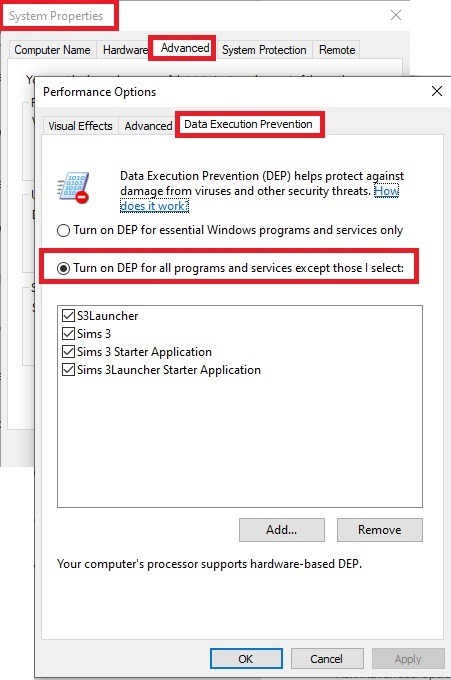
Click the Add button, a window to the file explorer opens. Navigate to your Sims 3 installation folder (the bin folder once again) and add TS3W.exe and TS3.exe.
Click OK. Then you can close all those dialog windows again.
Setting up the DXVK.conf file
Open the file with a text editor and delete everything in it. Then add these values:
d3d9.textureMemory = 1
d3d9.presentInterval = 1
d3d9.maxFrameRate = 60
d3d9.presentInterval enables V-Sync,d3d9.maxFrameRate sets the FrameRate. You can edit those values, but never change the first line (d3d9.textureMemory)!
The original DXVK.conf contains many more options in case you would like to add more settings.

A. no Reshade/GShade
Setting up DXVK
Copy the two files d3d9.dll and DXVK.conf into the Bin folder in your Sims 3 installation path. This is the folder where also GraphicsRule.sgr and the TS3W.exe and TS3.exe are located. If you are prompted to overwrite files, please choose yes (you DID backup your folder, right?)
And that’s basically all that is required to install.
Start your game now and let it run for a short while. Click around, open Buy mode or CAS, move the camera.
Now quit without saving. Once the game is closed fully, open your bin folder again and double check if a file “TS3W.DXVK-cache” was generated. If so – congrats! All done!
Things to note
Heads up, the game options will reset! So it will give you a “vanilla” start screen and options.
Don’t worry if the game seems to be frozen during loading. It may take a few minutes longer to load but it will load eventually.
The TS3W.DXVK-cache file is the actual cache DXVK is using. So don’t delete this! Just ignore it and leave it alone. When someone tells to clear cache files – this is not one of them!
Update Options.ini
Go to your user folder and open the options.ini file with a text editor like Notepad.
Find the line “lastdevice = “. It will have several values, separated by semicolons. Copy the last one, after the last semicolon, the digits only. Close the file.
Now go to your backup version of the Options.ini file, open it and find that line “lastdevice” again. Replace the last value with the one you just copied. Make sure to only replace those digits!
Save and close the file.
Copy this version of the file into your user folder, replacing the one that is there.
Things to note:
If your GPU driver is updated, you might have to do these steps again as it might reset your device ID again. Though it seems that the DXVK ID overrides the GPU ID, so it might not happen.
How do I know it’s working?
Open the task manager and look at RAM usage. Remember the game can only use 4 GB of RAM at maximum and starts crashing when usage goes up to somewhere between 3.2 – 3.8 GB (it’s a bit different for everybody).
So if you see values like 2.1456 for RAM usage in a large world and an ongoing save, it’s working. Generally the lower the value, the better for stability.
Also, DXVK will have generated its cache file called TS3W.DXVK-cache in the bin folder. The file size will grow with time as DXVK is adding stuff to it, e.g. from different worlds or savegames. Initially it might be something like 46 KB or 58 KB, so it’s really small.
Optional: changing MemCacheBudgetValue
MemCacheBudgetValue determines the size of the game's VRAM Cache. You can edit those values but the difference might not be noticeable in game. It also depends on your computer’s hardware how much you can allow here.
The two lines of seti MemCacheBudgetValue correspond to the high RAM level and low RAM level situations. Therefore, theoretically, the first line MemCacheBudgetValue should be set to a larger value, while the second line should be set to a value less than or equal to the first line.
The original values represent 200MB (209715200) and 160MB (167772160) respectively. They are calculated as 200x1024x1024=209175200 and 160x1024x1024=167772160.
Back up your GraphicsRules.sgr file! If you make a mistake here, your game won’t work anymore.
Go to your bin folder and open your GraphicsRules.sgr with a text editor.
Search and find two lines that set the variables for MemCacheBudgetValue.
Modify these two values to larger numbers. Make sure the value in the first line is higher or equals the value in the second line. Examples for values: 1073741824, which means 1GB 2147483648 which means 2 GB. -1 (minus 1) means no limit (but is highly experimental, use at own risk)
Save and close the file. It might prompt you to save the file to a different place and not allow you to save in the Bin folder. Just save it someplace else in this case and copy/paste it to the Bin folder afterwards. If asked to overwrite the existing file, click yes.
Now start your game and see if it makes a difference in smoothness or texture loading. Make sure to check RAM and VRAM usage to see how it works.
You might need to change the values back and forth to find the “sweet spot” for your game. Mine seems to work best with setting the first value to 2147483648 and the second to 1073741824.
Uninstallation
Delete these files from your bin folder (installation path):
d3d9.dll
DXVK.conf
TS3W.DXVK-cache
And if you have it, also TS3W_d3d9.log
if you changed the values in your GraphicsRule.sgr file, too, don’t forget to change them back or to replace the file with your backed up version.
OR
delete the bin folder and add it from your backup again.
B. with Reshade/GShade
Follow the steps from part A. no Reshade/Gshade to set up DXVK.
If you are already using Reshade (RS) or GShade (GS), you will be prompted to overwrite files, so choose YES. RS and GS may stop working, so you will need to reinstall them.
Whatever version you are using, the interface shows similar options of which API you can choose from (these screenshots are from the latest versions of RS and GS).
Please note:
Each time you install and uninstall DXVK, switching the game between Vulkan and d3d9, is essentially changing the graphics card ID again, which results in the settings in your options.ini file being repeatedly reset.
ReShade interface
Choose – Vulcan

Click next and choose your preferred shaders.
Hopefully this install method works and it won't install its own d3d9.dll file.
If it doesn't work, then choose DirectX9 in RS, but you must make sure to replace the d3d9.dll file with DXVK's d3d9.dll (the one from its 32bit folder, checking its size is 3.86mb.)
GShade interface
Choose –
Executable Architecture: 32bit
Graphics API: DXVK
Hooking: Normal Mode

GShade is very problematic, it won't work straight out of the box and the overlay doesn't show up, which defeats the purpose of using it if you can't add or edit the shaders you want to use.
Check the game's bin folder, making sure the d3d9.dll is still there and its size is 3.86mb - that is DXVK's dll file.
If installing using the DXVK method doesn't work, you can choose the DirectX method, but there is no guarantee it works either.
The game will not run with these files in the folder:
d3d10core.dll
d3d11.dll
dxgi.dll
If you delete them, the game will start but you can't access GShade! It might be better to use ReShade.
Some Vulcan and DirectX information, if you’re interested:
Vulcan is for rather high end graphic cards but is backward compatible with some older cards. Try this method with ReShade or GShade first.
DirectX is more stable and works best with older cards and systems. Try this method if Vulcan doesn't work with ReShade/GShade in your game – remember to replace the d3d9.dll with DXVK's d3d9.dll.
For more information on the difference between Vulcan and DirectX, see this article:
https://www.howtogeek.com/884042/vulkan-vs-DirectX-12/


#ccforhayley This time featuring the “You Are A Free Cow + aminovas’s Brown Guernsey Dafult Cow Skin”; I decided to do two things, the first one was to Realize the wish of my friend mspoodle1 and the second one was to release my first item for this great simmer Hayley ♥ This has been a Beautiful campaign and I hope that she can reach the goal :]
As you see everywhere in this post, this is a Default Replacement of two things, the Milkin’ it Dairy Corral from the Store and its Cows! I could not have made it without the help of Ami, she’s GREAT!
I highly suggest you to visit my blog and download there, however if you’re an adventurous and want to take risks, go ahead and download here :] LOL
Donate to Hayley and feel the Power! Visit my Blogger — Details, Pictures, Mirror Downloads and Useful Links. Download: Milking’ it Dairy Corral Default Replacement Download: Aminova’s Brown Guernsey Dafult Cow Skin
Remember that you need the corral first! If the links do not work then you’ll have to go to blogger
Some unused/placeholder/test animations from TS3! I thought they were pretty interesting, especially the bicycle ones which meant sims were able to get on them properly at one point before they scratched it.
Aurora

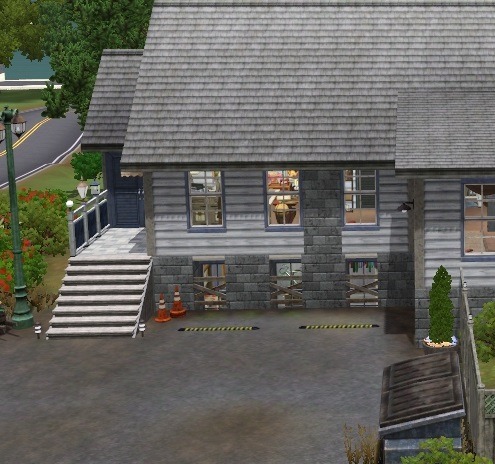
House with two double bedrooms, two bathrooms, a TV room, a living room, a kitchen, an outdoor area with a swimming pool, and a garage for one car. I hope you have fun!
Lunasims_
Price Unfurnished: 90000
Price Furnished: 180000
Furnished: Fully
Decorated: Throughout
Bedrooms: 2
Bathrooms: 2
Stories: 2
Lot Size (z): 30
Expansion packs: Late Night,Seasons,University,Into the Future
TSR Sims 3 Download
I think if you put someone from 2005 onto a website from 2025 without the slow creep we've lived through, they'd think they had malware
-
 swaggmin reblogged this · 2 months ago
 -
swaggmin liked this · 2 months ago
-
 blutterfly-trait liked this · 3 months ago
 -
 ts4alphafinds reblogged this · 3 months ago
 -
 alkaloidmods liked this · 3 months ago
 -
 nicknamed-her-the-bolter liked this · 3 months ago
 -
 skysbl0g liked this · 5 months ago
 -
 exvamps liked this · 5 months ago
 -
 sickfade liked this · 5 months ago
 -
 miu-sims liked this · 6 months ago
 -
 fullyvirtualtale liked this · 6 months ago
 -
 lazygalaxycloud-blog liked this · 6 months ago
 -
 keepingupwiththekardacheyennes liked this · 7 months ago
 -
 syntacticerrortxt liked this · 7 months ago
 -
 pmix01 reblogged this · 7 months ago
 -
 mzellepers liked this · 8 months ago
 -
 ravioliparty-blog1 liked this · 8 months ago
 -
 psychicpaperempathpainter-blog liked this · 8 months ago
 -
 swissbitms liked this · 9 months ago
 -
 spikestiel liked this · 9 months ago
 -
 straightouttadisney liked this · 9 months ago
 -
 scarabsims reblogged this · 9 months ago
 -
 lksh2 liked this · 9 months ago
 -
 novagyrl liked this · 9 months ago
 -
 anaesthes liked this · 9 months ago
 -
 shamelessbanditclamduck liked this · 10 months ago
 -
 kitteaasstuff liked this · 10 months ago
 -
 hyruleaantom liked this · 10 months ago
 -
 dofadalinecc reblogged this · 10 months ago
 -
 yearbookfinds reblogged this · 11 months ago
 -
 theyearbook liked this · 11 months ago
 -
 nagiqie reblogged this · 11 months ago
 -
 the-moonchildjin liked this · 11 months ago
 -
 letssgolesbians liked this · 11 months ago
 -
 ellyzsie liked this · 11 months ago
 -
ellyzsie reblogged this · 11 months ago
-
 aquaccfindings liked this · 11 months ago
 -
 green-04 liked this · 11 months ago
 -
 robynnnm liked this · 11 months ago
 -
 brezzysimmer liked this · 1 year ago
 -
 pepeunbothered liked this · 1 year ago
 -
 zamzam6372 liked this · 1 year ago
 -
 seasonalccfinds reblogged this · 1 year ago
 -
 suhweetea liked this · 1 year ago
 -
 s-hadow liked this · 1 year ago
 -
 simmerprince liked this · 1 year ago
 -
 honeybea-sims liked this · 1 year ago
 -
 ziggysims liked this · 1 year ago
