Back To School: Your Help Guide To Waking Up Early
Back to School: Your Help Guide to Waking up Early
1. Set your alarm for waking up early, a week or more before school starts. This will help you get into the habit of waking up earlier and you will ease yourself into it so that by the first day back you can wake up feeling refreshed instead of grumpy
2. Keep your phone away from you when you sleep… on the other side of the room if possible or maybe inside the drawer of your bedside table. This forces you to actually wake up and be attentive in order to turn off that alarm instead of just being able to roll over and tapping snooze.
3. Get out of your bed and open the curtains or blinds to let sunlight in, it will energize you and again force you to wake up. Plus, who doesn’t like watching the warm rays of the rising sun, if you are a nature lover or you just enjoy watching the sunrise this will even help you start your day on a positive and productive note.
4. Try to set yourself a regimen, I know this is hard because of all the homework and assignments and jobs or extracurriculars that accumulate over the school year but if you put in the effort to set yourself a regular sleep time each night you will definitely see the results.
5. Plan the night before. If there’s anything that you can get done fairly quickly at night so that you have more time to do things in the morning instead of rushing yourself because you’re rampaging through the house trying to find the pair of jeans that you thought was in your closet. The benefit of this is that your subconcious and concious mind will both feel at ease knowing that you are more relaxed about the day to come and it will allow for a better sleep which in turn will help you wake up on time.
Do you guys have any tips for waking up earlier in the morning for school? Reply to this post!
xo
More Posts from Marathon-notasprint and Others

This is how heart works <3 <3 <3
🌠Guide to Study Guides
Hi, so I make study guides when I revise as referenced to in this post/ask here. So in this post I’m gonna try and show you guys how I go about making a study guide like I did for sociology or philosophy, both of which are shown in that link there. This is my method so it probably is really complicated and stuff, I know for sure that my guides are overly “fancy” and whatnot, but it makes me happy and I guess the extra effort does pay off, at least aesthetically.

Okay, yes, let’s begin…
1. Visit colourlovers.com to choose a colour scheme for your guide!
I’ve provided the link to the most loved palette page which is where I choose my colour scheme. In Word, you change your colour scheme by choosing Page Layout > Colour > Create New Theme Colours and you go from there!! I basically started making my own colour schemes after I went through all the ones already provided by Word, but to be honest you can start with those since they’re really nice too. I recommend: Apex, Composite, Foundry, Metro, Module, Slipstream and Solstice.
If you do want to make your own colour scheme, you should get ready to do some fiddling around because I still don’t get this really. Making a colour scheme on Word requires at least 10 colours, that’s okay because on colourlovers, palettes are usually made up of 5 so just choose 2 that you think suit each other :) After this you need to input the hex codes manually into the popup window of “Create New Theme Colours” starting from Text/Background - Dark 2 to Accent 6. The hex codes are provided by individually clicking on the colours.

So that’s what one of my self-made colour schemes look like, you should be aware that Word usually randomises these? I don’t really know how it works but basically sometimes the colours won’t necessarily be in that order when you go to select it to specifically colour a word, if that’s the case you’ll just have to fiddle and change it around to choose your preferred colour in the scheme. Also not all the colours will go into the textbox options so be aware of that too!
2. Font shopping
Next if I haven’t updated the font collection for a while I’ll go to dafont.com because I just…really like jazzy fonts. From here I’ll either check out “All The New Fonts” (option is at the bottom of the front page) or go to the menu titled Script, and check out Handwritten, Fancy or Various. Here are some links to asks about fonts that I’ve used in my shown study guides or just fonts I like in general!! 1 and 2.
Okay so as you can see in the Disney Princess Document/Sociology Study Guide I used at least five fonts, I usually average around 4? Once downloaded choosing fonts that you like for your guide is basically a trial and error process, I choose any fonts that I like or haven’t recently used or just recently downloaded that I want to try out and I match them with what I think would look nice! Here I’ll show you why I use around four or more fonts:

In order to make the process of typing up your guide with these fonts easier, highlight one, so for example the Big Title, right click > Styles > Save Selection as New Quick Style…and it’ll be available to you in the Quick Styles menu underneath a heading like Style1. After this to easily change a font to that particular font, just highlight, go to Quick Styles, choose that particular font and bam! I try to make my fonts match, so if one is bold, I aim for at least a thick-ish font in the rest of my choices. Now to go through what they’re for.
So obviously the Big Title is for your BIG TITLE that could be your subject or your main topic, so if it was sociology (like in the first pic) I would use it for Key Concepts and Methods, I might later reuse the font for another BIG TOPIC, but really…it’s your choice.
The Subtitle is what I would use for well…your subtitle, so following my first pic it would be the subtitle of Positivism versus Interpretivism…Three Key Concepts, etc. The heading is therefore for the headings under the subtitle (this is only if you’re making a guide for something that is like intensely sectioned, like sociology), so I’d use that font for where it says Reliability etc.

It just brings something extra on top of all the later colour you’ll probably use, although I only use it for like a set theme, so dates, names etc. and only either a word or a phrase, if it gets too long it’ll just mess up the format of your sentence.
3. Okay, so you’re happily typing away but now you wanna add the speech bubbles, you wanna add the textboxes and the Disney princesses! Don’t worry my friend, I got you.
Basically I add textboxes or speech bubbles for 2 reasons, either to highlight a particular point or differentiate a piece of information from the rest OR to fill up space because of some particular study guide pet peeves.
Pet peeve, when a particular sentence ends like this:

I know it might seem like a bit much, but to be honest, it throws the whole format of a block of text if a bit of it ends with like this huge expanse of space. So in this instance I either will insert a photo or I’ll try and delete a word or add a word until I’m satisfied. THIS IS JUST ME, IF YOU DON’T CARE OBVIOUSLY IT DOESN’T MATTER 👌
You can insert speech bubbles by going to Insert > Shapes > Callouts (you’ll find it there) and textboxes by going to Insert > Textbox > Draw Textbox (I draw mine since I don’t tend to use the ones provided by Word. With the speech bubbles they actually act as textboxes, but I’ve found that using it in that way takes up a lot of space as in your words won’t necessarily take up the whole of the speech bubble so it simply expands and it’s all messy. Therefore, I put a textbox on the top of it, make the background and outline transparent and type there to save space.
Here are some examples of when I’ve used photos or speech bubbles to fill up space or solve the annoying sentence problem.


I generally tend to have themes around what photos I use, so for example my sociology guide was largely based on Disney/Cartoon Network depending on how I felt and I’d use particular photos to emphasise a point and make it more entertaining I guess… As you can see the speech bubbles with LSP are for filler purposes but also to differentiate information, it just adds something extra really. Also because I continuously indent my guides (since I type with bullet points) as they get further and further in they’ll leave gaps that can be filled with photos, seen here with what I’ve done with LSP. Also with the photos that I choose, I search for the ones with a grey, checkered background which means that they’ll be transparent, allowing me to put them in front of a textbox or just makes overall design easier, it means that I can have the Gangreen Gang in front of that textbox like that :)
4. Final step, going over your guide when it’s done.
I then go through the guide again and highlight, underline, italicise, bold, colour etc. particular points of a sentence/paragraph that I want to remember! I do this in order of the colour scheme that appears in the menu when you click to change the colour of a font, so I’ll highlight particular words for a portion of a paragraph before changing, achieving a sort of a rainbow effect, like so:

These are from my history study guide, where I made front covers (which I don’t usually do…I feel like all my guides really depend on how I feel and my subject). This is what they looked like if you wanted an idea for something you could do too!!

Um..so that’s pretty much it! I’ve tried to make this as extensive and as in-depth as I can, I’m sorry it ended up SO LONG, I’ve never made a post this long before so I’m really sorry. I would put it under a read more but I feel like the font on my blog is too tiny for when it’s redirected and I’d much rather not have everyone straining their eyes. If you guys have any more questions, please feel free to ask. If you want any more examples or screen shots of my guides, just hit up my ask box!! Sorry for this taking so long and being so long once again and I really hope it helps you all in at least some way!
***As an addition, those washi tapes you see are digital washi tapes which you can get just by googling! I use the free ones which only require a lil’ searching for. Also please tag me in whatever study guides you make and upload, I’d love to see them!!
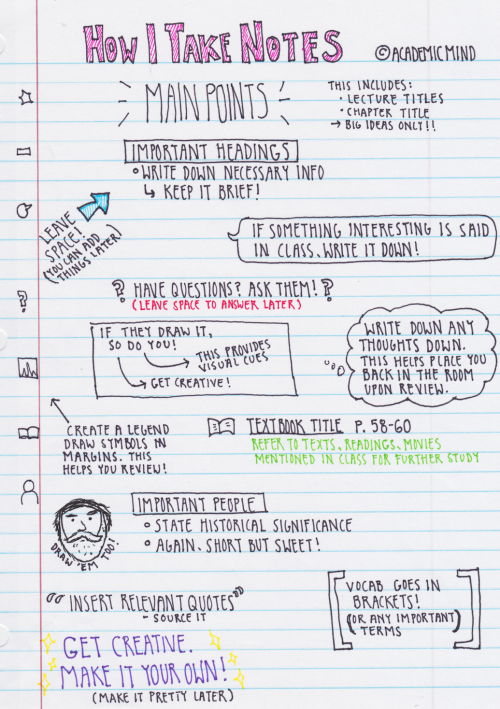
Some of you have requested that I show you my note taking technique. This is in no way a proven technique, but it really works for me and many of my professors have applauded my structure. So try it, and if you like it and it works for you, great! If not, I commend you on having a more structured system! These are my general rules when I take notes:
1. Leave space. A lot of space. While going through previous notes, whether it be right after class or a month later, I always found that I had information that I wanted to add, and cramped pages never allowed for that. Plus, it’s a bit less daunting on the eyes when there is some room between ideas. I do realize that this is not very eco-friendly, but hey!
2. Use the margins in a smart way. I have developed a “legend” of symbols to draw in the margins so that when I need a quick scan of what pages in the textbooks I referenced or vocab, I can find what I need easily. It might not seem useful on this one page, but when you have a whole 3″ binder full of notes, it’s a blessing.
3. Write on one side of the page. Again, not a eco-friendly option. However, I’m sure there are those of you (my past self included) who have wished you just had another page to write down book notes or additional thoughts without having to get a fresh paper. This solves that!
4. Make it pretty later. I know this page is visually appealing, but keep in mind that I was in my nice warm room by myself and listening to music while writing this. My notes straight out of class aren’t color coded and they definitely don’t have cute little decorations on them; just get the information down, worry about aesthetics later.
5. Put yourself in the classroom. You might think: “but I’m physically in the room what the hell are you talking about”. The concept is weird but it works. I always try everything I can to make sure I place as many visual cues in my notes as I can so that when I look back on them later I remember exactly where I was and what was happening. Are you not paying attention and thinking of food? Write it down. Did someone fart? Write it down. Placing yourself in the room is the most beneficial thing you can do for future you.
6. Keep it short. I can’t tell you how many times I freaked out when I first got to college because I was trying to write everything down. I was certain I was going to miss something. WELL HAVE I GOT NEWS FOR YOU. You aren’t going to miss anything if you keep your bullets to a minimum of one sentence. It’s proven that short phrases in your own words help memory better than full sentences that the professor gives you.
Finally, make it yours. This is a system that works for me because my brain is weird and can’t take notes the Cornell or outline way. The most important thing to learn in school is your own flow of things. Experiment, be creative! I hope I have helped those of you who aren’t traditional learners realize that there isn’t just one way to process information. If any of you have any questions or need specific examples, let me know! (I realize there is a typo on this but hey don’t worry about it) 🙈


October 2015 Monthly Pastel Planner Printables
By request! Comes in the 5 colours pictured above (peach, pink, lilac, blue, mint). There’s two versions. One where the week starts with Monday and one with Sunday.
Download from Google drive for free (PDF files):
Starts with Monday (October 2015)
Starts with Sunday (October 2015)
My other pastel planner printables:
Weekly
Daily
Hope you enjoy them! If you share pictures with them here, tag me with #studyblrbunny.
hi there, can you make a post about making mindmaps please?
There are many types of mindmaps, and they are all different depending on what they’re focused on ~ generally, they have the same structure, but just be careful if you’re doing a science-based one while following a literature-based tutorial.
Here’s a tutorial based on my most recent one {for English class, based on the novel Brooklyn}, hope it helps!
Keep reading
PLEASE MAKE A REAL COLLEGE TIPS POST BC I WAS TRUSTING THE ONE FROM THE FIRST YEAR UNTIL NOW
minimize gaps in your schedule if you’re commuting unless you work better on campus, in which case schedule large gaps and stay on campus all day
use academic advising services as early as possible to formulate your post-grad plan. don’t leave it until third or fourth year and risk missing prereqs, work/volunteer experience or references
networking sucks ass but guess what? you have to do it. figure out what your classmates are doing, who they’re speaking to, etc
make sure your profs know you. sit near the front, see them during office hours (make up questions if you have to), attend events, pick their brains. you might get an academic reference out of it or even a grad student position
you most likely have an online portal. visit it hourly. leave it for even a day and you will miss something
find out what textbooks you need before the semester starts and download the e-book, buy it used, whatever. just don’t fuck yourself over within the first couple weeks waiting for your book to arrive
read your syllabus very carefully. set all dates in your phone with an alarm days prior
get credit audits every year to make sure you’re on track to graduating when you anticipate
don’t take evening classes. you’ll never get anything done prior to class like you planned. ever.

My Study Method
My post 10 types of planners got way more notes than I expected. So today I will show you how I prepare for my exams. The method I’m going to explain is the one I’ve developed over the years and got me to get all A’s in high school. From taking notes, to nailing your exam.
1. HOW TO TAKE NOTES
1.1. Sit in the front of the classroom Don’t give a f**k if you look like a dork. Make sure you can see the blackboard clearly. You should be able to look at your teacher and the other way round. In case my experience is not enough: Studies show that those who “sit in the front and center (middle) of the classroom tend to achieve higher average exam scores”. Plus, your teacher will know who you are and will be aware that you pay attention in class.
1.2. Ask questions Don’t be afraid of asking questions. This took me years. Your teacher won’t think your question is stupid - in fact, it is their job to make sure everybody learns whatever they are supposed to teach. AND even if it looks as if the whole class has already understood the lesson, trust me, they haven’t.
1.3. Don’t write every word the teacher says There’s just no point in doing such thing. Contract words and use symbols and doodles. Once you get home, fair-copy your notes if they are not clear enough (or at least, re-read them). Otherwise, when you try to study with your notes a few weeks/months later, you won’t understand a thing.
1.4. Clarify your notes What did you just write down? Was it something that didn’t appear on the book? Was it an explaination of what the book says? Some info you should expand? Use a color code or symbols to clarify your notes. It doesn’t take time but will save you time in the future.
1.5. Compact notes Write with tiny (but legible) handwriting. It is quicker, tidier, and it saves paper. Also, write in two or three columns.
1.6. How to stay motivated to take good notes Last year I told one of my best friends (who is one grade bellow me) that I would give her all my notes at the end of the year. People normally dream of setting fire to their notes (and at least in Spain, people actually do that). But this other option (giving away my notes) was good for her and for me, since whenever I felt like writing carelessly, I’d think, “she won’t understand these notes, I have to do it better”.
2. PRE-STUDYING
Start pre-studying the very first day of class.
2.1. Active reading
Everytime I see someone whose book is entirely highlighted I’m like “why don’t you just dip it in a bucket of yellow paint?”. Seriously, stop.
Underline only the key words, not the whole sentence.
Use a different color (at least) for each paragraph.
When you read a paragraph, open a key in the margin and summarize what that paragraph is saying. Use between 1 and 10 words. Write as small as you can.
Right after you finish with a page, do an outline of the whole page in order to make sure that you have understood what you’ve just read. How? Scroll down.
2.2. Make it visual
Outlines, mindmaps, graphics… it really depends on the subject. All I know is that I just CAN’T study from a block of text.
Separate coordinated sentences and link them with symbols.
Use bullets or numbers and indent.
Color is not decorative. The same color links together different ideas.
Pink highlighters are cute but they don’t highlight at all.
Small handwriting and columns are your friends.
Highlight just the KEYWORDS. About 4-8 words per page.
Don’t use the same template or style on every page, unit or subject.
Number your pages.
Here you have a messy and a tidy example:


3. STUDYING
3.1. When should you start studying?
When I was in high school, I used to start studying one or two weeks before the exam. A few days before when I was too busy. The day before when I was about to jump out the window.
Divide whatever you have to study in equal parts to make it more approachable.
Try to organize yourself so that the day before the exam you don’t have to study because you already know everything (and you just need to revise a little bit).
3.2. Studying (and by studying, I mean memorizing) Once you have read it and understood it, you have to memorize it. My favourite quote is: “Don’t practice until you get it right. Practice until you can’t get it wrong.”
These are my methods. I also recommend reading this article for more. Use the method that works best for you or all of them to ensure you’ve got it.
Write your mind-map again and again and again. Don’t change the placement of each concept in your mind-map or you’ll become confused in the end.
Translate words into drawings. Translate your drawings into words. Repeat. Repeat!
Read a little bit, try to explain it out loud as if you were a teacher. Repeat endlessly.
Make a story that helps you fully understand what goes next and WHY.
3.3. Keywords list This is the spine of my whole studying method. So basically, reduce each sub-topic to ONE word. Then reduce each topic to ONE word. Study those words by heart.
In the exam, just write down your list of keywords and you will easily remember each topic and sub-topic.
4. EXTRA TIPS
4.1. When studying a list of words or names It is really important to know how many words there are.
Make a sentence with the first letter of each word.
Make a song. You can use a jingle you already know.
Picture a scene which contains all the words.
4.2. IMPORTANT!
Highlight, bookmark and make a list of those concepts that you usually forget or make mistakes, so it is the first thing you see (and revise) the next time you study.
The night before the exam, write in a little piece of paper that thing (an important formula, something that you always forget, your keywords list…) and that’s the only thing you should revise the following day.
Talk to older students and ask them for their old exams. Your exams will probably be different, but if the teacher is the same, they’ll be similar.
5. HOW TO NAIL AN EXAM
First of all, you should take a look to the Text Anxiety Booklet. It contains a lot of information for the ones who get really anxious.
5.1. Appearance matters My teachers always say that when they are correcting our exams, illegible handwriting really pisses them off. Since they are humans, that attitude towards your exam will be unconsciously reflected on your mark. On the other hand, when they get to a visually appealing exam, they are more compassionate. Conclussion: MAKE YOUR TEACHER’S WORK EASIER.
Use your best handwriting.
Write your name on every page (if you are asked to do so).
Leave margins.
Separate your paragraphs.
Indent when necessary.
Number your pages.
5.2. Don’t ever leave a question in blank Ever. Every little point adds up to you final mark, and a blank question means 0 points. If you write something and it is wrong, you simply made a mistake. But if you don’t answer, your teacher might think that you didn’t do it because you didn’t study. However, remember that your teacher is older and wiser than you, and will notice if you are trying to fool them.
In some tests, mistakes subtract points. In that case, you’d better leave the questions you don’t know in blank unless you like taking risks.
5.3. What if you go blank First of all, wait a minute and take a deep breath. This is not a waste of time because it will actually help you do better. Now, do the rest of the exam and come back later. Then, if you still can’t remember, try retracing not what you studied but what you were doing while you were studying. Maybe you were drinking tea, maybe your father came into your room or maybe you heard something on the street. And remember that you control your breathing, and your breathing controls your feelings.
5.4. An exam is not a race I guess some people believe they’ll receive a prize if they are the first one to hand in their exam. Those people have all of my disapproval. Use all the time your teacher gives you and always, I mean ALWAYS, revise your exam before handing in it. Revise. Your. Exam. Did you follow the instructions correctly? Did you answered all the questions? Are there spelling mistakes?
That’s it. I hope you found it helpful.
-
 i-wuz-here liked this · 6 years ago
 -
 cottageykid reblogged this · 6 years ago
 -
 serving-count liked this · 6 years ago
 -
 t4tliquidmantis liked this · 6 years ago
 -
 nefneslisettu-blog liked this · 7 years ago
 -
 afangirlscollection liked this · 7 years ago
 -
 thereisstrengthinlove reblogged this · 8 years ago
 -
 studyforthemoney reblogged this · 8 years ago
 -
 weedballs liked this · 8 years ago
 -
 hfsohitdovi liked this · 8 years ago
 -
 madelinetheadult-blog liked this · 9 years ago
 -
 ansku92 liked this · 9 years ago
 -
 zeropanza liked this · 9 years ago
 -
 marathon-notasprint reblogged this · 9 years ago
 -
 xxteen-lifexx-blog reblogged this · 9 years ago
 -
 missmoriss liked this · 9 years ago
 -
 saturatedxsunset reblogged this · 9 years ago
 -
 somelovelydaisies liked this · 9 years ago
 -
 negovorivavecobluza liked this · 9 years ago
 -
 beachwaves-greyday-goodlife reblogged this · 9 years ago
 -
 londontrip042015 liked this · 9 years ago
 -
 easternvagabond-blog liked this · 9 years ago
 -
 daffodillss liked this · 9 years ago
 -
 taylor-swift-slays liked this · 9 years ago
 -
 needlesspoetry liked this · 9 years ago
 -
 redvelvet-nights reblogged this · 9 years ago
 -
 fvckingpalee liked this · 9 years ago
 -
 eme8921 reblogged this · 9 years ago
 -
 hibi-chi liked this · 9 years ago
 -
 nuggetsblr-blog reblogged this · 9 years ago
 -
redvelvet-nights liked this · 9 years ago
-
 dontstopimagining reblogged this · 9 years ago
 -
 musicloverandy liked this · 9 years ago
 -
 lexhokage reblogged this · 9 years ago
 -
 anife77 reblogged this · 9 years ago
 -
 platycarpum liked this · 9 years ago
 -
 swordofwit liked this · 9 years ago