Note Taking Systems
Note Taking Systems
The Cornell Method
The Cornell method provides a systematic format for condensing and organizing notes without laborious recopying. After writing the notes in the main space, use the left-hand space to label each idea and detail with a key word or “cue.”
Method
Rule your paper with a 2 ½ inch margin on the left leaving a six-inch area on the right in which to make notes. During class, take down information in the six-inch area. When the instructor moves to a new point, skip a few lines. After class, complete phrases and sentences as much as possible. For every significant bit of information, write a cue in the left margin. To review, cover your notes with a card, leaving the cues exposed. Say the cue out loud, then say as much as you can of the material underneath the card. When you have said as much as you can, move the card and see if what you said matches what is written. If you can say it, you know it.
Advantages
Organized and systematic for recording and reviewing notes. Easy format for pulling out major concept and ideas. Simple and efficient. Saves time and effort. “Do-it-right-in-the-first-place” system.
Disadvantages
None
When to Use
In any lecture situation.
The Outlining Method
Dash or indented outlining is usually best except for some science classes such as physics or math.
The information which is most general begins at the left with each more specific group of facts indented with spaces to the right.
The relationships between the different parts is carried out through indenting.
No numbers, letters, or Roman numerals are needed.
Method
Listening and then write in points in an organized pattern based on space indention. Place major points farthest to the left. Indent each more specific point to the right. Levels of importance will be indicated by distance away from the major point. Indention can be as simple as or as complex as labeling the indentations with Roman numerals or decimals. Markings are not necessary as space relationships will indicate the major/minor points.
Advantages
Well-organized system if done right. Outlining records content as well as relationships. It also reduces editing and is easy to review by turning main points into questions.
Disadvantages
Requires more thought in class for accurate organization. This system may not show relationships by sequence when needed. It doesn’t lend to diversity of a review attach for maximum learning and question application. This system cannot be used if the lecture is too fast.
When to Use
The outline format can be used if the lecture is presented in outline organization. This may be either deductive (regular outline) or inductive (reverse outline where minor points start building to a major point). Use this format when there is enough time in the lecture to think about and make organization decisions when they are needed. This format can be most effective when your note taking skills are super sharp and you can handle the outlining regardless of the note taking situation.
Example:
Extrasensory perception
definition: means of perceiving without use of sense organs.
three kinds
telepathy: sending messages
clairvoyance: forecasting the future
psychokinesis: perceiving events external to situation
current status
no current research to support or refute
few psychologists say impossible
door open to future
The Mapping Method
Mapping is a method that uses comprehension/concentration skills and evolves in a note taking form which relates each fact or idea to every other fact or idea. Mapping is a graphic representation of the content of a lecture. It is a method that maximizes active participation, affords immediate knowledge as to its understanding, and emphasizes critical thinking.
Advantages
This format helps you to visually track your lecture regardless of conditions. Little thinking is needed and relationships can easily be seen. It is also easy to edit your notes by adding numbers, marks, and color coding. Review will call for you to restructure thought processes which will force you to check understanding. Review by covering lines for memory drill and relationships. Main points can be written on flash or note cards and pieced together into a table or larger structure at a later date.
Disadvantages
You may not hear changes in content from major points to facts.
When to Use
Use when the lecture content is heavy and well-organized. May also be used effectively when you have a guest lecturer and have no idea how the lecture is going to be presented.
Example:

The Charting Method
If the lecture format is distinct (such as chronological), you may set up your paper by drawing columns and labeling appropriate headings in a table.
Method
Determine the categories to be covered in the lecture. Set up your paper in advance by columns headed by these categories. As you listen to the lecture, record information (words, phrases, main ideas, etc.) into the appropriate category.
Advantages
Helps you track conversation and dialogues where you would normally be confused and lose out on relevant content. Reduces amount of writing necessary. Provides easy review mechanism for both memorization of facts and study of comparisons and relationships.
Disadvantages
Few disadvantages except learning how to use the system and locating the appropriate categories. You must be able to understand what’s happening in the lecture
When to Use
Test will focus on both facts and relationships. Content is heavy and presented fast. You want to reduce the amount of time you spend editing and reviewing at test time. You want to get an overview of the whole course on one big paper sequence.
Example:

The Sentence Method
Method
Write every new thought, fact or topic on a separate line, numbering as you progress.
Advantages
Slightly more organized than the paragraph. Gets more or all of the information. Thinking to tract content is still limited.
Disadvantages
Can’t determine major/minor points from the numbered sequence. Difficult to edit without having to rewrite by clustering points which are related. Difficult to review unless editing cleans up relationship.
When to Use
Use when the lecture is somewhat organized, but heavy with content which comes fast. You can hear the different points, but you don’t know how they fit together. The instructor tends to present in point fashion, but not in grouping such as “three related points.”
Three Examples:
Example 1:
A revolution is any occurrence that affects other aspects of life, such as economic life, social life, and so forth. Therefore revolutions cause change. (See page 29 to 30 in your text about this.)
Sample Notes:
Revolution - occurrence that affects other aspects of life: e.g., econ., socl., etc. C.f. text, pp. 29-30
Example 2:
Melville did not try to represent life as it really was. The language of Ahab, Starbuck, and Ishmael, for instance, was not that of real life.
Sample Notes:
Mel didn’t repr. life as was; e.g., lang. of Ahab, etc. not of real life.
Example 3:
At first, Freud tried conventional, physical methods of treatment such as giving baths, massages, rest cures, and similar aids. But when these failed, he tried techniques of hypnosis that he had seen used by Jean-Martin Charcot. Finally, he borrowed an idea from Jean Breuer and used direct verbal communication to get an unhypnotized patient to reveal unconscious thoughts.
Sample Notes:
Freud 1st – used phys. trtment; e.g., baths, etc. This fld. 2nd – used hypnosis (fr. Charcot) Finally – used dirct vrb. commun. (fr. Breuer) - got unhynop, patnt to reveal uncons. thoughts.
More Posts from Marathon-notasprint and Others

How to Take Notes: from a Textbook
(Be sure to change the post type from link to text post when you reblog, if that’s what you want to do)
This method is best suited for textbook or article notes, and is a version of revised notes. It is also well suited for books you plan on returning to the bookstore or books you have rented, as it does not involve writing directly in the book itself.
First, you’ll need to find a notebook, and the pens you like the best. My favorite notebooks to work with for note-taking, especially for my “revised” notes, are the Moleskine, hard or soft cover, in size extra large. For this specific class (Intro to Gender and Women’s Studies), I decided that lined pages would suit my needs better. For my math, engineering, and science classes, I usually opt for squared paper, as I draw in lots of diagrams and graphs.
My favorite pens ever are Staedtler Triplus Fineliners, so even though they show through the pages a little bit, I still choose to use them. I just love the way they write. I usually write out my notes themselves with a Pilot G2 05 with black ink, as it writes with a finer line and doesn’t bleed through quite as much.
I usually try to set up my notebooks about a week or so before class starts, that way it’s ready to go on my first day of class.

You’ll want to start off by setting up your notebook. On my first page, I put my course code for my university, as well as the course title.

Next, and this is perfectly optional (I just like the way it makes the book look, especially at the end of the semester), I include some sort of related quote to the course. For my engineering courses (which are related to my major), I put a different quote at the beginning of each section. But as this is a two-month long course during the summer, I opted for one quote by Mohadesa Najumi at the beginning of my book.

Next I set up my table of contents and include a page with basic course information. As this course is all online, my course information just included the start and end dates of the course, what time content is posted and on what day, and the name of my professor. For my usual courses, I will include the days of the week the class meets on and where, TA names and contact info, as well as posted office hours for my professors and TAs and tutoring hours either in the library or in the College of Engineering.

Next is one of the things I’m most proud of.
While I religiously use my Erin Condren planner to map out my days, weeks, and months, I have found throughout my college experience that including monthly views for the months my class ranges has been helpful. This way, there’s no sifting through the multiple colors I have in my planner, and everything related to that class is in the same notebook.
On this calendar I include start dates of the class, the end date, the dates of exams or quizzes, assignment deadlines, office hours, etc.
For this course, as I just started a few days ago, I don’t have a lot of dates or information, so my calendars are still very empty.


Next up I go to my weekly overview. At the beginning of each week, I set up a weekly layout, and I include a list of assignments, tests, quizzes, tasks, projects, etc that need my attention throughout the week, and I place the days I plan on doing them or the days they need turned in onto the weekly layout.

Now you’re finally ready to get into taking the notes.
Gather your book, some sticky notes, and your favorite pen or pencil.
I color code my stickies so that the “revision” process later goes a bit smoother. In this case, I’m using blue to denote something interesting, intriguing, or thought provoking, greenish-yellow to represent the facts or important concepts, and pink for important vocabulary words and their definitions.

Read the selection once.
As you read along the second time, write notes on your stickies, and place them in a place of relevance directly on the page in the book. Just make sure you don’t cover up anything you need to keep reading.


Now, once you’ve read all the material in questions (you can choose to break it up however you want, but since Chapter 1 was assigned for the week, I’ve elected to break it into chapters), carefully remove your stickies one by one and lay them out on a flat surface. This is when having a separate color for vocab can be helpful, as I sometimes put all of my vocab at the beginning or end of a section, especially if the section of reading was particularly large.
Organize your stickies in an order that makes sense to you, and use this order as your basis for transferring those notes into your notebook. The order you choose can just be lumping them under similar headings. Some classes even lend themselves to a nice chronological order. Whatever you choose, just make sure it’s something that will make sense to you when you come back to it in the end.

Okay so up there I wasn’t following my own advice, I just thought I would include the picture because my handwriting looks nice…

Now organize the stickies!

Now you just start writing everything from the stickies into your notebook. I like to take each category or subgroup and put them in the book on the facing page, then put them back in my textbook as I finish with each post it.

Moving on to the next category.


Before you know it, you’ve written all of your stickies into your notebooks.

Now you’re revved up and ready to go. You can either keep going and make a note summary page (which I’ll show you next week), or you can leave it. These will also be helpful when reviewing for tests and quizzes. You can highlight or underline, or use even more stickies (which is what I usually do) as you review.
Well, that’s all I have for you right now. Happy studying!
(To view this post on wordpress, click here)
🌠Guide to Study Guides
Hi, so I make study guides when I revise as referenced to in this post/ask here. So in this post I’m gonna try and show you guys how I go about making a study guide like I did for sociology or philosophy, both of which are shown in that link there. This is my method so it probably is really complicated and stuff, I know for sure that my guides are overly “fancy” and whatnot, but it makes me happy and I guess the extra effort does pay off, at least aesthetically.

Okay, yes, let’s begin…
1. Visit colourlovers.com to choose a colour scheme for your guide!
I’ve provided the link to the most loved palette page which is where I choose my colour scheme. In Word, you change your colour scheme by choosing Page Layout > Colour > Create New Theme Colours and you go from there!! I basically started making my own colour schemes after I went through all the ones already provided by Word, but to be honest you can start with those since they’re really nice too. I recommend: Apex, Composite, Foundry, Metro, Module, Slipstream and Solstice.
If you do want to make your own colour scheme, you should get ready to do some fiddling around because I still don’t get this really. Making a colour scheme on Word requires at least 10 colours, that’s okay because on colourlovers, palettes are usually made up of 5 so just choose 2 that you think suit each other :) After this you need to input the hex codes manually into the popup window of “Create New Theme Colours” starting from Text/Background - Dark 2 to Accent 6. The hex codes are provided by individually clicking on the colours.

So that’s what one of my self-made colour schemes look like, you should be aware that Word usually randomises these? I don’t really know how it works but basically sometimes the colours won’t necessarily be in that order when you go to select it to specifically colour a word, if that’s the case you’ll just have to fiddle and change it around to choose your preferred colour in the scheme. Also not all the colours will go into the textbox options so be aware of that too!
2. Font shopping
Next if I haven’t updated the font collection for a while I’ll go to dafont.com because I just…really like jazzy fonts. From here I’ll either check out “All The New Fonts” (option is at the bottom of the front page) or go to the menu titled Script, and check out Handwritten, Fancy or Various. Here are some links to asks about fonts that I’ve used in my shown study guides or just fonts I like in general!! 1 and 2.
Okay so as you can see in the Disney Princess Document/Sociology Study Guide I used at least five fonts, I usually average around 4? Once downloaded choosing fonts that you like for your guide is basically a trial and error process, I choose any fonts that I like or haven’t recently used or just recently downloaded that I want to try out and I match them with what I think would look nice! Here I’ll show you why I use around four or more fonts:

In order to make the process of typing up your guide with these fonts easier, highlight one, so for example the Big Title, right click > Styles > Save Selection as New Quick Style…and it’ll be available to you in the Quick Styles menu underneath a heading like Style1. After this to easily change a font to that particular font, just highlight, go to Quick Styles, choose that particular font and bam! I try to make my fonts match, so if one is bold, I aim for at least a thick-ish font in the rest of my choices. Now to go through what they’re for.
So obviously the Big Title is for your BIG TITLE that could be your subject or your main topic, so if it was sociology (like in the first pic) I would use it for Key Concepts and Methods, I might later reuse the font for another BIG TOPIC, but really…it’s your choice.
The Subtitle is what I would use for well…your subtitle, so following my first pic it would be the subtitle of Positivism versus Interpretivism…Three Key Concepts, etc. The heading is therefore for the headings under the subtitle (this is only if you’re making a guide for something that is like intensely sectioned, like sociology), so I’d use that font for where it says Reliability etc.

It just brings something extra on top of all the later colour you’ll probably use, although I only use it for like a set theme, so dates, names etc. and only either a word or a phrase, if it gets too long it’ll just mess up the format of your sentence.
3. Okay, so you’re happily typing away but now you wanna add the speech bubbles, you wanna add the textboxes and the Disney princesses! Don’t worry my friend, I got you.
Basically I add textboxes or speech bubbles for 2 reasons, either to highlight a particular point or differentiate a piece of information from the rest OR to fill up space because of some particular study guide pet peeves.
Pet peeve, when a particular sentence ends like this:

I know it might seem like a bit much, but to be honest, it throws the whole format of a block of text if a bit of it ends with like this huge expanse of space. So in this instance I either will insert a photo or I’ll try and delete a word or add a word until I’m satisfied. THIS IS JUST ME, IF YOU DON’T CARE OBVIOUSLY IT DOESN’T MATTER 👌
You can insert speech bubbles by going to Insert > Shapes > Callouts (you’ll find it there) and textboxes by going to Insert > Textbox > Draw Textbox (I draw mine since I don’t tend to use the ones provided by Word. With the speech bubbles they actually act as textboxes, but I’ve found that using it in that way takes up a lot of space as in your words won’t necessarily take up the whole of the speech bubble so it simply expands and it’s all messy. Therefore, I put a textbox on the top of it, make the background and outline transparent and type there to save space.
Here are some examples of when I’ve used photos or speech bubbles to fill up space or solve the annoying sentence problem.


I generally tend to have themes around what photos I use, so for example my sociology guide was largely based on Disney/Cartoon Network depending on how I felt and I’d use particular photos to emphasise a point and make it more entertaining I guess… As you can see the speech bubbles with LSP are for filler purposes but also to differentiate information, it just adds something extra really. Also because I continuously indent my guides (since I type with bullet points) as they get further and further in they’ll leave gaps that can be filled with photos, seen here with what I’ve done with LSP. Also with the photos that I choose, I search for the ones with a grey, checkered background which means that they’ll be transparent, allowing me to put them in front of a textbox or just makes overall design easier, it means that I can have the Gangreen Gang in front of that textbox like that :)
4. Final step, going over your guide when it’s done.
I then go through the guide again and highlight, underline, italicise, bold, colour etc. particular points of a sentence/paragraph that I want to remember! I do this in order of the colour scheme that appears in the menu when you click to change the colour of a font, so I’ll highlight particular words for a portion of a paragraph before changing, achieving a sort of a rainbow effect, like so:

These are from my history study guide, where I made front covers (which I don’t usually do…I feel like all my guides really depend on how I feel and my subject). This is what they looked like if you wanted an idea for something you could do too!!

Um..so that’s pretty much it! I’ve tried to make this as extensive and as in-depth as I can, I’m sorry it ended up SO LONG, I’ve never made a post this long before so I’m really sorry. I would put it under a read more but I feel like the font on my blog is too tiny for when it’s redirected and I’d much rather not have everyone straining their eyes. If you guys have any more questions, please feel free to ask. If you want any more examples or screen shots of my guides, just hit up my ask box!! Sorry for this taking so long and being so long once again and I really hope it helps you all in at least some way!
***As an addition, those washi tapes you see are digital washi tapes which you can get just by googling! I use the free ones which only require a lil’ searching for. Also please tag me in whatever study guides you make and upload, I’d love to see them!!


04:10 PM // Hello! I made these mind maps a few days ago. I’m really proud of them considering I never made one before.
Note taking masterpost:
An anon requested this today. I though I had already made one, but apparently not.
General note taking and guides:
Combining lecture and reading notes
Resources about making chapter outlines
Recognising key points in a lecture / reading (for efficient note taking)
10 tips for good note taking in lectures
Guide to note taking (the major approaches and techniques)
What to do after you take your notes
Organising a notebook
Taking notes that work (By Dustin Wax)
Top note taking tips
An example of me using cornell notes
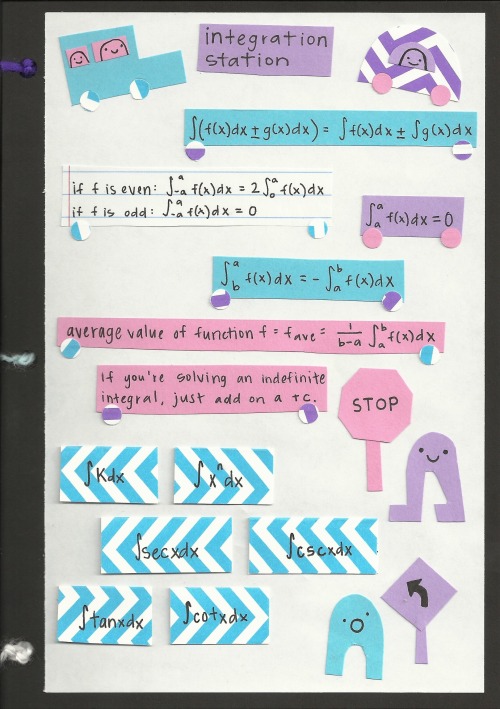
Visual / Pretty Notes:
Visual guide to illustrating notes
How to make your notes prettier!
Pros and cons of pretty notes
Guide to colour coding
Guide to my graphic notes
How to make notes cute and neat
Inspiration: 1 / 2 / 3 / 4 /
Electronic Note taking:
Guide to taking typed notes
Handwriting versus typing your notes
Organising your typed notes
Note taking apps

hi!!! i’ve seen lots of posts going around about how being a studyblr only means to have cute and expensive stationery and i know that lots of you don’t want or can’t spend that much money on stationery and i thought that doing your own stuff is waaaaay more fun and cheaper than buying it!!! (and it’s so original! no one will have the same notebook as you!) picture from here
dorm
dorm decor by @notquitenightingale
dorm room masterpost pt1 and pt2 by @studypops
46 cheap ways to decor your room
33 DIY ideas / 25 / 18
15 cute af ideas
16 even cuter ideas!!
10 DIY for lazy ppl
20 DIY DESKS!
stationery
school supplies pt1 and pt2 by @gracelearns
custom notebook covers by @studyquirk
make your own syllabible by @xannerz
map compositon book cover
pen loop! (rlly useful) by @studyingalpacas
make shift tabs by @vellichoristic
decorate white boxes! by @wodka-aunt
13 stationery ideas!
17 DIY projects
very very cute DIY
really nice DIY
10 DIY ideas
10 DIY pencil cases!!
20 backpack and pencil cases!!
15 pencil case tutorials
20 DIY pouches
super cute DIY pencil case
organize your binders
DIY cardboard binder
stylish af binders
11 DIY notebooks + another one!
17 cute ways to cover your books!
10 tutorials to make unique books!
15 ways to personalize your pens!
DIY calligraphy pens!
Flower pens!!!!!
+ my printables masterpost
treat yo self
25 relaxing spa ideas
so many face masks
a whole page on DIY beauty
17 DIY beauty products
50 DIY from pinterest!
27 hacks!!
10 DIY treatments
40 genius beauty hacks
+ my food masterpost


Requested // more close ups and extra pictures of chemistry revision cards for AQA C2. And yes I did colour in my banners since before I didn’t 💁🏽✨


hey guys, this is a masterpost requested by loveathenaa about notes and studying basically!!!
notes
taking notes from a textbook
an alternative to flashcards
pretty notes!!!!
AMAZING mind maps!!
how 2 make banners
creating better flashcards
my fav online flashcard website [there’s also an app for ur phone]
note taking methods
illustrated study methods!!!!
some more
more note taking stuff bc i just can’t get enough B-)
printables!!!!
how 2 take lecture notes
annotating!!!
studying
get motivated!!!
relax whilst studying
study playlists by me!!!!
reasons to study
my fav focusing app
how 2 study
memorisation and things
101 study tips!!!
studying biology
when ur having a bad day
productive study breaks
self-study resources
khan academy + on youtube
physics
japanese
other languages <3
more and more languages yaaas
crash course videos!!!
math help
masterpost!!!
mythology!!!!
check out 3 minute philosophy
the school of life which is my fav ever!!!!
sparknotes which is another fave
gradesaver
bbc bitesize
hope this helps u guys out a bit also if u need anything or want to request a masterpost, please message me!!! -helena xx

-
 multidimensionalfang1rl liked this · 6 months ago
 -
 phantomyao liked this · 8 months ago
 -
 robbyrobinavitch liked this · 9 months ago
 -
 memantercliri liked this · 1 year ago
 -
 thatea-the-star reblogged this · 1 year ago
 -
 uvindi liked this · 2 years ago
 -
 carnetist reblogged this · 2 years ago
 -
 latte-studies reblogged this · 2 years ago
 -
 aqquaa liked this · 2 years ago
 -
 maydeesblog liked this · 3 years ago
 -
 hazelgracelancaster2002 liked this · 3 years ago
 -
 hil-9000 liked this · 4 years ago
 -
 inara-a liked this · 4 years ago
 -
 hermionegrangerislifegoals reblogged this · 4 years ago
 -
coffeecrisp123 liked this · 4 years ago
-
 studywithdiana reblogged this · 4 years ago
 -
 theysaypotatoesisaycheese reblogged this · 4 years ago
 -
theysaypotatoesisaycheese liked this · 4 years ago
-
 fu0shigii liked this · 4 years ago
 -
 implausible-eclipse reblogged this · 4 years ago
 -
studywithdiana reblogged this · 4 years ago
-
 grandma-course liked this · 4 years ago
 -
 rollin-rollin liked this · 4 years ago
 -
 studyingfluff reblogged this · 4 years ago
 -
 crowsstuff reblogged this · 4 years ago
 -
 octubre-c liked this · 4 years ago
 -
 oceansunflowers reblogged this · 4 years ago
 -
oceansunflowers liked this · 4 years ago
-
 btr-1113 liked this · 4 years ago
 -
 studylazyass reblogged this · 4 years ago