TS3: Better Greet
TS3: Better Greet

Here’s a brand new script mod for you! I got sick of seeing all Sims greet each other with handshakes, so I made this mod to fix and expand upon one of EA’s most annoying oversights in my opinion.
Better Greet overhauls the visual aspect of the Greet social interaction and allows Sims to play diverse greeting animations under different circumstances. See more details on all its features under the cut! 👋
Overview
In the vanilla game, greetings are limited almost exclusively to handshakes, with the only exceptions being the cultural greetings from World Adventures and the Proper greetings from Supernatural, as well as a rare ‘wave’ greeting that takes place when one of the involved Sims is carrying a baby or an object.
This behavior seems to be an oversight by the developers, as the Social Data for the Greet interaction includes some rules that in theory would allow Sims to use different animations when greeting friends, romantic partners and so on, but the actual script that handles greetings completely disregards these rules.
This mod aims to solve that and expand upon the possibilities by making Sims’ greetings also take into account things like personality traits, social group and relationship status.
Features
There are a host of new conditions under which Sims can perform the new greeting styles. Some aspects of these conditions can be edited in the mod’s Tuning resource, such as the relationship level or social group level required for a greeting to be performed. By default, the mod is tuned in a way that strangers, acquaintances, friends and romantic partners all greet each other differently.
Though there are no hard requirements, many of the greeting styles rely on expansion packs for their animations or to fulfill certain requirements, such as: World Adventures, Showtime, University Life, Island Paradise, Into The Future. The mod can still be used without any of these packs, the corresponding greeting types will simply not be available.
If UL is installed, Socially Awkward Sims have a chance of performing some greetings awkwardly. The reaction to these greetings depends on the target Sim's traits; friendlier Sims won't mind and will turn an awkward greeting into a successful one.
An optional “Euro” mode can be enabled, which adjusts the rules of the Double Cheek Kiss greeting in order to mimic the customs of parts of the world where giving a kiss on each cheek is a common greeting. This can be mixed and matched with the Check Gender tuning, which can restrict this greeting to be performed only with female Sims if enabled.
Acquaintance Greetings
Wave: By default, Sims will introduce themselves with a Wave instead of a Handshake. If their LTR is -20 or below, they will always use this greeting, with special animations if LN is installed.
Handshake: Sims will greet with a Handshake if at least one of the Sims is an adult, or if one of the Sims is a Workaholic. If WA is installed, two Workaholic Sims will greet with a Fast Handshake.
Double Cheek Kiss: If WA is installed and Euro Mode is enabled, Friendly Sims can greet with a Double Cheek Kiss as long as the target is not a Loner.
Friendly Greetings
Friendly Hug: Sims will greet with a Friendly Hug if their LTR is at least 40. If one of the Sims is a Loner, their LTR must be at least 60.
Shaka Bra: If IP is installed, Sims who share the Loves to Swim trait and have a LTR of at least 15 will perform this greeting.
What's Up: If SHT is installed and the actor has the Social Butterfly trait, they will perform this greeting with other Sims if their LTR is at least 10. Uses the Trait Bonding animation. If SHT is not installed, the required trait is Schmoozer.
Double Cheek Kiss: If WA is installed, Sims who share either the Snob or Diva (SHT) traits will perform this greeting if their LTR is at least 25. If Euro Mode is enabled, the trait requirement is skipped.
High Five: If UL and ITF are installed, Sims who share a Social Group can greet with a High Five as long as their influence level is at least 1, and they have a LTR value of at least 20.
Old Friend Hug: If ITF is installed, Old Friends can perform this greeting. Uses the Hug Long Lost Descendant animation.
Romantic Greetings
Amorous Hug: Romantically involved Sims will perform this greeting if their LTR value is at least 60.
Shy Kiss: Romantically involved Sims will perform this greeting if they have had their first kiss before and the actor is Shy and their LTR is at least 70.
Amorous Kiss: Romantically involved Sims will perform this greeting if they have had their first kiss before and their LTR is at least 80. Shy Sims can perform this greeting if their LTR is at least 90.
Dip Kiss: If ITF is installed, Romantically Involved Sims will perform this greeting if the actor isn't Shy, is a Hopeless Romantic, has had their first kiss before and their LTR is at least 90.
Tuning
To edit the mod’s tuning, open the .package file with s3pe and edit the Tuning XML resource in a text editor of your choice.
There are lots of different tunables as I've tried to make the mod as customizable as possible, but adding them all in here would make the post even longer than it already is 😅. I've tried to organize them as neatly as I could in the XML so hopefully you'll be able to make changes easily!
Compatibility
This mod will conflict with any other mod that replaces the social_greet jazz script in JazzData.
Download: SFS / MTS
Place the .package file in your Packages or Overrides folder.
Credits & Thanks
Battery’s Script Mod Template Creator: Getting started with scripting quickly.
nraas: I studied their code and used parts of it to work out how to replace the Action Data of a social interaction, as well as inject the tuning of one interaction into another.
dnSpy: Peeking into the game’s files.
Visual Studio 2022: Writing the script.
s3pe: Exporting/Importing resources, creating the package file.
Adobe Photoshop: Creating and editing the preview image.
Thanks to @lazyduchess for helping me with scripting!
Thanks to @misspats3 and @probablyzora for testing and giving feedback!
Thanks to the lovely community at TS3 Creators Cave!
Hey bb girl mwah!
More Posts from Yvonnestarr and Others
why did white people stop assassinating their own presidents... nobody wants to work anymore
How to convert CAP patterns into 100% working package files
(tutorial originally by @ohmysims, I just copied it, put the screenshots back, and wrote it without the “keep reading” cutaway that’s in every reblog I found. Click on images to enlarge them. See my notes at the end. Wayback Machine backup)
——————-
Thanks to this god-blessed tutorial, I’ve been able to convert some patterns made with CAP into 100% working package files. And I thought I should keep a record of the process here for future reference. I only rewrote the exact same tutorial with pictures and this tut is really simple.
I. Convert a pattern made with Create-a-Pattern tool into package format. (Read this tutorial if you don’t know how to convert.)
II. GIVE THE PATTERN A NEW RESOURCE NAME
The cause of the notorious Materializing Materials error is that ALL the patterns made with CAP has the SAME instance value (*). So, the solution is to give each pattern a unique instance value.

Open the file with S3PE. Double click on the _IMG tags with instance of 7edd20633162e6ce.
Click [Use resource name]
Write down any unique name
Click FNV64 button. It will regenerate new instance value.
The instance has changed to 0xAEE5CFA2DED89772. Copy the value except for the first two letters (0x).
III. EDIT XML TO HAVE THE NEW RESOURCE NAME


Right-click the _XML that has the type 0x0333406C and select [Notepad] so you can edit the xml file.
Replace 7edd20633162e6ce with the value you copied in Step II-5. In this case it is AEE5CFA2DED89772.
Save the XML file and close the notepad.
Select YES to commit change AND SAVE.
——————-
Notes by @sweetdevil-sims:
This tutorial applies to patterns that were converted from .sims3pack to .package format.
(*) this is NOT the reason for the Materializing Materials error. The issue described and fixed by @ohmysims. manifests as multiple patterns being replaced by the image of a single pattern. The MM error is caused by an extra space where there shouldn’t be one. For more info, check these resources:
MTS thread with several ways to fix the MM error
Tumblr post with a tutorial for fixing the MM error
The fix for the “Materializing Materials” error is independent of the one for the Create-a-Pattern conflicting resources error (which is described in the tutorial above).


cc free sims
well hello there~ im here with cc free sims that someone asked for :) hope you guys enjoy them if you do add them to your game! do with them as you please haha (idc what you do tbh as long as you credit if you use them as a base)… click their pictures for their names or get to know them under the cut!
EDIT: idk which eps i used exactly but everything + high end loft stuff pack :)
-ˏˋ download ˊˎ-
Keep reading
Creator Folders

𝔸𝕔𝕔𝕖𝕤𝕤 𝕥𝕠 𝔸𝕝𝕝 𝔽𝕠𝕝𝕕𝕖𝕣𝕤:
📁 ALL

𝔸𝕔𝕔𝕖𝕤𝕤 𝕥𝕠 𝕊𝕖𝕡𝕒𝕣𝕒𝕥𝕖𝕕 𝔽𝕠𝕝𝕕𝕖𝕣𝕤:
📁Aikea-Guinea
📁Alecseycool / AlexS3CC / Alexo-sims
📁AllAboutStyle
📁Amethyst-sims
📁Anarchy-Cat *Only via MP
📁Annoyinglydarkblaze
📁Art-Sims
📁Awesims
📁Bigtittysims
📁Blinksims
📁Bloomsbase
📁Bluehoppersimming
📁Bobby The Hacker
📁Bombsy / Bombs
📁Bucket / bkt
📁Buhudain / Mahamudo
📁Cakenoodles
📁Candylover
📁Capitalsims / Skylarksims
📁CloudWalkerSims
📁Cropzsims
📁Diiamondsimmer
📁Dizziesims
📁EA / STORE
📁Editsim / Littlecat
📁Eodsy
📁ExoticElements
📁Faerielandsims
📁Fatboatsims
📁Fearpixls
📁GameManuals
📁Gardenbreeze / Pocci
📁Gelinagelina
📁Golyhawhaw
📁Gramssims
📁Grannyzaza
📁Grumpysimmies
📁Ha2d / Hal
📁Heiret
📁Ilikeyourfacesims
📁In3s
📁Joedy
📁Juba_0O
📁Julia526
📁Kalethegrey
📁Kelly&Co
📁Kurasoberina
📁Lemonleaf
📁Leseffrayants *Broken Link
📁Lifenpink / Dollbehavior
📁Lillysboutique
📁LittleCat
📁Lolabourbonsims
📁Lunasims
📁Marlazarakorah / Childrenoftwinbrook
📁Mini-Simmer / Chique
📁Mitarasi
📁Modishkitten
📁Moonskin93
📁Murfeelee
📁MYOS
📁Mysimtopia
📁Nelo-Style / Drippd / Simannova
📁Nygirlsims
📁NoChillsims
📁Noelyely
📁Ohmysims
📁Pickypikachu
📁Plbsims
📁Polarjennyfox / Zhu
📁Procrasimnation
📁R0ach3z / Simtai / Suku
📁Raonjena / Raonsims
📁Robokitty
📁Rosesims2
📁Rustynail
📁Sakurasims
📁Sasha. J / Sashasims
📁Saucemiked
📁Scaryberry
📁Shokoninio
📁Simnaru
📁Simplanx
📁Simsinspring
📁Simsxolove
📁Sirabin / Srb-u / Totkr / Rain-blossom-sims
📁Steffor
📁Suza
📁Tariks-Sims
📁Taultvec / Simbeings
📁Tencentsims
📁Theothersim
📁Thornsofpeace / Yesodsims / Jesodsims
📁Tifa
📁Tinkle / BlackPearlSims
📁Toys-of-Dukeness
📁VKG // Verakasthethird // AMR // VtMB // Adele // BioShock
📁Walkininfected
📁Wiktoria Von Frege
📁WOE / Landofwoe
📁Yosimsima
📁You-lust
📁YS Studio
How to keep Sims from moving around when you’re photo-shooting, without resorting to poses (yes, it IS possible!)
Because I’m trying to shoot pics for a large wedding party, I figured I’d eventually run into the bane of every Simmer who attempts to put a lot of Sims into one location:
They won’t bloody well stay where you want them to!
Want them all sitting down? Soon enough, one or more of them will get out of their chairs, even if you have Sim Autonomy OFF.
I found something that fixes that, and it’s something so simple: the Movie Maker cheats.
Apparently, you need Generations for this (or you did when it was released; I’m not sure if a subsequent patch enabled it for everyone) but give it a try, regardless of whether you have Generations or not.
To access it, open up the cheat console (CTRL + SHIFT + C) and type:
TestingCheatsEnabled True
And then type:
MovieMakerCheatsEnabled True
Now, when you Shift-left-click on a Sim, you’ll get the following menu:

Disable Autonomy will make ALL the Sims on the lot do nothing, except what you tell them to do. Sit them all down, and they’ll stay put. THIS is the cheat you need to keep all those little wandering buggers in place!
Turn off Look Ats will stop their heads from moving (you probably want to keep this enabled for most things, as it looks more natural)
Animation lets you play almost any animation on any Sim, from the idles to the conversations, the solo dances (sadly no animations that require two people, so your Sims can’t slow-dance this way unless you switch on some music and tell them to slow dance). You can play them once or play them in a loop.
Remember to shift-left-click the mailbox and set all needs to static if you’re doing a day of shooting, or else you’ll have some Sims starving to death in puddles of pee ;)
Private Clinic - Psychiatry

Ever want to do something to help all the messed up Sims in your town? With this mod, your Sim can run a private clinic as a therapist.
You can join the Psychiatry career, buy a Therapist couch and start treating patients for all their emotional and mental maladies. Using a clinic controller object, patients will be pushed to your clinic lot in need of treatment. Active patients can be identified by the orange and white symbol over their head (pictured above).
This is the first part of a larger game mod that allows Sims to be more active doctors similar to what we have in TS4 Get to Work. Your Sim will be able to run a clinic out of their house or from a commercial lot and treat patients for different ailments. Eventually you'll be able to play as a Psychiatrist, Optometrist, Ob-GyM, or a General Physician.
This mod also adds two additional features:
Medicine - Sims can buy prescription or over-the-counter medicine to treat various mild ailments. Medicines can be purchased at the grocery store (Home section) or Buy catalog. There is also a collection file where you can find all available objects. Prescription medicine can only be obtained at the grocery store or hospital with a prescription.
Drug Addiction - Sims can get addicted to the prescription medicine if they overuse it. This can lead to withdrawal symptoms and potential overdose. There is an option to go to rehab at the hospital for Sims that need the help to kick the habit.
You need NRaas Careers (for the custom career), University, Island Paradise, Ambitions EPs.
Download instructions:
The Private Clinic main module has all the medicines, the clinic controller and addiction system. You need that to play as a Therapist but if you just want the medicines, you only need to download these files. Note that you cannot write prescriptions or do anything doctor related without downloading the Psychiatry module. Download here
There is also a collection file which has all the available objects
The Psychiatry module is required to play as a therapist. The career is optional but some features won't be available without it. Download here
There are documentation files in both folders that go through the features in detail so PLEASE READ through them before downloading.
Credits/Thanks: All the objects except for the Couch which is EA's are from @aroundthesims so thanks as always to Sandy for her wonderful stuff and generous use policy. Buff images are courtesy of Freepik. Thanks to everyone on the S3 Creators Discord that did early testing for the mod, especially @misspats3 who tests like it's her job with photos, videos, detailed notes. 👌 Also to Battery who helped me with the manager system.
As always if you have any issues (resets, missing strings, etc.) please let me know.


Favorite Female Hairs ♡ 01. Amelia / 02. Anne / 03. Anti / 04. Autumn Breeze / 05. Ayelle / 06. Break Free / 07. Carly / 08. Carrousel 84 / 09. Cerise Lover / 10. Color of Wind / 11. Confetti (Dreads) / 12. Confetti / 13. Crazy Love / 14. Da Bomb / 15. Daydream / 16. Desirae / 17. Disco Heaven / 18. Divine / 19. Dolphin / 20. Double Bun / 21. Dream Girl / 22. Dream Glory / 23. Endorphine / 24. Eternity / 25. Ethereal / 26. Eva / 27. Everyday / 28. Exhale / 29. Firefly / 30. Foam Summer / 31. Focus / 32. Fontana Di Trevi / 33. Fragile / 34. Freaky / 35. Gypsy Twists / 36. Hair 93 / 37. Hair 107 / 38. Haley / 39. Half Buns & Half Curls / 40. Heaven / 41. Horizonte / 42. Janice / 43. Jenner / 44. Jennifer / 45. Kei / 46. Kiki / 47. King Kyle / 48. Kinky Curls / 49. Kira / 50. Kylie* / 51. Kylie* / 52. Labyrinth / 53. Ladder to Heaven / 54. Lannister / 55. Layla / 56. Lemonade / 57. Lisa / 58. Lorde / 59. Ludmilla / 60. Lush / 61. Lynn / 62. Malibu / 63. Marina / 64. Marion / 65. Mathilda / 66. Maya / 67. Melanie / 68. Melt Away / 69. Merida / 70. Mermaid Melody / 71. Mermaid / 72. Mhysa / 73. Millet / 74. Minaj Curls / 75. More than Honey / 76. Myra / 77. New Rules / 78. New Vegas / 79. Night Dancer / 80. Nightrunner / 81. Peaky Angels / 82. Persephone / 83. Queen / 84. Renaissance / 85. Revival / 86. Rogue / 87. Sakura / 88. Sandy / 89. Scarlett / 90. S-Club 10 / 91. S-Club 14 / 92. S-Club 16 / 93. Selena / 94. Silhouette (Chop) / 95. SkySims 29 / 96. SkySims 36 / 97. SkySims 48 / 98. SkySims 120 / 99. SkySims 195 / 100. SkySims 260 / 101. Solace / 102. Soundwave / 103. Starfall / 104. Stefanie / 105. Sunset Glow / 106. Swan / 107. Sweet Slumber / 108. System / 109. Te Amo / 110. Tell Me / 111. The Moment / 112. Thunder / 113. Tyra / 114. Vanilla / 115. Viola / 116. Wings OS0203 / 117. Wings 403 / 118. Wings OS0306 / 119. Zendaya *It have the same name but are different hairs.

It's the tutorial that no one asked for! And I blew my entire day on it, so you better appreciate it! :) No, seriously, this is as much for me as for anyone else. I don't do this process often, and when I do, I have to re-remember the steps, and sometimes I forget some of them and have to figure it out again. This will save future me from having to do that.
Even if you aren't me, if you're interested in being able to place diving lots in most any world you like and that has ocean, this will be relevant to your interests. Unfortunately, it is a sometimes fiddly process to get a working lot at the end, and I went into a lot of detail, so the tutorial is long, but please do follow it closely because if you skip a step or mess anything up, your lot will be wonky or it might not work at all, and I don't want to hear your whining. :)
Note that this is a tutorial for placing a new, empty diving lot, which is the first step in placing a downloaded diving lot or one that you yoinked from another world, but this tutorial doesn't cover how to get such lots working. This just shows you how to place an empty lot, which I'm assuming for this tutorial's purpose that you will then build/decorate yourself. Frankly, I've discovered that building your own is much easier than trying to ram square pegs into round holes, which is what placing downloaded dive lots often feels like, even if you know what you're doing. It can be as time-consuming, if not more time-consuming, to get a pre-made lot placed and working than it does to just build your own.
So, here we go.
Step 1: Pick Your Poison. Choose the world/save you'd like to plop a dive lot into, open it, and go into Edit Town. You can use any world you want, EA or custom, so long as it has accessible ocean in it. (More on that in Step 3.) I'm going to use Sunlit Tides, just because many people want to put dive lots in it yet can't always get them working.
Step 2: Cheats! You need some cheats, so open the cheat box by pressing Control+Shift+C and then enter these three:
testingcheatsenabled true debug on enablelotlocking on
Note that you need to enable testing cheats first because the other two aren't available otherwise.
Step 3: Placing the Lot. Go into World Editor and in the Lots submenu of it choose the lot size you want:

As far as I know, a dive lot can be any size you want from the minumum 10x10 to the maximum 64x64, any of the EA standard sizes or any custom size you might add using this mod. If you are bound and determined to try and place a downloaded/yoinked lot, then in my experience, it's best to make the new lot a little bigger than the lot you want to place, if possible, so that you have some wiggle room to get it to fit better. But, I'm assuming you're going to build your own here.
If you plan to do lots of terrain sculpting on your dive lot, bigger is better. That said, unless you're going to do something really elaborate, it doesn't have to be 64x64, the largest possible size, either. Smaller will mean that your prospective lot will fit in more places on the map. So, it's up to you. For this, I'm just going to place a 30x30 lot, because I'm not going to build/decorate it or anything.
Now, it needs to be said that not every world will be able to have diving lots. The world must have ocean, obviously, and that ocean must be routable or else sims won't be able to get to it. The ocean also has to be deep enough. Generally speaking, "deep enough" is if the water is dark blue. (Or green, or whatever color the lighting mod you use might make it.)
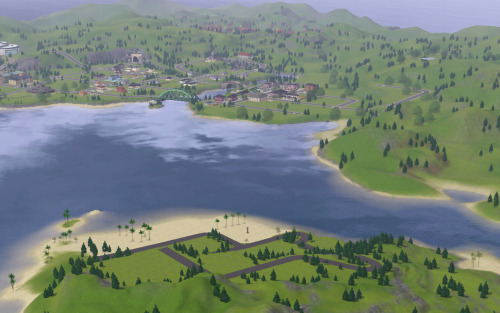
For instance, in Sunlit Tides here, it's pretty obvious where the deeper water is:

But you know what? I'm going to place a dive lot in some of the shallower water, anyway, because I/you actually can, within reason. And if you're interested in doing this in Sunlit Tides, I'll warn you that the deep spot in the pic above has a very uneven bottom. It's really not a good place to put a dive lot. And I'm not sure what the deep water on the outskirts of the map is like, but the good news is that much of the deeper and flat-bottomed shallows, as I've noted, work well.
So: With your chosen lot size selected, move your cursor around in the ocean where it seems to you that the water is "deep enough" until you come to a spot you like and where the lot grid is green. If the grid is never green, then the ocean likely isn't routable at all and you won't be able to place diving lots in that world. I have never run into that, myself, but I also haven't done this all that often, so it's certainly possible. Anyway, I'm picking here:

My advice would be to not make your lot too far off-shore even if you can do so, or else it will take sims a long time to get to it. Especially merfolk, because they always swim out to dive lots rather than take a water taxi, and they swim much more slowly than a water taxi moves. Once you find your spot, go ahead and place the lot. Doing so will create a square island, not a sunken lot. That's fine. We'll fix it in a moment.
Step 4: Change the Lot Type. Click the lot's icon and change the lot type to community and then choose "Diving Area" as the subtype:

Note that this option will only show if you've enabled lot locking. So if you didn't enter that cheat up in Step 2 or if you entered it incorrectly, rectify that situation now so that you can set the lot type.
Step 5: Sinking the Lot Enter the lot and flatten it with this tool in build mode:


This will submerge the lot so that it's level with the sea floor rather than being an island. You can now move the camera down under the water and have a look at your potential diving area, like so:

In particular, check the edges of the lot to see if there are any huge drop-offs or other great differences between the level of your lot and the surrounding terrain. Whether or not this will happen is world-dependent. Some worlds have very uneven/jagged underwater areas, which is what will make you end up with drop-offs, while others, like Sunlit Tides here, are (mostly) pretty flat.
You can see in the above pic that this lot is a little sunken along two of its sides. That's fine; that small amount of difference can easily be smoothed out with the terrain sculpting tools. If there are steep drop-offs or upward slopes, you can sculpt the lot to try to blend it with its surroundings, but be advised that 1) Interactable objects like dive caves can't be placed on uneven terrain and still be usable and 2) If you end up really deep down, the camera goes wonky and it's frustrating-to-impossible to build or play the lot. So, if you've got a huge drop-off and/or a steep upward slope on one or more of the edges of your lot, I'd recommend just trying a different spot. But, it's up to you. If you feel you can work with the uneven edges in some way, have at it. You are braver than me.
Step 6: Save that MFer. Once you have a lot you're satisfied with, this is a good time to save. So, go back to Edit Town and do that.
I recommend saving often during this entire process because, I don't know about your game, but sometimes mine will "hang" or even crash when moving between Edit Town and Build/Buy, especially if I do it a lot. And with this process, you will be doing it a lot, not to mention exiting out to the main menu and then going back into the save a few times. Since getting a dive lot placed can be a fiddly business, it sucks to lose a lot of progress to a hang/crash. So, in my opinion, you can't save too often, but in this tute I'll only prompt you to do it when you must.
Step 7: Exit Stage Right Remember long ago in the last step how I said you'll be exiting to the main menu a few times? Yeah, the first time is now. You do this because, for whatever reason, the game doesn't register changes made to the "structure" of dive lots without exiting and re-entering the save. So do that. Once it's reloaded go back into Edit Town and then back into the new diving lot. Because now it's time to place a dive buoy.
Step 8: Deploy Buoy The dive buoy is located in the debug items, so if you haven't turned on access to that yet, do so now. Then, go into the buy menu, sort it "by function," not the default "by room," and you should see this question mark here:

Click that, and then I recommend that you go to the filters on the right-hand side of the menu and choose just Island Paradise objects. Because you'll be going into the "Misc. Objects" tab and, especially if you have all EPs/SPs, there's a crap-ton of objects in there to sort through. So, filter, then choose the "Misc. Objects" tab, and you'll see this much-more-manageable selection:

Choose the dive buoy, as indicated, and place it anywhere on your dive lot. It doesn't matter where because (spoiler alert) this one's going to be deleted, anyway.
Step 9: Ogle That Shapely Buoy Once your buoy is placed, move your camera down to the ocean surface and have a closer look at it. Like so:

See how the ball part of it is just sitting on the surface of the ocean? That's bad. If you were to leave it like that, you'd have sims (and sharks, if you place a surface shark spawner) swimming/snorkeling in the air, if the lot would work at all. But don't panic! We can fix it. We just need to shift the entire lot down a l'il bit, so let's do it!
Step 10: Copy the Lot to the Library Go back out to Edit Town. Check to make sure that your lot designation is still "Diving Area." (Because during this process, it will sometimes change.) Then, save the lot to your library. The game will give you a warning about cancelling all sim interactions or something. That's fine. Just put a copy of the lot in the library. The thumbnail in the community lot catalog will look like a blue square.
Why are you doing this, you ask? Because now you're going to bulldoze the original. Why? Because we need to move the entire lot down a little bit, and you can only do that by placing a fresh copy of the lot. And you may need to do this several times until you get it at the right depth, so having a copy of the lot in your library is necessary. You can delete it out of the library once you've got your dive lot in the right place, if you want.
Step 11: I'm a Steamroller, Baby Once you've got a copy of the lot safely in your library, bulldoze the original lot you placed. Once bulldozed, the game will change the lot designation back to "No Visitors Allowed," so you'll need to change it back to "Diving Area."
Step 12: Go Down on That Lot To move the lot down when it's placed, you need this cheat activated:
setimportedterrainoffset -0.1
The value at the end can be whatever you want, as many decimal places as you want. A positive number will move the lot up, and a negative number will move it down. (You can use a larger negative number to make deeper a lot that's too shallow, and it can also be helpful if you're intending to try to place a downloaded diving lot on this lot so that it might better match the depth of the water in whatever world it came out of, but this won't always have the effect you want. For one, your lot will be down in a hole.) For the purposes of this tute, all I need to do is move the lot down a teeny bit so that the dive buoy on the lot is sitting IN and not ON the surface of the water. Hence, the -0.1 value.
(Now, I should mention that other tutes I've seen will have you just lower the terrain right under the buoy to sink it a little bit rather than doing this bulldoze-and-replace-with-a-whole-lowered-lot thing I do. This method can work, but I don't like it for various reasons that I won't go into for brevity's sake. I'm just telling you what I do, which has worked every time I've placed a dive lot, including shallow-water ones like this one.)
Step 13: Re-Placing the Lot Go into your library and place your saved lot back where it was. DO NOT ROTATE IT or else things will get screwed up. (Namely, your lot will become an island again and resinking it won't really work.) Just click "Accept." And then check its lot designation and change it to "Diving Area" again, if necessary, which it probably will be because stupid game.
Step 14: Ogle that Shapely Buoy 2, Electric Boogaloo Now, enter build mode and move the camera down to the ocean surface again to check the dive buoy. Ideally, it will now be sitting IN, not ON, the water, like so:

If it's still sitting on the surface, the lot needs to be deeper and therefore moved down farther, so go back to Edit Town, bulldoze the lot again, change the value of the imported terrain offset cheat to a larger negative number (Perhaps -0.5) and try again. Be aware that, as I said, once you get to larger numbers (as in greater than -5 or so) you start ending up with your diving lot down in a hole, which may or may not be workable.
Now, there is a marker on the buoy, the little black rectangle I outlined in the pic above. If the ball part of the buoy is at least partly in the water but that marker is still above the water, as in the above pic, the lot will still work, but there will be a "hop" (and sometimes a pause) when a water taxi or a swimming merperson crosses the boundary of the lot. The higher the marker is above the water line, the larger that "hop" will be. (Because, if you haven't figured it out yet, the dive buoy is what tells the game where sims can swim, vertically, on a dive lot.)
If such a hop doesn't bother you, you can leave the buoy as-is. If you're a perfectionist like me, you go back to Edit Town, bulldoze the lot, and change the value of the terrain offset cheat to try again. Do this as often and with as many decimal places as your level of perfectionism demands. :) I'm not that fussy, so I usually just move the lot down in increments of 0.1 until the marker is at or below the water line but the ball of the buoy is not completely underwater because you don't want the ball completely underwater, either. At least some of it needs to be above water. So, fiddle as much or as little as you feel you need to.
(For reference/scale, the gap between the marker and the water line in the above pic would probably be fixed by an offset of about -0.15 instead of -0.1. But it would also be fine as-is unless a little hop at the lot boundary will bother you.)
Step 15: Bye-Bye Buoy! Once you have the lot so that the buoy is where you want it, DELETE THE BUOY. I repeat: DELETE THE BUOY. Yes, DELETE THE BUOY. For whatever reason, dive lots drawn from your library that contain buoys won't work. I don't know why. They just don't. You need to place a fresh buoy. (I'm pretty sure this is why lots of people can't get downloaded dive lots or lots that they pulled from other worlds to work. Sometimes the answer is simply to delete the buoy, if the lot came with one, and place a fresh one.)
Step 16: Exit Stage Left Once you have DELETED THE BUOY and only once you have DELETED THE BUOY, go back to Edit Town, check to make sure the lot is still designated as a diving area (and change it back if necessary) and save. Why? Because now you need to exit to the main menu and reload the save again. So do that.
Step 17: Fresh Meat Buoy! Once the save is reloaded, go back into Edit Town, and check to make sure the dive lot is still designated as one. Redesignate, if necessary. Then, go into build/buy and place a fresh buoy, just as you did before. This one will be staying permanently, so place it where you actually want it to be. (Which really doesn't matter; aside from defining the vertical space of the diving lot, it just designates where your sim "enters" the lot.) If you want the lot to generate sharks on the surface, you can also place surface shark spawners now, too, as few or as many as you want, and because you have properly adjusted the height of the lot, the spawned sharks will not be swimming in the air. The spawners are also in debug mode, under the fish spawners. (There is also a spawner for underwater sharks. Do not put that one on the surface. Make sure you only put surface shark spawners on the surface.)
Step 18: Set the Lot's Skill Level You set the required skill level for the diving lot by going to buy mode (if you left it), making sure the hand tool is active, and then holding down control and shift while clicking on the dive buoy. Choose the option "Set Required Diving Level…" from the menu that comes up:

…and then from the resulting options under that choose a NON-ZERO number. For some bizarro reason, buoys default to level zero when placed, and a diving lot set to skill level zero is inaccessible even if a sim has level 10 scuba skill. (Good move, EA! Why is zero even an option if it doesn't work??) So, pick whatever skill level you'd like, so long as it ISN'T ZERO. (I suspect that this is another reason why people can't get downloaded dive lots that they place in a world to work.) Once you have the skill level set, go back to Edit Town and save.
Step 19: Test And now you're pretty much done. All that's left is to test the thing to make sure the lot works before you bother with building/decorating it. So, return to the game and send a victim to your new, empty lot and see if they successfully arrive (with or without a "hop" at the lot boundary) and successfully get themselves underwater. (My advice, for testing purposes, is to just give the sim you pick enough diving skill to use the lot. This can be done with NRAAS Master Controller.) Don't bother with doing anything further with the lot until you make sure it works.
Here is evidence that my lot, though shallow, works:

If your lot doesn't work, then something went wrong somewhere. Most likely, you missed a step or did a step wrong. I know there are a lot of words here, but they're all necessary to (more or less) guarantee a working lot in the end. So, try again. It's possible that you will have to pick a different location and start over, but I've been able to get a lot working wherever I've placed one, so long as it was in deep-enough routable ocean.
Step 20: PROFIT! Assuming that your lot works, "all" that's left is to build it! :D I'm not going to go into detail about that. It's all up to you. You can sculpt the terrain, paint it with whatever terrain paints you want, place objects, whatever. If you're in shallower water, any objects you place that are tall enough to stick out of the water will just be chopped off at the water line; you won't be able to see the rest above water. The corals and stuff are in debug mode under "Underwater Objects," but if you don't want the tropical look, so long as you have moveobjects turned on, you can place (almost) any object you want down there, aside from things like walls and fences and other build items that can't be drawn underwater. Rocks, plants, trees, columns, and anything from the buy and debug catalogs are all good. If such an object has a function, sims won't be able to use them, though. They'll just become deco. (So, no underwater basketweaving sculpting. Sorry.) So, go to town. Have fun. For this tute, I'll just mention a couple objects and their settings and we'll finally be done.
Miscellaneous Objects:
First, treasure chests. Like the dive buoy, they're located in the "Misc. Objects" of debug mode. There are two versions, one for land and one for water. Obviously, on a diving lot, you want the water one if you want any at all. If you do want to use them on your lot, place down as many as you want, and then set the diving skill level necessary to open each one and designate the treasure each one will hold. You do both by holding down control and shift while in buy mode with the hand tool active and clicking on a chest, just like setting the skill level of the lot on the buoy. This brings up this menu:

The "Assign Treasure" option gives you eight different treasures for the chest. You simply pick the one you want. The "Set Required Skill Level" option allows you to assign the diving skill necessary to open the selected chest. You can choose any number you like from 0 to 10. (Yes, zero is OK for this purpose, even though no one with zero skill can scuba dive, so…Yay EA.)
Then there's the dive caves. I think they are in the "Underwater Objects" section of the debug catalog; I'm not sure because a mod I use moves them to the regular rock section. Anyway, there are two styles, which you're probably familiar with, but they both function the same way. If you have more than one of them in the world, even if they're all on the same lot, your sims can travel between them, much like a subway. Unfortunately, I can't show you how to set this up because that mod I use to move the caves to the rock section also makes them recolorable, but it breaks setting up this functionality and I don't feel like hunting the mod down and taking it out. But it's pretty easy. You Control-Shift-Click on each one, give them a name, and then you can connect them by using the names you give them. Again, it works much like subways. It's pretty self-explanatory.
Finally, there's the fog emitter. If you're unfamiliar with this object, it's a base game object located in the "Misc. Objects" section of the debug catalog. The thumbnail in the catalog looks like this:

And it looks like this when it's placed:

They can be used on any lot, they disappear in live mode, and they can generate not just fog but many, many different effects. Literally thousands of different effects. You place the emitter where you want, and then control-shift-click on it and choose "Set Visual Effect" from the resulting menu:

When you click on it, you get this:

In that window, you type/paste the code for the effect you want. Of course, you will need to know the code for the effect you want. For your convenience, I've uploaded my list of effect codes, which is complete and includes the codes from all EPs, here. It's just a text file, and the codes are in alphabetical order. Since the list is all-EPs, some of them may not work if you don't have the EP the effect comes from, but if that's the case, then any such code you enter simply won't do anything.
The most relevant effects for a diving lot all start with "ep10," but there are others you could possibly use, too. Some of the names of the codes are more helpful than others in terms of knowing what it will do. Generally, you need to experiment. But, you can add schools of fish, single (but non-catchable) fish of all kinds (if you want catchable fish to spawn, you need to use the spawners, not the fog emitter), sharks (non-interactable), light rays, bubbles, glows, fog, all sorts of things, if you're patient enough to go through the list, look for interesting possibilities, and try them out to see if they will work for you. There are whole tutorials dedicated to the object, if you look for them. There's also a mod that makes them shiftable, which can be very useful, here.
One final suggestion: If you go through this process in a world that you know or even just suspect that you'll want to use again and you'll want the dive lot(s) you made in that future save, for the love of pie keep a copy of this save file somewhere. That way you won't have to go through all this crap again. Because even if you save a copy of your finished lot, unless you manage to place the empty initial lot in the new save in the exact spot you placed it when you built the lot, it's not likely to be quite right. So beware.
And with that, I think we're done here. If anyone has any questions, or if you decide to try to make your own diving lot and have questions along the way, feel free to hit me up and I'll do my best to help. Just keep in mind that I'm not an expert by any means.

Hello Simmers, the moment is finally here. This is the first official release of my The Sims (2000) to Sims 3 world.
Revisit all lots and neighborhoods from The Sims base game, Hot Date, Unleashed and Superstar in an open-world experience in the Sims 3!


If you enjoy my creations, please consider helping me save for a new laptop on Ko-fi ❤️
Let’s get to the good part. You can download this Sims 3 world here. Just double-click the file and the Sims 3 launcher will open that will allow you to install it.
To build this world I used all Expansion packs except for Into The Future. Stuff pack wise I only used High End Loft Stuff and Town Life Stuff.

You’ll find that by default this world is not populated, that is because the Sims 3 Create A World tool (CAW) does not support adding households. So to get a fully populated Sims 1 world, we need to do a little workaround. There are 2 options:
You can download all of the households here and place them into their houses in Edit World mode in the Sims 3. Just place these .package files in your Sims 3/library folder.
Install the populated save file. Just unzip and place these in your sims 3/saves folder.


I would really like to hear it if you run into an issues with the world file, so that I can fix them! Let's be in touch 😉
Follow me to be the first to download the Complete version of the Sims 1 to Sims 3 world in the future, which will also include all lots from The Sims Vacation and Makin’ Magic expansion packs!
Thanks to everyone who has been supporting me throughout this project, it really means a lot to me! ❤️
I have one last note for people have downloaded an early progress version of this world. If you did and are using it for a save file you want to continue playing in, please beware that by installing this world it will overwrite older versions of it and so your save file could be lost.

Reblog if you've ever cried over the death of a fictional character
-
 troistimesthree liked this · 1 month ago
 -
 lonelicole liked this · 1 month ago
 -
 phantomleaves liked this · 1 month ago
 -
 pastelpnk20 liked this · 1 month ago
 -
 jusissimscc reblogged this · 2 months ago
 -
 m-oonmist liked this · 2 months ago
 -
 perrokallejero liked this · 2 months ago
 -
 goldenennina liked this · 2 months ago
 -
 ts3-rauh liked this · 2 months ago
 -
 cheejer liked this · 2 months ago
 -
 cribaby2u liked this · 2 months ago
 -
 kjoulout reblogged this · 2 months ago
 -
 grilledcheese-ts3finds reblogged this · 2 months ago
 -
 eccentrisim reblogged this · 2 months ago
 -
 mavassss liked this · 2 months ago
 -
 privatemainvault liked this · 2 months ago
 -
 standrws reblogged this · 2 months ago
 -
standrws liked this · 2 months ago
-
 xsaitan liked this · 2 months ago
 -
 theplumbobpantry reblogged this · 2 months ago
 -
 vickccfinds reblogged this · 3 months ago
 -
vickccfinds liked this · 3 months ago
-
 bulkate liked this · 3 months ago
 -
 v1mpyr liked this · 3 months ago
 -
 beeswearpants liked this · 3 months ago
 -
 thulipzz liked this · 3 months ago
 -
 8bitcarson reblogged this · 3 months ago
 -
8bitcarson liked this · 3 months ago
-
 teecupsx liked this · 3 months ago
 -
whirlily reblogged this · 3 months ago
-
 ravenwccds reblogged this · 3 months ago
 -
 ravenwooods liked this · 3 months ago
 -
 mrsmecg liked this · 3 months ago
 -
 kneedeepinpixels reblogged this · 3 months ago
 -
pumpkincries reblogged this · 3 months ago
-
 toadifylackoffantasy liked this · 3 months ago
 -
 ts3mlamou reblogged this · 3 months ago
 -
lechangementpositif liked this · 3 months ago
-
 simelysun-cc reblogged this · 3 months ago
 -
simelysun-cc reblogged this · 3 months ago
-
 lovelacing liked this · 3 months ago
 -
 dominiquehr liked this · 3 months ago
 -
 gifappels-stuff reblogged this · 4 months ago
 -
 simbouquet reblogged this · 4 months ago
 -
 autumnappreciator liked this · 4 months ago
 -
 nightvirgo liked this · 4 months ago
 -
 airbenderedacted liked this · 4 months ago
 -
 hlootoo liked this · 4 months ago
