Archer Challenge: Make A Quiver


Archer Challenge: Make a Quiver
You can use all sorts of materials to create a system for holding your arrows. Get creative and build one!
Source: Wood&Faulk
More Posts from Rgfellows and Others
Hello! Your embroidery is beautiful! Do you perhaps have tips or could recommend webpages/videos on how to embroider? I'm especially interested in how to do these mushrooms/flowers, which kind of stitches (?)/styles produce these artworks? Thank you for posting your gorgeous results!
Hello, and thank you!
I learned embroidery mostly from books, and have somehow watched hardly any embroidery videos. But I know there are lots and lots of websites and videos out there.
The main book I refer to now for embroidery is 18th Century Embroidery Techniques by Gail Marsh, but the Reader’s Digest Complete Guide to Needlework is my go-to book for anything that’s not in the 18th century one.The Readers Digest one is VERY thick and has a huge range of stuff from quilting to bobbin lace, and an excessively large number of embroidery stitches. It’s a very common book and if your local library doesn’t have it you can get a secondhand copy for pretty cheap. (Here’s one on etsy for $7.) And it’s just one of many similar needlework guidebooks, so it ought to be pretty easy to obtain one. The 18th century one still has a lot of stuff that typical needlework guides don’t though, like metal embroidery.
But you asked specifically about the mushrooms and flowers I’ve posted, and I’m happy to report that those require only a few basic stitches! Needlework guides are full of dozens of different stitches and variations, but most projects only require a small number of them.
Here’s a breakdown of what I’ve been using, with links to tutorials for each stitch.
Satin Stitch - This is one of the most common, especially for flowers and leaves and other such solid shapes. I prefer to use one strand for this, so I don’t have to un-twist anything.

You can also do Padded Satin Stitch, which is the same except you work it on top of one or more layers of satin stitch, or some other filling stitch. This makes it more 3 dimensional. For my waistcoat I’m not padding it though, I want my shapes to be nice and flat like a picture.
Long and short stitch - Very similar to satin stitch, but with longer and shorter bits so you can fill a larger area, or blend different colours together. This shows up a lot on shaded flowers and leaves. I used it to do a little bit of shading on my tree stump, and to fill in the wider part of my green mossy ground, because you don’t want to make your satin stitches excessively long.

This little sample I did a few years ago illustrates it more clearly.

Stem Stitch - Also fairly similar to satin stitch, but done thin and very slanted. It’s pretty easy to vary the thickness, like I’m doing for my maple twigs.

French Knots - These take a little practice because you need to get the tension right, but they’re not difficult. I’m using them for the dots on my mushrooms. The mushrooms themselves and their little patches of substrate are done in satin stitch, and the French knots added on top afterwards.

For the ferns I’m using stem stitch for the stalk, and to do the leaves I just do little straight lines coming off them. These are easy, you just bring the needle up at the tip of the leaf and back down again at the end that’s attached to the stalk, or the other way around, whichever. This probably has a name but I don’t know what it is.
(However, you can get a similar fern effect with Fly Stitch. Or, if you want your leaf placement to alternate, with Feather Stitch.)

The brown fanned out triangles on the border are done like my fern leaves too. Just in on one side and out on the other to make little straight stitches. The clusters of 3 green dots are French knots, and the solid green and brown lines on either side are satin stitch.

Split Stitch - That Beardsley inspired waistcoat I made all those years ago was almost entirely done in split stitch, with the exception of a few French knots here and there. Chain Stitch produces a very similar effect though.

Backstitch - This is a stitch I mostly use for garment construction, and it produces nice strong seams, but it’s also good for embroidering thin and fairly smooth outlines. It’s what I used for most of the embroidery on my monster waistcoat.

There are a lot more embroidery stitches, but that’s most of what I’ve been using!
Taken individually the stitches themselves are fairly easy, and when you use them all together in different shapes and colours you get something that can look much more complicated than it really is. I hope this is sufficient to get you started on whatever it is you’re looking to embroider.
Remember to always do samples before starting a Big Project!
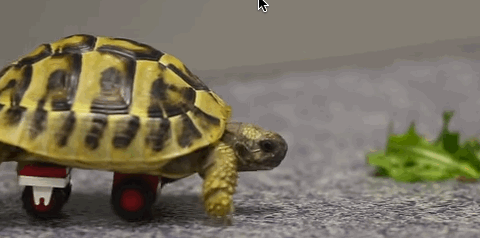
Tortoise Gets Wheelchair Made From LEGO Bricks, Skates Around Like A Pro
“LEGO bricks are making life a lot easier for this critter.
Last year, Iris Peste of Germany began noticing something peculiar about her tortoise, Blade, Ruptly TV reported.
“I noted for the first time that Blade wasn’t so active and fit as the other two turtles [I own],” Peste said, according to the video’s description.
When she brought Blade to veterinarian Dr. Carsten Plischke, it was discovered that he had a metabolic bone disease and couldn’t support the weight of his shell. That’s when Plischke had an idea.”
See the full video from Ruptly TV at the huffingtonpost.

This is what a mass migration of stingrays looks like. Study the creatures of the deep and become an Oceanographer.
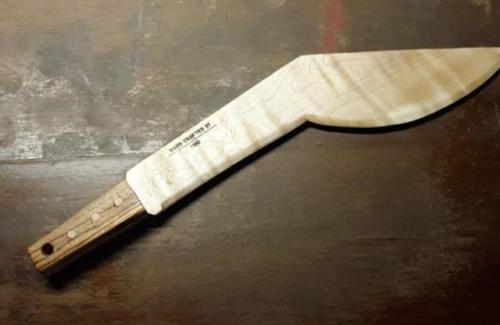
via /r/woodworking
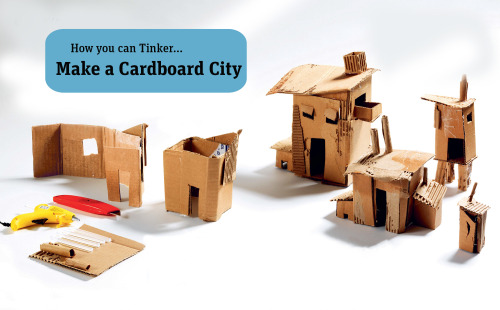
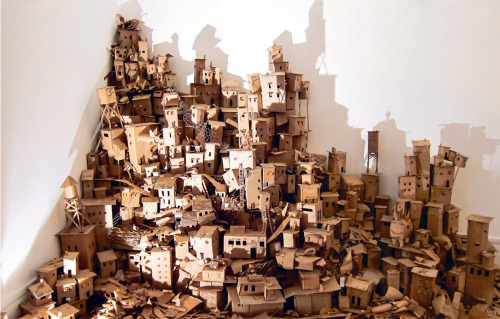
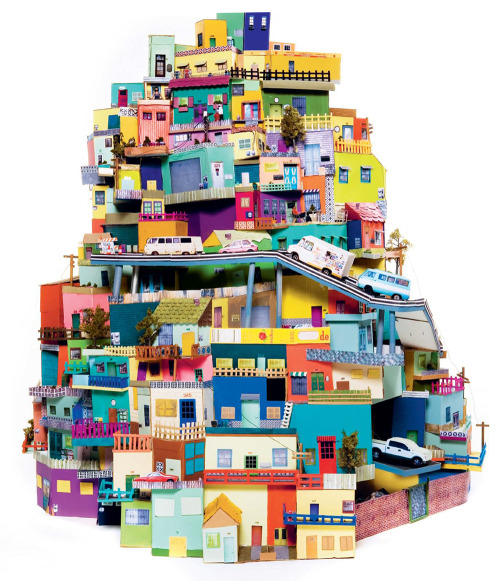

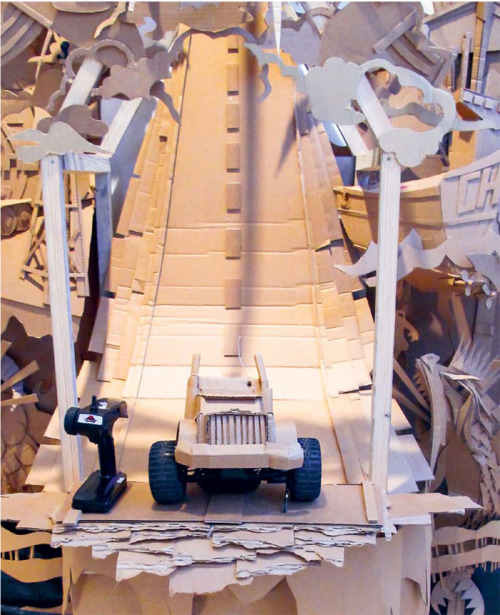

Learn how the Cardboard Institute of Technology (CIT) constructs disposable multiverses. #tinkeringtuesday Working out of a huge, shared warehouse space on Treasure Island in the San Francisco Bay, CIT builds sprawling mythologies and microworlds out of scavenged cardboard and hot glue (bought in 20 lb. boxes). Want more details or suggestions? This activity and over 150 more from artists and tinkerers are featured for you to try yourself in The Art of Tinkering, available now at http://tinkering.exploratorium.edu/the-art-of-tinkering


By instagram.com/genialetricks.de

Gallium is a metal with such a low melting point that it can melt in just a glass of warm water.
[Click for more interesting science facts and gifs]


Before and After: 5 Laundry Rooms That Make Washday More Fun


Micro fungi of Australia | images by Stephen Axford
-
 spidergoatduex liked this · 1 year ago
 -
 rgfellows reblogged this · 4 years ago
 -
 nayxolotl liked this · 7 years ago
 -
 masterbox reblogged this · 8 years ago
 -
 ranah-arrowsong reblogged this · 8 years ago
 -
 the-arcane-archives-archived liked this · 8 years ago
 -
 zerogravity85 liked this · 8 years ago
 -
 hillbillynick liked this · 9 years ago
 -
throwgernade-blog reblogged this · 9 years ago
-
throwgernade-blog liked this · 9 years ago
-
 this-wounded-wolf liked this · 9 years ago
 -
 bellecavalier liked this · 9 years ago
 -
 brandonwadley liked this · 9 years ago
 -
 impossiblystupendousnight-blog reblogged this · 9 years ago
 -
impossiblystupendousnight-blog liked this · 9 years ago
-
impossiblystupendousnight-blog reblogged this · 9 years ago
-
 drajl19 liked this · 9 years ago
 -
 voplenitsa reblogged this · 9 years ago
 -
 velocitybow-blog liked this · 10 years ago
 -
 fest-und-treu liked this · 10 years ago
 -
 antlered-doe reblogged this · 10 years ago
 -
blogflecher liked this · 10 years ago
-
 faldre liked this · 10 years ago
 -
 me-and-you123 reblogged this · 10 years ago
 -
 anchor-point-zen reblogged this · 10 years ago
 -
 throw-yourself-at-the-ground liked this · 10 years ago
 -
 fandom-nerd15 reblogged this · 10 years ago
 -
fandom-nerd15 liked this · 10 years ago
-
 treesareforme-blog liked this · 10 years ago
 -
 d-r-eam--c-a-tcher-blog reblogged this · 10 years ago
 -
 rldraider7 reblogged this · 10 years ago
 -
 westexas liked this · 10 years ago
