8.30.15// Anatomy And Physiology Body System Flow Chart


8.30.15// Anatomy and Physiology body system flow chart
More Posts from Marathon-notasprint and Others


October 2015 Monthly Pastel Planner Printables
By request! Comes in the 5 colours pictured above (peach, pink, lilac, blue, mint). There’s two versions. One where the week starts with Monday and one with Sunday.
Download from Google drive for free (PDF files):
Starts with Monday (October 2015)
Starts with Sunday (October 2015)
My other pastel planner printables:
Weekly
Daily
Hope you enjoy them! If you share pictures with them here, tag me with #studyblrbunny.


i never used to do notes for any classes but this year i promised myself to put effort into making my notes look decent and it’s definitely a work in progress ✨


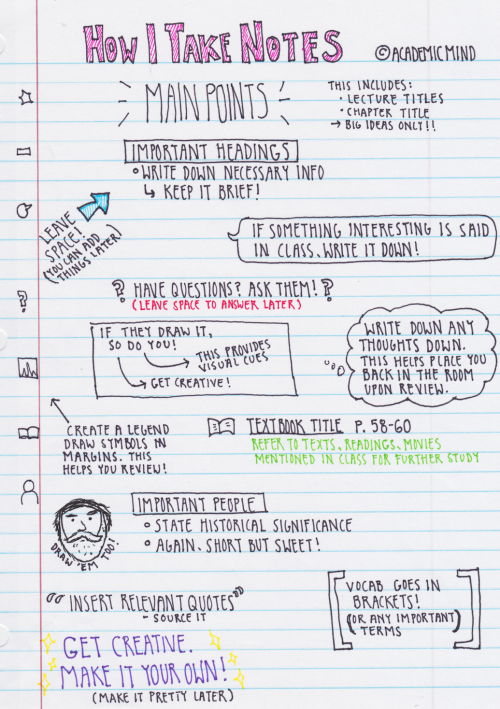
Some of you have requested that I show you my note taking technique. This is in no way a proven technique, but it really works for me and many of my professors have applauded my structure. So try it, and if you like it and it works for you, great! If not, I commend you on having a more structured system! These are my general rules when I take notes:
1. Leave space. A lot of space. While going through previous notes, whether it be right after class or a month later, I always found that I had information that I wanted to add, and cramped pages never allowed for that. Plus, it’s a bit less daunting on the eyes when there is some room between ideas. I do realize that this is not very eco-friendly, but hey!
2. Use the margins in a smart way. I have developed a “legend” of symbols to draw in the margins so that when I need a quick scan of what pages in the textbooks I referenced or vocab, I can find what I need easily. It might not seem useful on this one page, but when you have a whole 3″ binder full of notes, it’s a blessing.
3. Write on one side of the page. Again, not a eco-friendly option. However, I’m sure there are those of you (my past self included) who have wished you just had another page to write down book notes or additional thoughts without having to get a fresh paper. This solves that!
4. Make it pretty later. I know this page is visually appealing, but keep in mind that I was in my nice warm room by myself and listening to music while writing this. My notes straight out of class aren’t color coded and they definitely don’t have cute little decorations on them; just get the information down, worry about aesthetics later.
5. Put yourself in the classroom. You might think: “but I’m physically in the room what the hell are you talking about”. The concept is weird but it works. I always try everything I can to make sure I place as many visual cues in my notes as I can so that when I look back on them later I remember exactly where I was and what was happening. Are you not paying attention and thinking of food? Write it down. Did someone fart? Write it down. Placing yourself in the room is the most beneficial thing you can do for future you.
6. Keep it short. I can’t tell you how many times I freaked out when I first got to college because I was trying to write everything down. I was certain I was going to miss something. WELL HAVE I GOT NEWS FOR YOU. You aren’t going to miss anything if you keep your bullets to a minimum of one sentence. It’s proven that short phrases in your own words help memory better than full sentences that the professor gives you.
Finally, make it yours. This is a system that works for me because my brain is weird and can’t take notes the Cornell or outline way. The most important thing to learn in school is your own flow of things. Experiment, be creative! I hope I have helped those of you who aren’t traditional learners realize that there isn’t just one way to process information. If any of you have any questions or need specific examples, let me know! (I realize there is a typo on this but hey don’t worry about it) 🙈


Ladies and gentlemen, new guest post on the blog
5 Proved Tips for Witing a Fresh Book Review
“Do you know how to write a fresh book review? You may have already faced with this unordinary task but we have some tips for you to do it at your best. Some basic things you should know is that a book review is intended to describe, analyze and evaluate. It also should…” Read More>>
The author of the post is http://youreasystudy.tumblr.com/!
My Study Method
My post 10 types of planners got way more notes than I expected. So today I will show you how I prepare for my exams. The method I’m going to explain is the one I’ve developed over the years and got me to get all A’s in high school. From taking notes, to nailing your exam.
1. HOW TO TAKE NOTES
1.1. Sit in the front of the classroom Don’t give a f**k if you look like a dork. Make sure you can see the blackboard clearly. You should be able to look at your teacher and the other way round. In case my experience is not enough: Studies show that those who “sit in the front and center (middle) of the classroom tend to achieve higher average exam scores”. Plus, your teacher will know who you are and will be aware that you pay attention in class.
1.2. Ask questions Don’t be afraid of asking questions. This took me years. Your teacher won’t think your question is stupid - in fact, it is their job to make sure everybody learns whatever they are supposed to teach. AND even if it looks as if the whole class has already understood the lesson, trust me, they haven’t.
1.3. Don’t write every word the teacher says There’s just no point in doing such thing. Contract words and use symbols and doodles. Once you get home, fair-copy your notes if they are not clear enough (or at least, re-read them). Otherwise, when you try to study with your notes a few weeks/months later, you won’t understand a thing.
1.4. Clarify your notes What did you just write down? Was it something that didn’t appear on the book? Was it an explaination of what the book says? Some info you should expand? Use a color code or symbols to clarify your notes. It doesn’t take time but will save you time in the future.
1.5. Compact notes Write with tiny (but legible) handwriting. It is quicker, tidier, and it saves paper. Also, write in two or three columns.
1.6. How to stay motivated to take good notes Last year I told one of my best friends (who is one grade bellow me) that I would give her all my notes at the end of the year. People normally dream of setting fire to their notes (and at least in Spain, people actually do that). But this other option (giving away my notes) was good for her and for me, since whenever I felt like writing carelessly, I’d think, “she won’t understand these notes, I have to do it better”.
2. PRE-STUDYING
Start pre-studying the very first day of class.
2.1. Active reading
Everytime I see someone whose book is entirely highlighted I’m like “why don’t you just dip it in a bucket of yellow paint?”. Seriously, stop.
Underline only the key words, not the whole sentence.
Use a different color (at least) for each paragraph.
When you read a paragraph, open a key in the margin and summarize what that paragraph is saying. Use between 1 and 10 words. Write as small as you can.
Right after you finish with a page, do an outline of the whole page in order to make sure that you have understood what you’ve just read. How? Scroll down.
2.2. Make it visual
Outlines, mindmaps, graphics… it really depends on the subject. All I know is that I just CAN’T study from a block of text.
Separate coordinated sentences and link them with symbols.
Use bullets or numbers and indent.
Color is not decorative. The same color links together different ideas.
Pink highlighters are cute but they don’t highlight at all.
Small handwriting and columns are your friends.
Highlight just the KEYWORDS. About 4-8 words per page.
Don’t use the same template or style on every page, unit or subject.
Number your pages.
Here you have a messy and a tidy example:


3. STUDYING
3.1. When should you start studying?
When I was in high school, I used to start studying one or two weeks before the exam. A few days before when I was too busy. The day before when I was about to jump out the window.
Divide whatever you have to study in equal parts to make it more approachable.
Try to organize yourself so that the day before the exam you don’t have to study because you already know everything (and you just need to revise a little bit).
3.2. Studying (and by studying, I mean memorizing) Once you have read it and understood it, you have to memorize it. My favourite quote is: “Don’t practice until you get it right. Practice until you can’t get it wrong.”
These are my methods. I also recommend reading this article for more. Use the method that works best for you or all of them to ensure you’ve got it.
Write your mind-map again and again and again. Don’t change the placement of each concept in your mind-map or you’ll become confused in the end.
Translate words into drawings. Translate your drawings into words. Repeat. Repeat!
Read a little bit, try to explain it out loud as if you were a teacher. Repeat endlessly.
Make a story that helps you fully understand what goes next and WHY.
3.3. Keywords list This is the spine of my whole studying method. So basically, reduce each sub-topic to ONE word. Then reduce each topic to ONE word. Study those words by heart.
In the exam, just write down your list of keywords and you will easily remember each topic and sub-topic.
4. EXTRA TIPS
4.1. When studying a list of words or names It is really important to know how many words there are.
Make a sentence with the first letter of each word.
Make a song. You can use a jingle you already know.
Picture a scene which contains all the words.
4.2. IMPORTANT!
Highlight, bookmark and make a list of those concepts that you usually forget or make mistakes, so it is the first thing you see (and revise) the next time you study.
The night before the exam, write in a little piece of paper that thing (an important formula, something that you always forget, your keywords list…) and that’s the only thing you should revise the following day.
Talk to older students and ask them for their old exams. Your exams will probably be different, but if the teacher is the same, they’ll be similar.
5. HOW TO NAIL AN EXAM
First of all, you should take a look to the Text Anxiety Booklet. It contains a lot of information for the ones who get really anxious.
5.1. Appearance matters My teachers always say that when they are correcting our exams, illegible handwriting really pisses them off. Since they are humans, that attitude towards your exam will be unconsciously reflected on your mark. On the other hand, when they get to a visually appealing exam, they are more compassionate. Conclussion: MAKE YOUR TEACHER’S WORK EASIER.
Use your best handwriting.
Write your name on every page (if you are asked to do so).
Leave margins.
Separate your paragraphs.
Indent when necessary.
Number your pages.
5.2. Don’t ever leave a question in blank Ever. Every little point adds up to you final mark, and a blank question means 0 points. If you write something and it is wrong, you simply made a mistake. But if you don’t answer, your teacher might think that you didn’t do it because you didn’t study. However, remember that your teacher is older and wiser than you, and will notice if you are trying to fool them.
In some tests, mistakes subtract points. In that case, you’d better leave the questions you don’t know in blank unless you like taking risks.
5.3. What if you go blank First of all, wait a minute and take a deep breath. This is not a waste of time because it will actually help you do better. Now, do the rest of the exam and come back later. Then, if you still can’t remember, try retracing not what you studied but what you were doing while you were studying. Maybe you were drinking tea, maybe your father came into your room or maybe you heard something on the street. And remember that you control your breathing, and your breathing controls your feelings.
5.4. An exam is not a race I guess some people believe they’ll receive a prize if they are the first one to hand in their exam. Those people have all of my disapproval. Use all the time your teacher gives you and always, I mean ALWAYS, revise your exam before handing in it. Revise. Your. Exam. Did you follow the instructions correctly? Did you answered all the questions? Are there spelling mistakes?
That’s it. I hope you found it helpful.
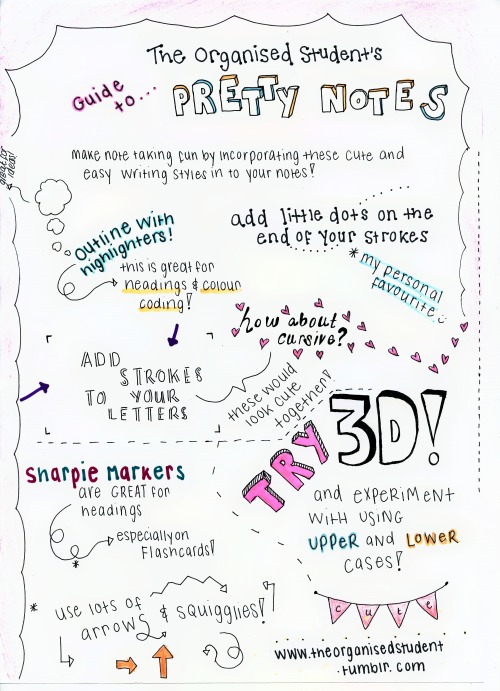
2/4/2015 // I love experimenting with pretty, new hand writing styles for my study notes! I made this info-graphic and scanned it in to show you some of the styles I am loving right now.
Medical School Resources! (and other human biology,physiology,biochemistry-related resources)
Hi Everyone!
Update: I am now officially done with my second year! I know i’ve been MIA on here for a while now - but that’s only because I was drowning in textbooks and assignments! I will be writing a whole other post on what my second year in medical school was like - so watch out for that :)
I, for one, can not just rely on one method of learning. Meaning, I’ll jump from videos, to textbooks, to flashcards. In this post I’m going to list some of my holy grail youtube channels that have helped saved me.
1) Handwritten Tutorials
https://www.youtube.com/user/harpinmartin
Every video in this channel is short, but not so much that you feel like you’re missing out on information. Definitely one to save as a favourite!
2) Armando Hasudungan
https://www.youtube.com/user/armandohasudungan
The best thing about this channel is the fact that there are over 300 videos, covering a wide range of core topics in endocrinology, neurology, physiology and pharmacology. Another pro is the presentation of topics (otherwise considered snooze-worthy) in an artistic manner!
3) Speed Pharmacology
https://www.youtube.com/channel/UC-i2EBYXH6-GAglvuDIaufQ
Raise your hand if you’ve ever fallen asleep trying to read about the mechanism of action of opioids, their side effects and contraindications. I know I have. Fret not, for this youtube channel will introduce you to a world where pharmacology is actually interesting.
4) Wendy Riggs
https://www.youtube.com/user/wendogg1
Wendy Riggs is a very down-to-earth professor in Northern California, and she covers a wide range of topics in Anatomy, Physiology and General Biology.
5) Anatomy Zone
https://www.youtube.com/user/TheAnatomyZone
A better way to learn anatomy is to supplement your textbook information with videos from this channel. The explanations and visuals provided are absolute gold.
I hope you all find these channels as helpful as I did!
While you’re on a study break:
Paint your nails. Doesn’t matter if you’re good at it or not. It’s a quiet, calming, easy activity that takes up the perfect amount of time for a break and still requires some amount of focus. Put on a Youtube video or Netflix while you do it.
Watch a John Oliver video. If you don’t know him, he’s a comedian and host of Last Week Tonight on HBO. His pieces are hilarious, informative, and all around 15-20 minutes.
Change the sheets on your bed. Changing your sheets often is good for your skin, still technically productive, and who doesn’t love snuggling up in a fresh bed after a long day?
While you’re at it, clean your space. It’ll get you on your feet and again, still technically being productive.
Make yourself something to drink. I hate to be that blogger™ but Stay hydrated, loves! No energy drinks, if you need something more exciting. We are adults in this household, we get our caffeine like adults. Always go tea or coffee.
Take a nap. There are legends that if you drink a coffee before you take a nap, the caffeine will wake you up naturally a little bit later and you’ll feel super energized. That sounds fake but idk knock yourselves out.
Put on an RIP Vine compilation and dissociate for a bit. I’m not kidding.
Take a shower. Or just stand there under the hot water a bit. You’ll feel like a new being.
Know that you are a boss
Seriously
You got this and I believe in you
-
 stationary-slutt-blog reblogged this · 6 years ago
 -
 ge-ia liked this · 6 years ago
 -
 rinrin-obliviate liked this · 6 years ago
 -
 merabellamari liked this · 6 years ago
 -
 shroomiewrites liked this · 6 years ago
 -
 jack-loves-cats-blog reblogged this · 6 years ago
 -
 l-0ollo0-l liked this · 6 years ago
 -
 pitches-and-witches liked this · 6 years ago
 -
 iamstudyingblr liked this · 6 years ago
 -
 tajomstvo-7 reblogged this · 6 years ago
 -
 imaginaryunrealinsanityworld liked this · 6 years ago
 -
jack-loves-cats-blog liked this · 6 years ago
-
 oxfrd reblogged this · 6 years ago
 -
 lawschoolstudying reblogged this · 6 years ago
 -
 lizzardtriestostudy reblogged this · 7 years ago
 -
 coperniculus liked this · 7 years ago
 -
 reallythoughtfulphilosopher liked this · 8 years ago
 -
 studyhardbethechange reblogged this · 8 years ago
 -
 uniqueradiance liked this · 8 years ago
 -
 acciosnoww-studyblr reblogged this · 8 years ago
 -
 pizzaindia00-blog liked this · 8 years ago
 -
 shortgirlprobs07 liked this · 8 years ago
 -
 girlybooknerd227-blog liked this · 8 years ago
 -
 lonely-monet liked this · 8 years ago
 -
luministudy reblogged this · 8 years ago
-
 trencherswear liked this · 9 years ago
 -
 iris-aesthetic-blog liked this · 9 years ago
 -
 terry-may liked this · 9 years ago
 -
 noemipopa liked this · 9 years ago
 -
 coral759-blog liked this · 9 years ago
 -
 jazzy124world liked this · 9 years ago
 -
 sunshinedesert liked this · 9 years ago
 -
 ladynellodee liked this · 9 years ago
 -
 metime2teatime liked this · 9 years ago
 -
 celestialnympho reblogged this · 9 years ago
 -
 dreamlandxx reblogged this · 9 years ago
 -
studyingissexy reblogged this · 9 years ago
-
 studyneuro reblogged this · 9 years ago
 -
 gatheringdreams reblogged this · 9 years ago
 -
 adrasteial reblogged this · 9 years ago
 -
 study-to-the-stars reblogged this · 9 years ago