Rgfellows - RG Fellows DIY Projects

More Posts from Rgfellows and Others

DIY Maple Caramel Sauce from thebibliosphere on Tumblr
Source: thebibliosphere
Time to make some maple caramel sauce to give to the fam for the holidays. Hopefully this pot is big enough to accommodate the lava bomf about to occur because I can’t be fucked washing two pots.

We’re less than ten minutes in and it’s already doubled. I think I may have made a mistake.


Panic, a visual study in three parts.

For reference, this is a 6 quart pot filled with molten sugar. And now I need to add butter to it. Fucking pray for me.
I lived, bitch!

By the magic of time lapses and a lot of flailing, we have salted maple caramel sauce. I did not attempt to record the chaos that occurred when I added the butter, but let’s just say I absolutely 100% needed a bigger pot for the portion size I made. I did not however melt the pot to the stove. This time.
Anyway, assuming you want to do this safely, here’s how you make a sane sized batch of maple caramel sauce.
Ingredients:
2 cups maple syrup (needs to be the real kind, will not work if it has corn syrup in it)
4 table spoons of butter
½ cup milk (if you want it to be really luxurious, use ½ cup heavy cream. I just used milk because that’s what I had and fuck going to the grocery store)
pinch of salt
Things you will need:
A medium to large sized saucepan with a heavy bottom. Pots with a lot of height are preferable, as this mother fucker likes to climb.
A wooden spoon or silicone, heat resistant spatula. Do not use plastic or nylon, they may will melt.
A candy thermometer.
Something to store it in.
Better self preservation skills than I have.
Method:
Imagine you are a maple tree
Take your maple syrup and put it over a medium heat. Do not start out on a high heat or you’ll burn the sucker. Gradually bring it to a boil until it is between the temperature of 225F - 230F.
Unlike my maple candy recipe, you do not want to go above 230F, because it will start to harden and you don’t want that. You also don’t want to stir as much, cause stirring causes crystallization and we want this sauce to be smooth.
Once it’s reached the desired temp, remove it from the heat and carefully add your butter. It may fizzle and seize, but that’s okay, just keep stirring until it’s melted in.
Add your milk/cream and stir in until blended.
Add a pinch of salt. Stir.
Pour into a heat proof jar, preferably using a ladle because handling hot sugar is dangerous (omg please be careful, don’t hurt yourselves), and allow to cool before refrigerating.
Don’t worry if it looks really thin, it’ll thicken up as it cools. Like so:

If it doesn’t thicken up, you needed to heat it longer. If it’s grainy, you over stirred it. If it’s melted to your stove you over heated it and possibly needed a bigger pan. Practice makes it easier, but generally speaking I find newbies to caramel actually find this easier than sugar cane caramel, largely because there’s no eyeballing involved.
If stored properly in the refrigerator this should last two weeks. Like most home made caramel sauces. If you freeze it in a freezer safe jar, it should last up to 2-3 months.
Enjoy.
Velux balcony roof window installed by instagram.com/patrynwoodworks


Beautiful interiors by shokodesign on Instagram
By instagram.com/chefclubtv

via /r/woodworking
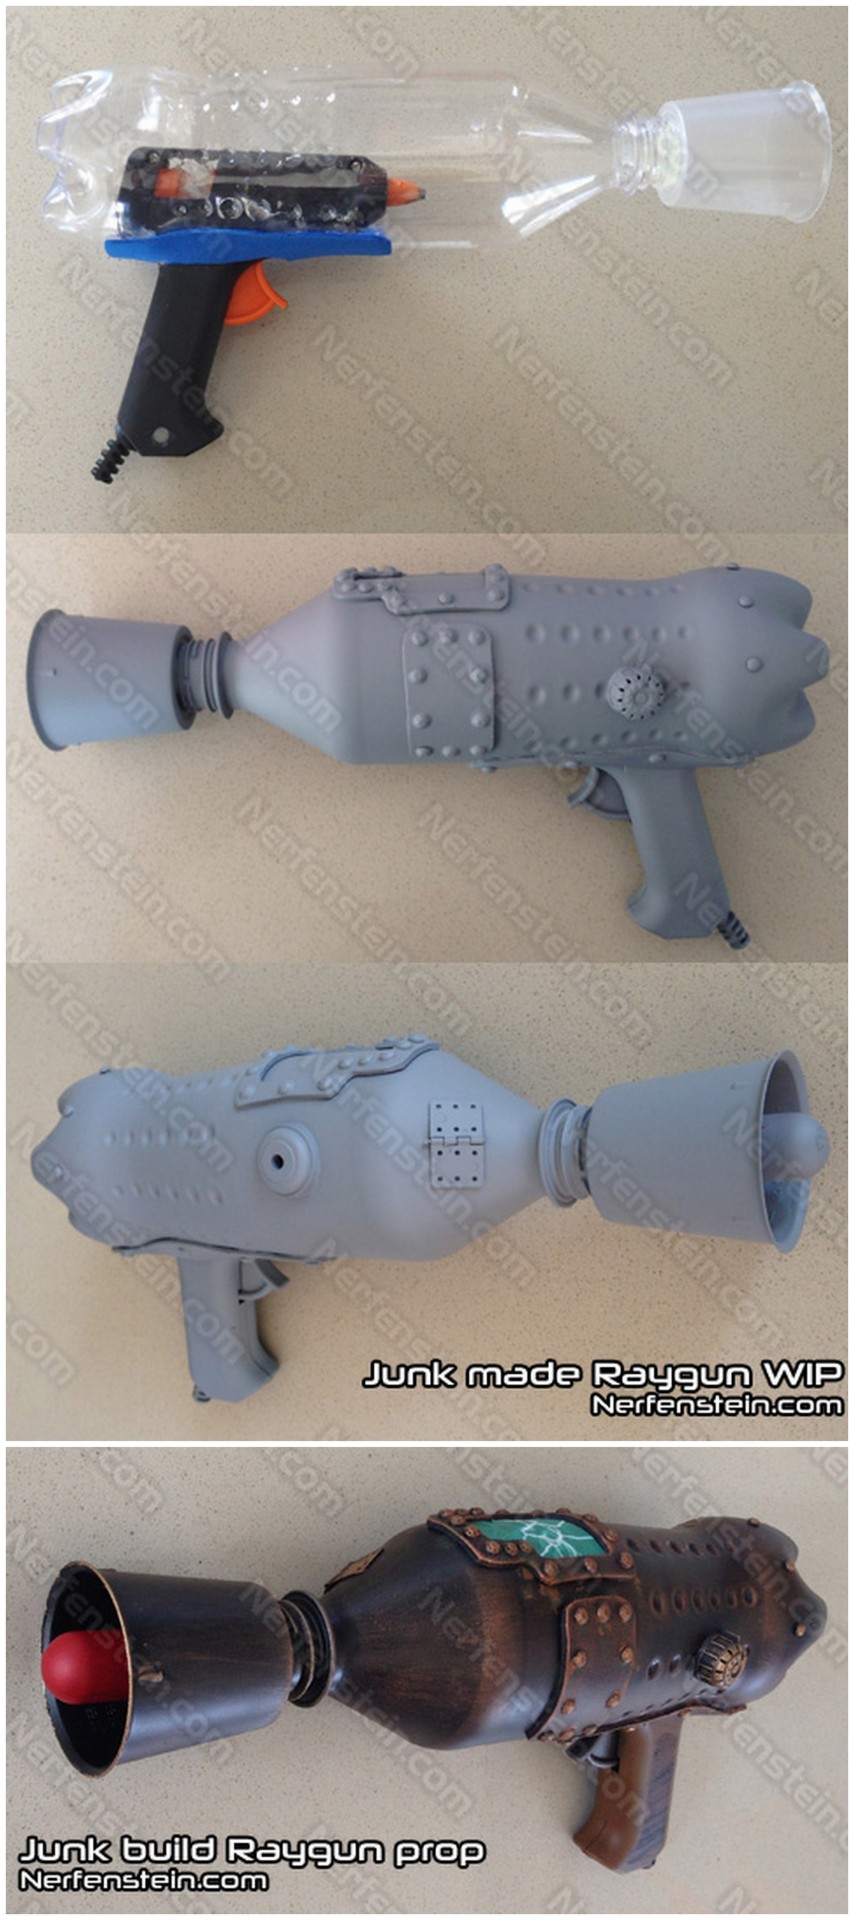
DIY Dan Dare Steampunk Ray Gun
More photos of the finished DIY Steampunk Ray Gun below

This is a junk build made of the following:
old plastic sprite bottle
broken hot-glue gun
medicine cup
C02 tube
irrigation switch
foam
craft gems
primer and paint.
TIP: Rub n’ Buff is a crafter’s secret weapon.
For everything DIY Steampunk go here.
Find more info for this DIY Steampunk Ray Gun from Nerfenstein here.
More DIY Ray Guns
For this DIY Easter Egg Ray Gun Tutorial from EPBOT go here.

Make a $2 Dollar Store DIY Steampunk Ray Gun from EPBOT here.

For the DIY Steampunk Ray Gun Display Stand Tutorial from EPBOT go here.


via /r/woodworking

By SoYummy on Instagram
-
 caneverythingcalmdownplease liked this · 1 year ago
 -
 acebee70 liked this · 3 years ago
 -
 rgfellows reblogged this · 4 years ago
 -
 unapologetically-yellow reblogged this · 4 years ago
 -
 tiaisthebest liked this · 4 years ago
 -
 time-of-the-heart liked this · 4 years ago
 -
 mermaiddis reblogged this · 4 years ago
 -
 halfwaysleeping liked this · 4 years ago
 -
 jewelsfern liked this · 4 years ago
 -
 lalakay-love liked this · 4 years ago
 -
 dragoncaverns liked this · 4 years ago
 -
 digidiskette reblogged this · 4 years ago
 -
 evanzselinn liked this · 4 years ago
 -
 2s3t liked this · 4 years ago
 -
 2lazy2upd8 liked this · 4 years ago
 -
 ohitsringo reblogged this · 4 years ago
 -
 burningthestarlight liked this · 4 years ago
 -
 bkiloo liked this · 4 years ago
 -
 rychazz liked this · 4 years ago
 -
 sheisunique reblogged this · 4 years ago
 -
mermaiddis liked this · 4 years ago
-
 sublimesoulsblog liked this · 4 years ago
 -
 watchtimestop reblogged this · 4 years ago
 -
watchtimestop liked this · 4 years ago
-
 voidofstarryink liked this · 4 years ago
 -
 elfyz reblogged this · 4 years ago
 -
 self-fulfilling-prophet liked this · 4 years ago
 -
 reasonpeason liked this · 4 years ago
 -
 popthecherry liked this · 4 years ago
 -
 fadedth0ughts liked this · 4 years ago
 -
 devins-arts-and-crafts reblogged this · 4 years ago
 -
 lexiemae liked this · 4 years ago
 -
 miniaturelightfun liked this · 4 years ago
 -
 iptdmoe liked this · 4 years ago
 -
 qpqdelia liked this · 4 years ago
 -
 gommyguts liked this · 4 years ago
 -
 cautiousgoose liked this · 4 years ago
 -
 earthnevv liked this · 4 years ago
 -
 happylittlecephalopod liked this · 4 years ago
 -
 effervescentraccoon liked this · 4 years ago
 -
 stuffandatherstuff liked this · 4 years ago
 -
 blithesea liked this · 4 years ago
 -
 asgardian-viking reblogged this · 4 years ago
 -
 preidyboy reblogged this · 4 years ago
 -
 ultrarebelheart liked this · 4 years ago
 -
 powerbadger liked this · 4 years ago
