Coffee Colour ☕

coffee colour ☕
6aintme
More Posts from Purpletelescope and Others
Duolingo Spanish Vocab: Science

Duolingo recently rolled out a new feature that includes a dynamic list of vocabulary terms as new lessons are completed. I love this feature and its way of keeping track of words and phrases that are getting rusty, but I want a way to categorize the terms based on subject. Until a feature like that rolls out (if ever), I’m going to start posting subject- and lesson-specific vocabulary lists for Duolingo Spanish.
el análisis analysis
la atmósfera atmosphere
la ciencia science
el científico, la científica scientist
el concepto concept
los descubrimientos discoveries
la distancia distance
el elemento element
la energía energy
el equilibrio balance, equilibrium
la filosofía philosophy
la física physics
la fórmula formula
la función function
la información information
el laboratorio laboratory
el límite limit
la línea line
la masa mass
la materia matter
la medida measurement
el método method
el núcleo core, nucleus
la observación observation
la profundidad depth
el promedio average
la proporción proportion
las proteínas proteins
los puntos points
el químico, la química chemist
la superficie surface
la sustancia substance
la técnica technique
el técnico technician
la tecnología technology
la teoría theory
la temperatura temperature
la tesis thesis
la Tierra Earth
el universo universe
la velocidad speed
el volumen volume


Asperitas and Mammatus
Well-defined, wave-like structures in the underside of the cloud; more chaotic and with less horizontal organization than the variety undulatus. Asperitas is characterized by localized waves in the cloud base, either smooth or dappled with smaller features, sometimes descending into sharp points, as if viewing a roughened sea surface from below. Varying levels of illumination and thickness of the cloud can lead to dramatic visual effects.
Occurs mostly with Stratocumulus and Altocumulus
Mammatus is a cellular pattern of pouches hanging underneath the base of a cloud, typically cumulonimbus rainclouds, although they may be attached to other classes of parent clouds.
source | source | images: x, x, x, x, x, x, x
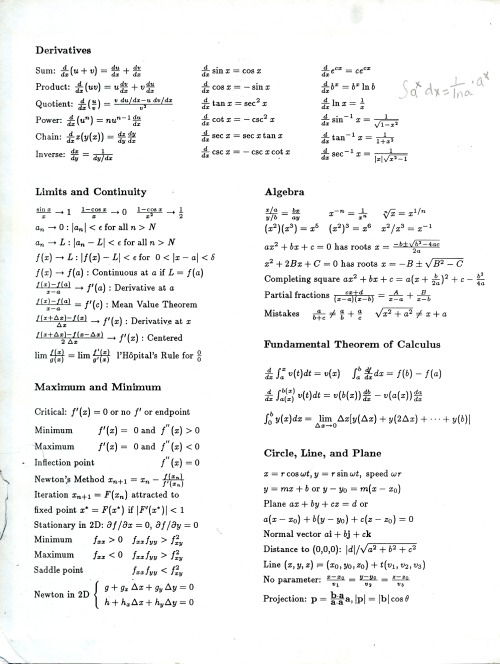
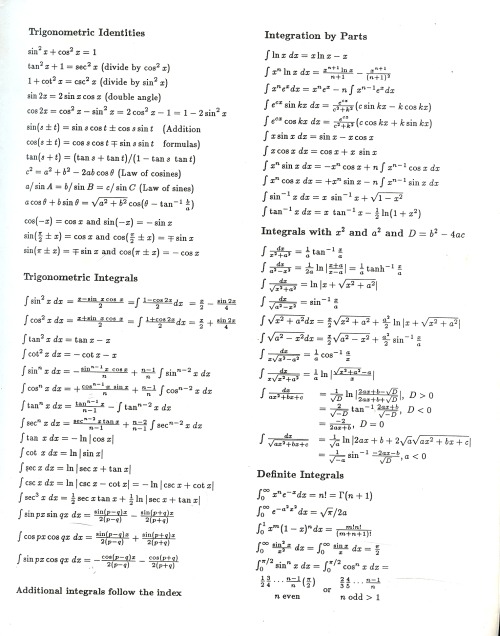
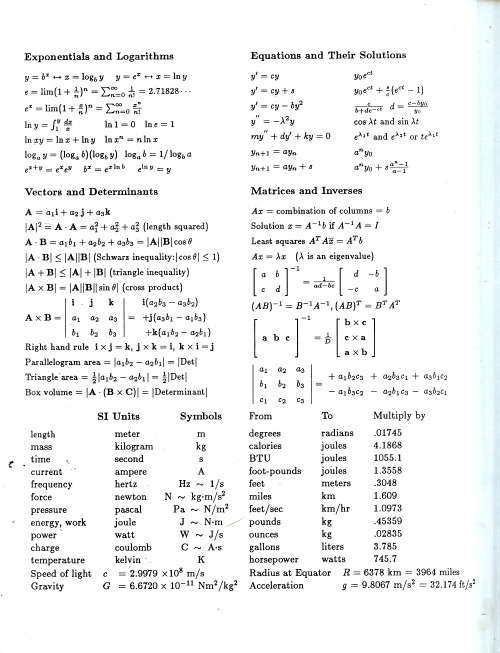

Scans of the inside covers of Strang’s Calculus, which you can legally-download for free here from the MIT website. This is my all-time favorite math or physics textbook. Scanned it so I could cut and paste it into my new sketchbook, wanna try and make a ~cool artistic~ reference poster out of it, ‘cuz I’ve been real into that idea since I took notes about rings for the algebra midterm on a big piece of watercolor paper.


by Laure S


(Travel Journal)
New Zealand 2022: Christchurch
Christchurch was so much smaller and quieter than I had expected, especially having lived in Melbourne for years. It felt very much to me like a big town than a city, resembling Ballarat or Bendigo in Australia, but with its unique charms, of course.
We visited the Tannery (Yes I've posted this spread inspired by the vibes there before, so this is a re-post), a quaint shopping area with beautiful boutiques and vintage shops. Most of the time however, we were around the Riverside Market, trying the local produce or just enjoying the vibes of the place.
Christchurch Botanic Gardens was definitely a highlight, with flowers I've never seen before, massive trees, beautiful water features and charming rose gardens. I enjoyed Christchurch Botanic Gardens more than the one in Auckland, although the weather probably played a big part! The curated experience of the two gardens were very different though, so it's probably not a fair comparison. But I'd definitely recommend all three areas to anyone visiting Christchurch.
Listen to your elders
So last week I posted abut the importance of downloading your fic. And then three days later AO3 went down for 24 hours. No one was more weirded out by this than I was. But while y’all were acting like the library at Alexandria was on fire I was reading my download fic and editing chapter eight of Buck, Rogers, and the 21st Century. And also thinking about what I could do to be helpful when the crisis was actually over.
So first off, I’m going to repeat that if you’re going to bookmark a fic, you really need to also download the fic and back it up in a safe place. I just do it automatically now and it’s a good habit to get into.
But let’s talk about some other scenarios. Last October I lost power for over a week after hurricane Ian. Apart from not having internet or A/C I did find plenty to do, I collect books so I had plenty to read, but maybe, unlike me, your favorite comfort reads aren’t sitting on a bookshelf. So let’s do something about that, shall we?
In olden times many long years ago around 1995 we printed off a lot of fic. It was mostly SOP to print a fic you planned to reread and stick it in a three ring binder. And that’s totally valid today too, but you can also make a very nice paperback with a minimum amount of skill and materials.
Let’s start with the download; Go to Ao3 and select your fic, we’ll be working with one of mine. This method works best with one shots, long fic tends to need a more complicated approach. Get yourself an HTML download

Open up the HTML download and select all then copy paste into any word processor. Set the page to landscape and two columns, then change the font to something you find easy to read, this is your book, no judgement. This is all you have to do for layout but I like to play a little bit. I move all the meta, summary, notes to the end and pick out a fun font for the title:

No time like the present to do a quick proofread. Congratulations, you’ve just created your first typeset. On to the fun part.
Now you’re going to need some materials: 8.5x11in paper ruler one sheet of 12x12 medium card stock (60-80lb) scissors pencil pen or fine tip marker sheet of wax paper white glue two binder clips 2 heavy books or 1 brick butter knife
You’ll also need a printer, if you’re in the US there is almost a 100% chance your local library has a printer you can use if you don’t have your own. None of these materials are expensive and you can literally use cheap copy paper and Elmers glue.
Print your text block, one page per side. Fold the first page in half so that the blank side is inside and the printed side out:

use the butter knife to crease the edge. Repeat on all the sheets. When you’ve finished, stack them up with the raw edge on the left and the folded edge on the right. I used standard copy paper, because you’re only printing on one side there’s no bleed to worry about. Take the text block and line everything up. Use the binder clips to hold the raw edge in place.
Wrap the text block in the wax paper so that the raw edge and binder clips are facing out. I’m going to use my home built book press but you don’t need one, a brick or a couple of books or anything else heavy will work fine.

Once the text block is anchored down, take off he binder clips and get out the glue.

You can use a brush but you don’t need one, smear some glue on that raw edge.
Go make a margarita, watch The Mandalorian, call your mother. Don’t come back for at least an hour
In an hour smear some more glue on there and shift your brick forward so that the whole book is covered. This keeps the paper from warping. While glue part 2 is drying we’ll do the cover. Get out your 12x12 cardstock

Mark the cardstock off at 8.5 inches and cut it. Measure in 5.5 inches from the left and put in a score line with the butter knife (the back edge not the sharp edge)
Carefully fold the score line, this is your front cover. You have some options for the cover title, you can use a cutting machine like a cricut if you have one, you can print out a title on the computer and use carbon paper to transfer the text to the cardstock. I was in a mood so I just freehanded that beoch. Pencil first then in pen.
Take your text block out from under your brick. Line it up against the score mark and mark the second score on the other side of the spine

Fold the score and glue the textblock into the cover at the spine. Once the glue dries up mark the back cover with the pencil and then trim the back cover to fit with your scissors.
Voila:


I’m going to put this baby on the shelf next to the Silmarillion.
The whole process, not counting drying time, took less than an hour.
If you want to make a book of a longer fic, I recommend Renegade Publishing, they have a ton of resources for fan-binders.


Sometimes I open this book again every once in a while to just see these. God I miss my shitty handwriting (that's a lie. No I do not.)
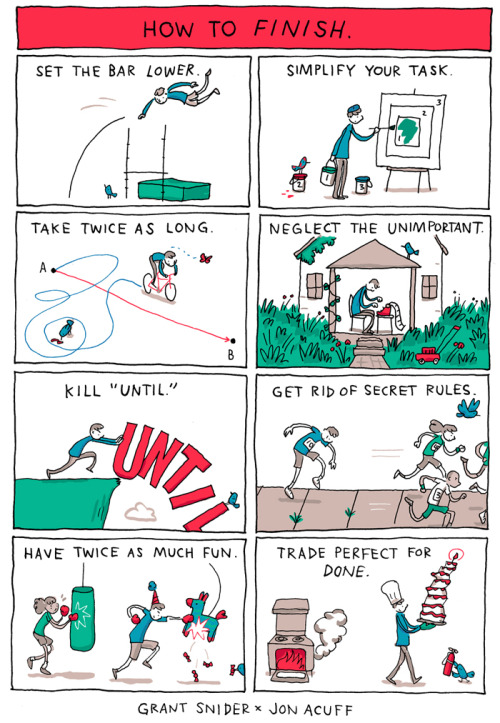
How to Finish
I drew this poster for Jon Acuff and his FINISH book tour. Big thanks to Jon for this collaboration, his book has some great ideas about how to complete creative and life goals.

-
 laperlla reblogged this · 1 month ago
 -
 mariadreams liked this · 1 month ago
 -
 greyashowl liked this · 1 month ago
 -
 blackioannis liked this · 1 month ago
 -
 wishfuldreamings reblogged this · 1 month ago
 -
 crossdresserica liked this · 1 month ago
 -
 ansatsu-sha reblogged this · 1 month ago
 -
ansatsu-sha liked this · 1 month ago
-
 9teenninety5 reblogged this · 1 month ago
 -
 the-portrait-of-laura-hunt reblogged this · 1 month ago
 -
the-portrait-of-laura-hunt liked this · 1 month ago
-
 imknotnice liked this · 1 month ago
 -
 persephone-sighed reblogged this · 1 month ago
 -
 mikefrawley liked this · 1 month ago
 -
 justmeagain4 reblogged this · 1 month ago
 -
 mvseumfits liked this · 1 month ago
 -
 northernmood liked this · 1 month ago
 -
 fromvodkawithlove reblogged this · 1 month ago
 -
wishfuldreamings liked this · 1 month ago
-
 walkingfree liked this · 1 month ago
 -
 dancinggalone reblogged this · 1 month ago
 -
dancinggalone liked this · 1 month ago
-
 galhardia reblogged this · 1 month ago
 -
rowen2008 liked this · 1 month ago
-
 bentpages reblogged this · 1 month ago
 -
 sleeping-in-times reblogged this · 1 month ago
 -
 daisylav liked this · 1 month ago
 -
 tat2dbear liked this · 1 month ago
 -
 pascallyt reblogged this · 1 month ago
 -
 tea-and-grace liked this · 1 month ago
 -
tinmwky liked this · 1 month ago
-
 clementineswann liked this · 1 month ago
 -
 hummingbird006 reblogged this · 1 month ago
 -
hummingbird006 liked this · 1 month ago
-
 imlikemoony reblogged this · 2 months ago
 -
imlikemoony liked this · 2 months ago
-
 imperfect-danna reblogged this · 3 months ago
 -
imperfect-danna liked this · 3 months ago
-
 itsmetippyy reblogged this · 7 months ago
 -
 dancing-coyote liked this · 7 months ago
 -
 aquatixwitch reblogged this · 7 months ago
 -
 nerdia-a liked this · 8 months ago
 -
 smell-the-flowers-in-the-chaos liked this · 9 months ago
 -
gooblin23 liked this · 9 months ago
-
 safetymesh liked this · 9 months ago
 -
 skiagrafia reblogged this · 9 months ago
 -
 vegan-y2k-fantasy liked this · 9 months ago
