Chibi Foliage Guide: Rose (pt.2)

Chibi foliage guide: Rose (pt.2)
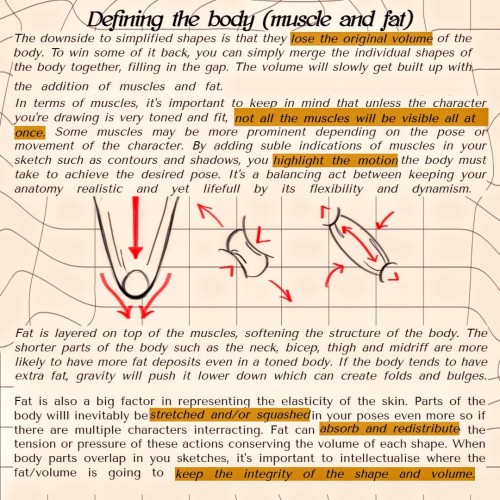
More Posts from Kaylaaplaf and Others


5K notes and i come out as trans to my parents (tehe unrealistic for a reason 😊😊😊)
(inspo from @madambellepepper lmk if u want me to take this down)
RAHHHH
I keep seeing these so here we go
10k notes before may ends and I'll come out to my friends as bisexual no limit (yes it's unrealistic on purpose I'm a coward) I'll tag a few: @deadskincellsonyourpillow @system-of-cats @sillyness-incarnate
I hit 1k subscribers right in time for my fourth tutorial! 🎉🎉 Thank you so much for your support in my other tutorials it really means a lot! I'll soon post a giveaway to celebrate all this so keep an eye out if you're interested!👀
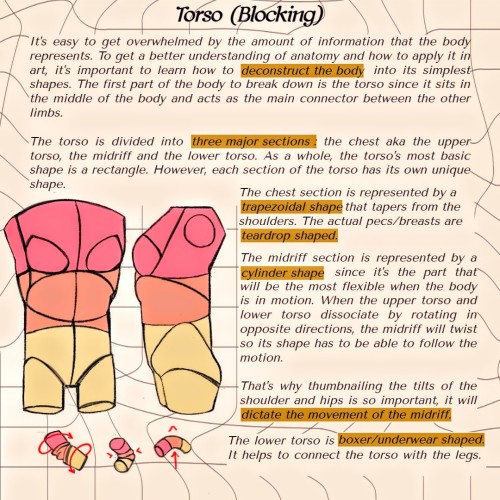
I hope this helps some of you in your art journey and I hope it's well articulated 😩🤞. Anatomy is hard to explain so feel free to send me some ask if you'd like me to elaborate more.
Bad taste cuz some flavors coat your mouth with a specific flavor and no matter how much water you drink, it will never go away
If you're neurodivergent which one is worse (for you!)?
-a disgusting smell
-uncomfortable clothes
-an annoying sound
-feeling too cold/too warm
-a bad taste in your mouth
-too many lights/lights being too strong
-not neurodivergent option/see results


Artist: RaeGunBlast

@dimiclaudeblaigan asked for a tutorial on how to begin drawing. Good news! If you can draw a funky looking stick man, you have already started!
I think that stick people are a great starting point for artists because of the things you can learn from them that will be important later on.
If you are able to draw a circle and a couple of lines, you can easily put together a stick person.

Congratulations! You have started to draw. :)
A stick person is a very minimal artistic representation of a real life person. It is simple yet recognizable, and is widely used in art, media, and signage.

But what can a stick person teach us about drawing people that look more like… well, people? Lets have a look!
By simply adding a few more lines, we can add a pair of eyes and a mouth. Maybe even a little triangle nose! Or half circles for ears. We can now draw a face, which provides a basis for all sorts of expressions.

These simple additions can allow us to explore the wide range of human emotion and individuality.

This may seem like the basics of the basics. But that is what we want! In order to get to the point where we are able to draw complex, elaborate representations of humans and objects, we will need to start with simple shapes like lines and circles and build our understanding from there.
For instance, lets give our stick person some cool new features, such as hands and feet. I chose little squiggly circles to represent hands, and triangles to represent feet.

We can go a step further and modify the body of the stick person to include shoulders, hips, elbows and knees. These parts of the human body are quite complex in real life But here, all we need to do is add a few simple lines and dots to our stick person.

The lines provide some additional structural elements to our stick person's body, which are the shoulders and the hips. The dots indicate the points of articulation - elbows and knees, the places where the arms and legs bend!
Now we can use our stick person to show us an even wider range of human movement, action, and expression.

Our little drawing of a human being is evolving! All it took was adding a few more lines and shapes here and there.
By elongating some of the existing lines and making the head an oval instead of a circle, we can give our stick person proportions that resemble that of a real life human.

By this point, we have managed to add more complexity to our stick person simply by using our ability to draw lines, circles, and other basic shapes!

These basic ideas are the building blocks that will enable us to create more complex shapes.
The next part may be a considerable step up if you are absolutely new to drawing, but I have decided to include it in order to show you how complex objects like the human body can be built from shapes that are a bit more complex than circles and lines.
For example. Two ovals and a rectangle can be combined to create a cylinder.

Six squares can be combined to create a cube, or a box. Here, each square is distorted slightly depending on which way the cube is facing.

Note that the back faces of the cube and the bottom of the cylinder are hidden. These shapes allow us to visualize that which should not normally visible.
A sphere from all perspectives can be represented by a circle. But we can make it more like a sphere by adding lighting and shadow if we so desire.

Cubes, cylinders, and spheres are examples of 'solid shapes' because they consist of 3 dimensions.
Lets see how these solid shapes can be used to compose the human body.
By stacking three cylindrical objects, we can create a torso. Two spheres have been added to form shoulders, while a smaller cylinder forms the neck.

An arm is an alternating sequence of spheres and cylinders connected together. Note that the hand has been simplified for this example.

We can apply these solid shapes to the rest of the body to give us a more recognizable representation of the human form. It doesn't even have to be perfect. And just like that, our stick figure now has a silhouette that is unmistakably a person!

In the above examples, notice that we kept the stick person at the beginning while building up the shapes and solids around it. This is because the stick person serves as a guide for positioning the body and its various parts -> also known as posing.
You can do the same thing to everyday objects! Here, I drew a wine glass by stacking these three dimensional solid shapes.

The cup and its contents are two ovoid shapes that were cut in half. The stem is a very thin cylinder shape. The base is a cylinder with a slightly wider bottom.
Solid shapes help inform us how objects and parts of the human body may appear from different perspectives.

For example, a sphere can be used to demonstrate how the human head appears when looking up or down, turned to the side, or tilted at an angle.

With these examples, I hope I have managed to convinced you that if you can draw a circle and a couple of lines, you can draw a person! You just have to train your eye to recognize the simple shapes within complex objects. Try it with everyday objects as well! Or even your favourite media! A drawing subject can be as simple or as complex as you envision it to be.

Once you have mastered that, there are many aspects of drawing you can explore from here that may require you to seek additional resources or a fellow artist's advice.

Last of all, remember that drawing is an iterative process. Even if you draw something correct the first time, you will need to draw it again and again to get it right all times! And by making small changes like the ones we explored in this tutorial, your drawings will gradually transform!
I hope what I've demonstrated here are enough to provide the basics of how to get started with drawing objects and people, and also to help refresh more experienced artists. :) Hopefully I didn't go too off topic with what was requested, and let me know if there are any more questions I can answer.
Cheers :3


Disclaimer: I do not actually know how they paint the eyes,this is just me guessing their process purely from observations
Transcript:
General Shape:
- Upper eyelid is always thicker than the lower one
- younger characters tend to have bigger and rounder eyes than the adults
- there are five parts to an eye: 1. the upper eyelid corner(towards the nose) ; 2. the upper eyelid main part ; 3. the upper eyelid corner at the back ; 4. the lower eyelid ; 5. the iris
Eyelid:
- more muted color of the hair + accents with saturated eye color
Iris:
- lots of muted darker colors
- hue and saturation shift in lighter areas
- highlights are almost pure white
Eye drawing Steps:
sketch
flats
first shadow
first color
second shadow
highlight color
refine

BAN ON CONVERSION PRACTICES IN THE EU. GO SIGN IT. DEADLINE IS FUCKING MAY 17. WE'RE STILL MISSING 800.000 signatures. FUCKING DO IT.

-
 decayingeggs liked this · 1 month ago
 -
 houry-888 liked this · 1 month ago
 -
 phantomspider liked this · 1 month ago
 -
 zeroking6 reblogged this · 1 month ago
 -
zeroking6 liked this · 1 month ago
-
 galactaknightyaoi liked this · 1 month ago
 -
 kyenasketches reblogged this · 1 month ago
 -
 melancholnd reblogged this · 1 month ago
 -
 sailerofthemistyvalley liked this · 1 month ago
 -
 octastars liked this · 1 month ago
 -
 d-blue02 reblogged this · 1 month ago
 -
d-blue02 liked this · 1 month ago
-
 the-quest-for-quintessence liked this · 1 month ago
 -
 germanyballartsandanimations liked this · 1 month ago
 -
 frenzaie liked this · 1 month ago
 -
 cant-hear-u-im-listening-2-music liked this · 1 month ago
 -
 pepper-ff liked this · 1 month ago
 -
 blitzfox liked this · 1 month ago
 -
 unicornfoal reblogged this · 1 month ago
 -
 flyingmandala liked this · 1 month ago
 -
 lwyzlwyz liked this · 1 month ago
 -
 noxernia reblogged this · 1 month ago
 -
 detective-marshmallow liked this · 1 month ago
 -
 jsalim-art reblogged this · 1 month ago
 -
jsalim-art liked this · 1 month ago
-
 pudgebudge liked this · 1 month ago
 -
 ash-takes-a-dose-of-chillium reblogged this · 1 month ago
 -
 earthnashes liked this · 1 month ago
 -
 sipurrim reblogged this · 1 month ago
 -
sipurrim liked this · 1 month ago
-
 vanitythevantropist liked this · 1 month ago
 -
 sidyashchiy-na-plakhe liked this · 1 month ago
 -
 who-is-this-weirdo reblogged this · 1 month ago
 -
who-is-this-weirdo liked this · 1 month ago
-
 entelodante liked this · 1 month ago
 -
 vampirthedarkone liked this · 1 month ago
 -
 scentedglitterillumination liked this · 1 month ago
 -
 quickrunnerspride liked this · 1 month ago
 -
 gravitytrips reblogged this · 1 month ago
 -
gravitytrips reblogged this · 1 month ago
-
gravitytrips reblogged this · 1 month ago
-
gravitytrips liked this · 1 month ago
-
 quaelgeist333 reblogged this · 1 month ago
 -
quaelgeist333 liked this · 1 month ago
-
 bellabooberry liked this · 1 month ago
 -
 theanoninyourinbox reblogged this · 1 month ago
 -
theanoninyourinbox liked this · 1 month ago
-
 flamestar456 reblogged this · 1 month ago
 -
flamestar456 liked this · 1 month ago
