Me And My Cousin Discussing Batman Me: And Then He Adopted An Alien Telepathic Starfish And Put Him In
me and my cousin discussing batman Me: and then he adopted an alien telepathic starfish and put him in a little robin costume My cousin who just started watching Batman TAS : So there is more than one robin

Sending out the love to all my fellow donut-house-builders.
More Posts from Godwhathave-i-done and Others

Evening gown, Worth, 1910
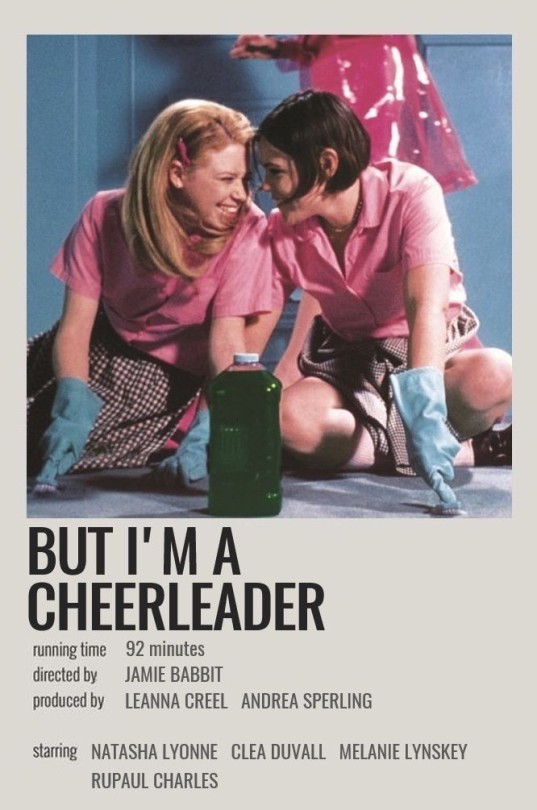
I really love 'but I'm a cheerleader'. it made 13 year old me feel normal seeing Megan who thought that liking girls was just something everybody did, also really liked that they didnt immediately turn Megan into a butch ( not that there's anything wrong with that) after finding out shes a lesbian. Cause some people just assume your straight because you aren't masc
I really liked the movie, if there are any sapphic movies like it I would really love to get recommended some
When you're trying to draw hands but cant draw them properly but you're supposed to draw them properly cause they're one of the only obvious things that differentiate your art from AI art


I am sick and tired of AI generated art, I firmly believe that we should just ban Ai art from fandoms and communities. It's even being used in goddam newspapers now, just hire some artists the impact that the image would have had just doesn't work when it's made with Ai. I wont notice your product if it has Ai art slapped over it I'd probably be busy making a post about it on tumblr instead

A simple way to recreate the Nevermore 'look' in procreate
this could (ofc) be achieved in other digital art programs as well, but since I use procreate i'll stick to what i know) I'm no expert, and i might update this as i learn, so please take all of these 'rules' with a grain of salt, these are just principles/steps that i have found work for me. i wanted to share my insight in case this could be helpful to a handful of people out there <3
All credit for this wonderful style goes to Kate Flynn and Kit Trace. i'm not claiming to know how to replicate their work, but simply offering my interpretation of it as a humble admirer :)

Brushes

Step-by-step
*this tutorial assumes you have basic knowledge of how to use procreate.

sketch/lineart - make your sketch in any way comfortable for you. use brush #1 (gesinski) in black or a grey slightly lighter than black. make sure to vary your line weight (thick -> thin). completely color in the very darkest shadows (*typically* the top lip, under the chin, pupils and ear canal). *optional: set the lineart layer to 'linear burn'.
flat colors - add background color / flat colors with brush #2 (monoline). don't add any shadows or blush at this stage, just pick the default™ color for each detail. even if you don't plan on drawing a background, i recommend filling in a color, as this helps to set the scene and to make everything look more cohesive. (note: do not color the lips at this stage)

3. blush / gradients: use brush #3 (salamanca) to color in areas of saturation (blush) + the lips. for this particular step there are a lot of brushes you could use, the key is to get one that looks 'cloudy' and has some texture to it. it can be helpful to set the blush layers to 'clipping mask' on top of the flat colors, so that everything stays within the lines. ***once added, turn the blush layers OFF as you do the shading so that they don't mess with your perception of shadows.
4. shading: (NOTE: shading layers should go above blush layers). nevermore uses a lot of sharp, clean shapes for their shadows, so avoid smudging them out! use brush #2 (monoline) and (the key) - a very saturated color. paint all of your shadows in one color, on one layer, and then set that layer to 'linear burn'. lower the opacity to 30-50%. for extra dark shadows, do the same thing on a new layer, above the previous one. you can even use the same color, 'linear burn' will automatically adjust to the flat colors beneath it so that you don't have to manually pick shadows. to clean up the shadows i like to erase with the same monoline brush, and smudge the edges just a bit with brush #5 (streaks).
at this point, depending on your colors, you could also add a highlight layer with the same technique. i'll show this a little later.


5. highlights: turn your blush layers ON again. (NOTE: highlight layers at this stage go above the lineart layer). use brush #4 (round brush) to paint in a few soft highlights with white (typically on the bottom lip, tip of the nose, the corner of the eye and on the iris). you can play around with the mode on this layer, but i find 'normal' works just fine.
finally, use brush #5 (streaks) in a slightly yellowish white to paint the sharp highlights. these are *usually* made in large, bold strokes along the edges of your figure. they are used to indicate the light source, to show wisps of hair or to create contrast with the background (see reference above). set your layer to 'add' and adjust the opacity accordingly. don't be afraid to go outside of your lineart to really bedazzle your work.
if there's anything else you'd like to add at this point (i.e. makeup or other details), i suggest using streaks or any other textured/grainy brush.
one final secret ingredient i use to really sell the lighting (especially in dark settings) is to fill in a layer on top of everything in the color of your background. set this layer to 'color' and adjust the opacity (imo 10-30% should be good, but you can really push this). this will slightly mix all of your flat colors with the background color, making them all into one unified color palette.
slap on a watermark and you're done!
here is a final look at my layers:

Applying this to different colors/lighting
here i used the same steps above on simple spheres to make them easier to understand.
row 1: an example from my original piece (annabel's hair, to be exact)
row 2: the same lighting but in a darker color, which requires an extra highlight layer in step 4
row 3: an example of shading in a dark, nighttime environment
the colors on the right are the exact ones i used to render the spheres, shown at full opacity. i am often able to use the same color for multiple shadows, but you can also make them analogous (meaning next to each other on the color wheel), such as purple and blue in row 3.

for the particular highlight in row 2 i set the layer to 'screen' and 30% opacity, but you can always play around with different layer modes. this layer goes below the lineart.
i'm sure everyone's heard the phrase "don't shade with black" by now, but i thought i would show you regardless (without the blush layer):

As you can see, even though 'linear burn' does adjust to your flat colors, it can't make up for the dullness of plain ol' grey. highlights are a little more versatile (as in pure white is easier to work with), but still, choosing a bright color close to white often makes for a richer overall effect.
Conclusion
using all of the principles above, i drew my neversona (left) in the nevermore style, and adjusted the colors in my original piece to place annabel in a dark environment. these use pretty much the exact same colors as my sphere examples, and use all the same steps i showed above.

i hope this tutorial made sense for you guys)) feel free to ask questions, i will happily clarify/expand on anything in this post. you can also repost this tutorial to other platforms, please just credit my tumblr @.
happy drawing!
I would just love for The Batman movies to not have the Joker as the main villain, I know its highly probable that joker would star in the next batman movie because of the cameo ( my least favourite part of the amazing movie) but I am just so tired of the Joker especially because Batman's extensive rogue's gallery has some amazing potential for the next big batman villian, I just want poison ivy , Mr freeze, killer croc, clay face heck even the Vintrilquiost as the next cinematic batman villain
All this discourse over who does "painting with light"
Hiroshi Nagai's paintings need sunglasses to look at.

They look like how it feels to walk across a parking lot on a 98° summer day without a speck of shade in sight.

They look like heaven but also like you'd burn your bare feet on the ground.

Even when you can see shade you know it's not enough and the minute you step out you'll be burnt to a crisp like a vampire.

And it's BEAUTIFUL
Continue✨ Keep going✨
-
 shfourrky liked this · 1 week ago
 -
 luhnsilvars liked this · 1 week ago
 -
 missfae liked this · 1 week ago
 -
 dragonbleps reblogged this · 1 week ago
 -
 gregorsamsaismydeadname liked this · 1 week ago
 -
 doe-is-tired liked this · 1 week ago
 -
 itsleezard reblogged this · 1 week ago
 -
 rorindiel reblogged this · 1 week ago
 -
 jimin-nothing-stronger liked this · 1 week ago
 -
 heroineimages liked this · 1 week ago
 -
 runeb0y liked this · 1 week ago
 -
 waterloggedsoliloquy liked this · 1 week ago
 -
 atomized liked this · 1 week ago
 -
 chuckywucky reblogged this · 1 week ago
 -
chuckywucky liked this · 1 week ago
-
 thegrandmarsh liked this · 1 week ago
 -
 brownheadedcowbird reblogged this · 1 week ago
 -
brownheadedcowbird liked this · 1 week ago
-
 colorfulcuttlefish reblogged this · 1 week ago
 -
 stavarosthearcane reblogged this · 1 week ago
 -
 noodleassociate reblogged this · 1 week ago
 -
noodleassociate liked this · 1 week ago
-
 beingstacey reblogged this · 2 weeks ago
 -
 skywindsong liked this · 2 weeks ago
 -
 faithful-grigori reblogged this · 2 weeks ago
 -
faithful-grigori liked this · 2 weeks ago
-
 paisleypanic liked this · 2 weeks ago
 -
 cityofthedaleks reblogged this · 2 weeks ago
 -
 cyewren reblogged this · 2 weeks ago
 -
cyewren liked this · 2 weeks ago
-
 honeyedhands liked this · 2 weeks ago
 -
 cyclone-rachel liked this · 2 weeks ago
 -
 apathbacktoyou reblogged this · 2 weeks ago
 -
 alverrann liked this · 2 weeks ago
 -
 st753m reblogged this · 2 weeks ago
 -
 howlatabluemoon reblogged this · 2 weeks ago
 -
 kiwibirbkat reblogged this · 2 weeks ago
 -
kiwibirbkat liked this · 2 weeks ago
-
 fangirl39 liked this · 2 weeks ago
 -
 astoundingness liked this · 3 weeks ago
 -
 littlemarie4 reblogged this · 3 weeks ago
 -
 warriorxena reblogged this · 3 weeks ago
 -
warriorxena liked this · 3 weeks ago
-
 enchanted-mp3 liked this · 3 weeks ago
 -
 purplepinksunrise reblogged this · 3 weeks ago
 -
 clevertyranttidalwave liked this · 3 weeks ago
 -
 myaphelion liked this · 4 weeks ago
 -
 stuckstuckreblogs reblogged this · 4 weeks ago
 -
 the-sage-libriomancer liked this · 4 weeks ago

35 posts