
fgadxbc
75 posts
Latest Posts by fgadxbc

Muscles of the Glabellar Region by Anatomy For Sculptors
Support the creators and check out their store!

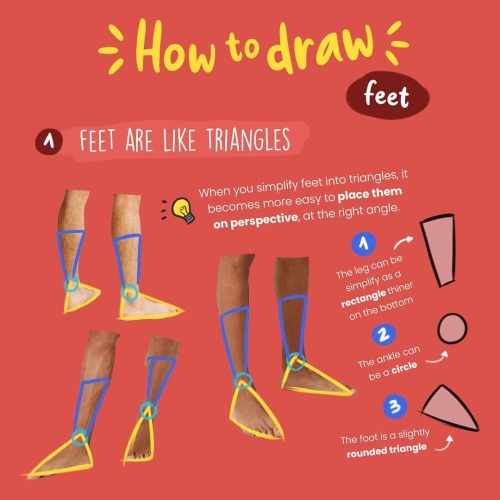
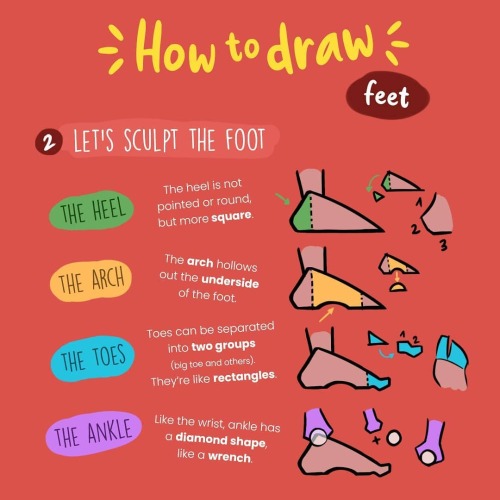


How to draw feet by zephy.fr
Support the artist and follow them on instagram!
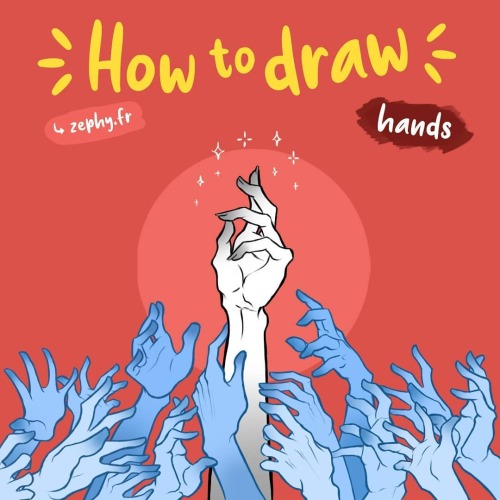
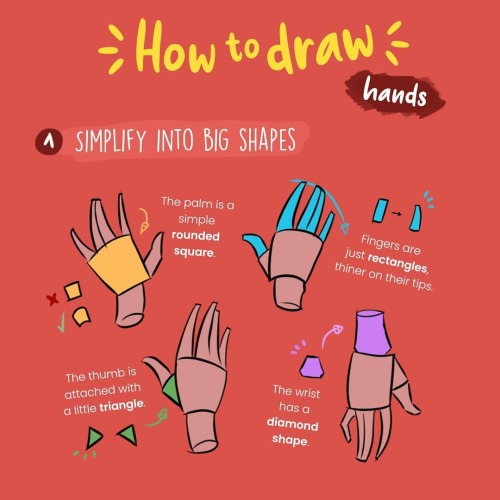
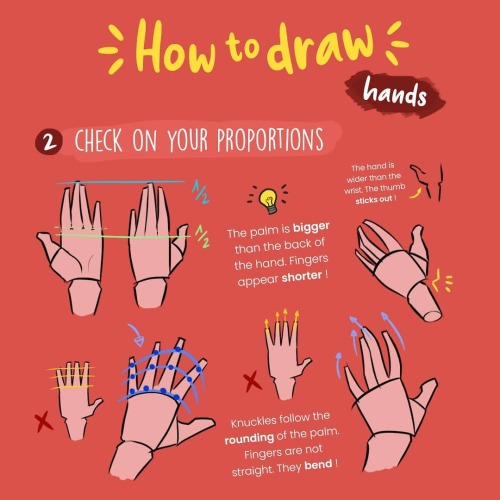
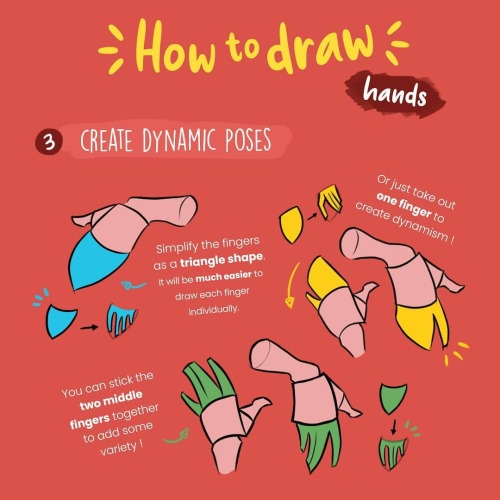

How to Draw Hands by zephy.fr
Support the artist and follow them on instagram!


Anatomy Tips by zephy.fr
Support the artist and follow them on Instagram!
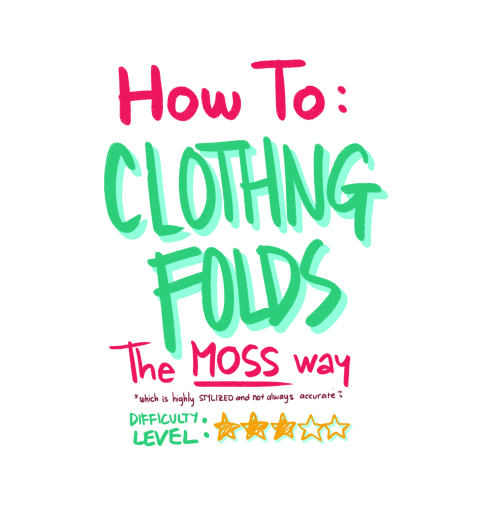
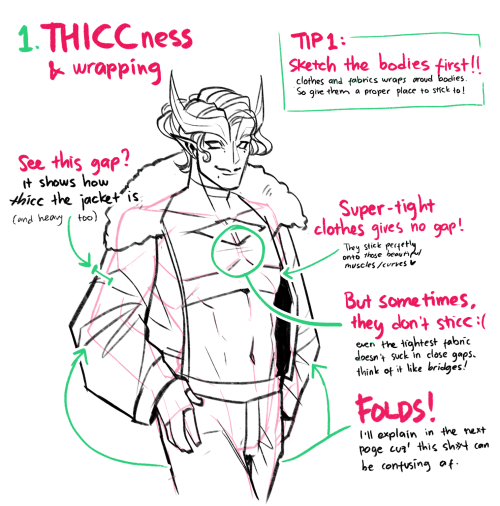
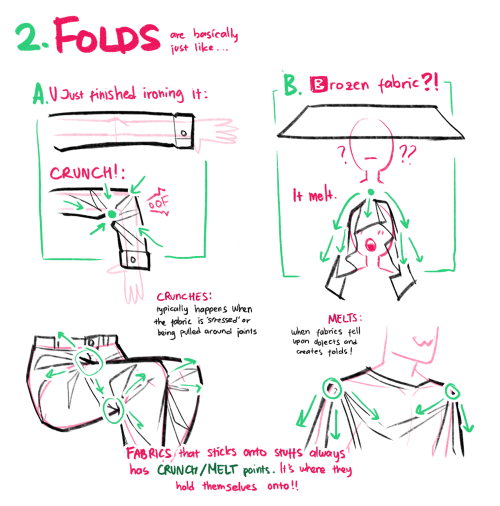
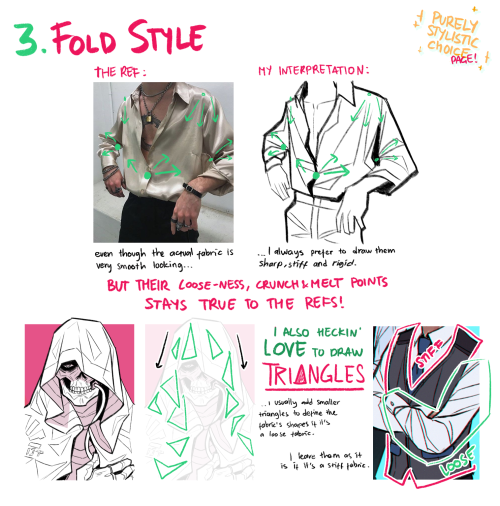
Tutorial: Clothing Folds
Im not that good of a teacher/instructor, but i hope this small tutorial on clothing folds helps ;o;
How you draw boobs? (Sorry for the weird question but-) I would like to draw the complete body of a woman than a woman who looks like a girl -Queen (Btw you draw awesome! :D)

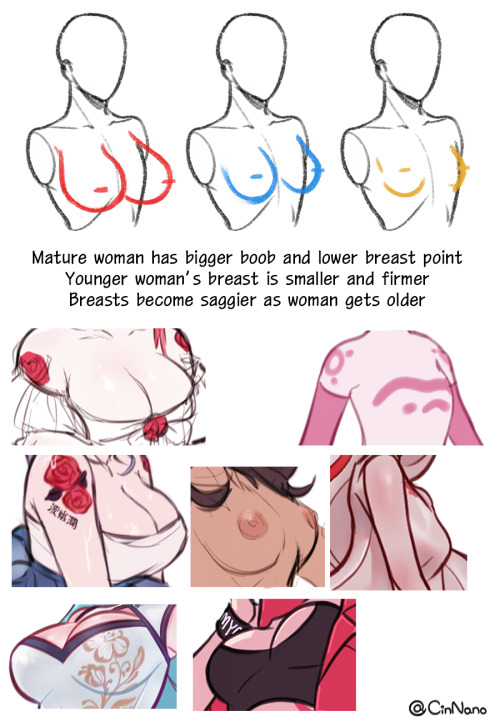

I hope this might help you! :)

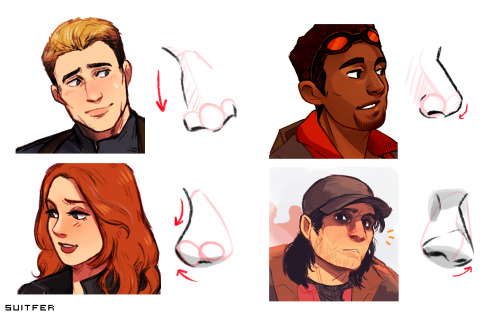
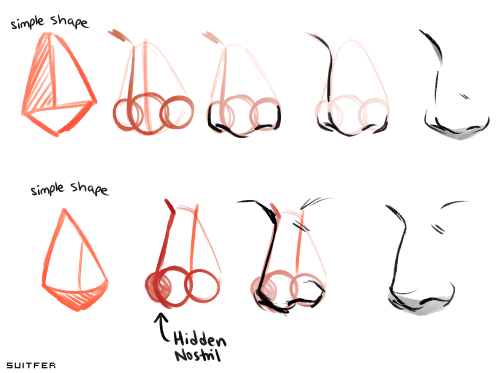
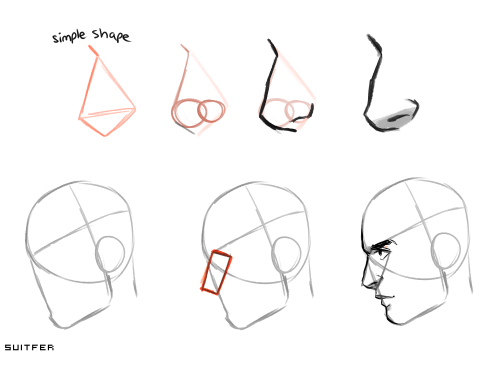
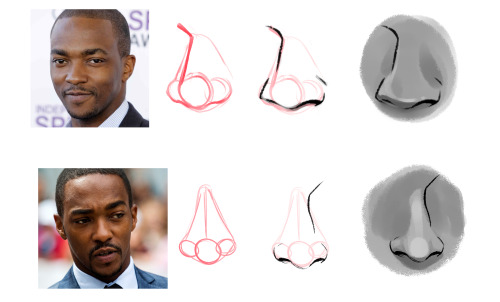
thank you so much!! noses can be tricky, but if you simplify them to triangles and circles, you’ll understand them better! applying these guidelines while studying photographs can help a lot in the process.
with my art style, i like to make the characters cartoony but still recognizable to the actors, mostly by getting their noses and head shape right. like chris evans’ nose which points down, or sebstan’s wide and squareish nose.
i also want to highlight the importance of nostril shapes, shown in the anthony mackie study :0 this is just how i do it, but there’s way more tricks and styles out there!
the rectangle-profile trick is from here, circle trick, more nose shapes: 1 and 2


Disclaimer: I never went to art school and am NOT an expert in these things, but here are some basic guidelines that I follow when I draw heads.
Here are some extremely helpful videos by Kienan Lafferty that are pretty close to how I draw heads, so I hope it’s useful for you guys too!


oh I super did not think about the lines while making these
SO here’s one of those drag things (there’s a lot though so I would recommend taking a screenshot) Many of the features can overlap (ex: A nose can be broken and flat; eyes can be small and piercing; so forth) but I didn’t want it to be very constricting.
DO u have any tips on how 2 draw anatomy???? ur anatomy is phenomenal tbh!!!!!
Well, heed my english though, english isn’t even my first language so I hope this list of tips helps you ton!! I just drew all of these now tho:

when drawing a body, there are 3 layers each, the chest , the abdomen and the waist. Reminder that they are separated in bent shapes but are joined accordingly. It kinda gives of a posture?

Joints are the reason that helps arms to maintain its shape equally, plus always make the parallel joints equal to the other when drawing a static body

or in general. its the territory of the arm??
Fr the hands, for me in most parts, I learned to love to draw hands after I knew about that a square is the basis of drawing hands.
(ps. credits to my brother because he’s the one who told me about it lol)

Though i know there are people who doesn’t use squares as a basis, sometimes you a circle can be helpful.


ALWAYS explore different body shapes, as i said, its gives off diverse character profiles, depending which is which.


But all in all, the key to the goal is always practice!! it’s the only thing that would help you develop your skills the most when you keep doing it! so yeah i hope this tutorial helps!!
and sorry for the weird english haha;;;
Sorry, if you've answered this before, but do you have any tips on drawing mouths and lips?
Hello anon! :D I’m not the best at making tutorials and giving tips but I’ll do my best to answer your question! ^^
I sure do love drawing lips! It might be in fact my favourite part of the face to draw.
Let’s see what makes them so irresistible ;)

tip 1: let them shine! that tiny shiny spot does wonders for the lips - it makes them fuller, softer and more three dimensional. It also makes the lips look slightly wet. Sexy!
tip 2: Build the depth with some darker spots. Quirking corners are great for that, and if you make the darkest spot in the middle of the mouth it seems like it’s about to part. And maybe whisper something seductive ;)
tip 3: The very middle of upper lip is my favourite area, it gives the mouth its distinct character. It’s also a great spot to play with shadows, one lighter stroke, one darker stroke and you have a very dramatic shading going on!
tip 4: When drawing lineart it’s good to keep the line varying in width and pressure. Equally thin, flat line might look good in anime, but even there it’s rarely the case. Making the line thicker in the shadowy part of the mouth adds depth to your drawing.
General remarks:
I almost never outline the upper lip, it tends to look weird. Just a thin “U” shape in the middle is usually enough.
Upper lip is usually in the shadow, at least half of it. Lower lip tends to catch the light, especially with pouty plump lips. The more shadow you add under it, the fuller the lips look.
When drawing male characters I usually play around with skin tones instead of pink and red (see the third row of examples). But it’s not a rule. Some boys rock them rosy lips. ;)
Never paint the teeth white, never. Gray, yellowish and pinkish tones are great.
And the final tip: use reference! Look for pictures of people with beautiful lips, with thin lips and full lips, try to see which line goes where and how it changes the shape and expression. I hardly ever draw without a reference.
Good luck! 👄
quick proportion tips
- eyeballs are an eyeball width apart - ears align with the top of your brows to the bottom of your nose, and are the center-point of a profile view - lip corners line up to the center of each eye - hands are roughly the size of your face - feet are the same size as your forearm - elbows are aligned with your belly-button - your hands reach down mid-length of your thighs - both upper and lower legs (individually) are roughly the same size as your torso (this is all rough estimates for proportion! feel free to add more to help others)
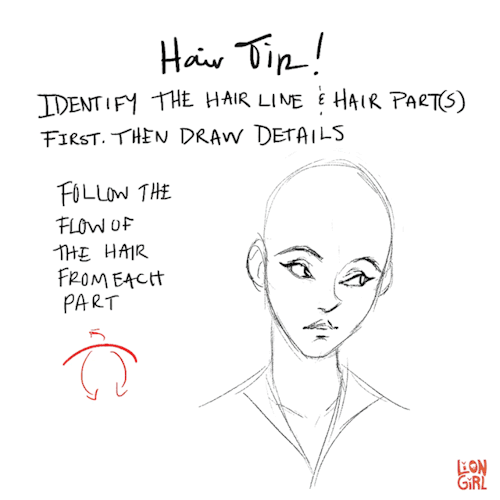

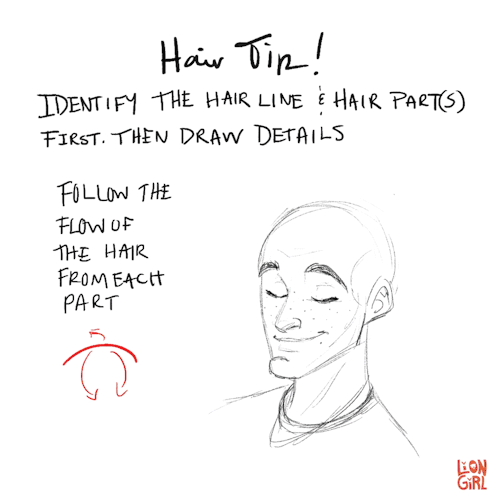

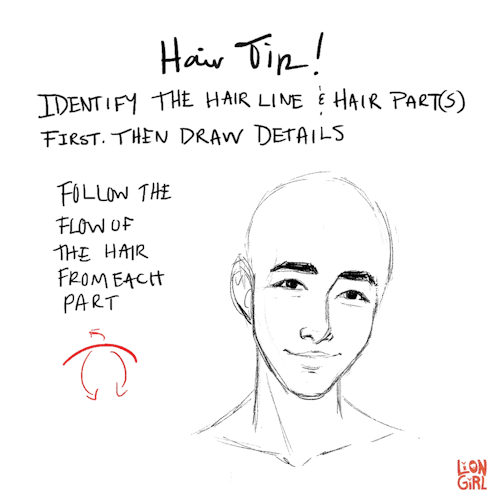
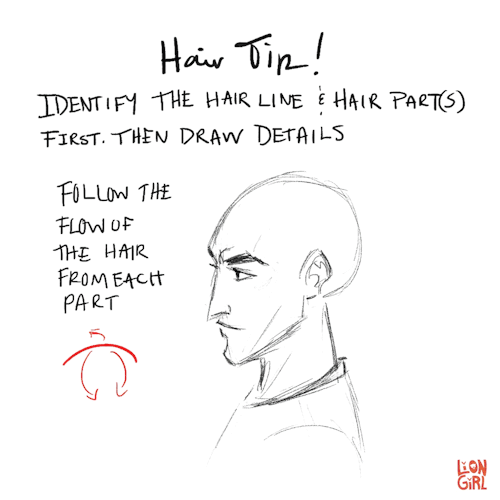
Hair Tip #1 - When drawing hair, start with the hairline and hair part(s). Then keep the flow and volume in mind while you add details!
I’m not the best at drawing or painting hair, but someone on instagram requested that I make a post about it so hopefully this will help someone! This is the first of 3 tips I’m going to share.
art tips post
for all the artist following me
Have two sketchbooks: One for finished and high-quality art (stuff made with Prismacolor or Copic if you use that or art for your portfolio) and the other sketchbook for more messy doodles. This way you have a place to try new things and mess up as much as you need. When I only had one sketchbook I was scared to draw in it because I didn't want to mess it up
Do studies. I cant tell you how much I've improved just by doing studies of shoes, hands, noses, and all that. This works for when you have art block too since you’re not really making stuff up and just learning how real things work.
Learn from others. I’ve never taken a real art class because 1. I can’t afford it and 2. there’s no good art classes/programs at my school. I’ve been following several artists and learning from them over the years and they’ve helped me tremendously. Just please do not steal art because that is never okay.
Break down concepts. If you notice there’s something wrong with your piece then figure out why. You can’t get better if you leave mistakes and don't try to understand whats going on. If the color is weird figure out if the values look right or maybe its the saturation of the color.
Watch youtube tutorials. Here are some youtubers I think are pretty good art teaching all things art: Draw with Jazza | DrawingWiffWaffles | Proko | Baylee Jae
Have an inspiration folder/blog. Sometimes you just need a collection of starry nights or a misty forest or even a French bakery. All of those things can help you get inspired to draw. It could even be completely unrelated to what you plan to draw.
There are no dumb ideas in the creative process. If you want to draw a lizard in a dress go for it! If you want to draw various pastries with faces do it! Don’t let the thought of it being too dumb stop you because if I’ve learned anything in my several years of drawing it’s that an idea can lead to another and another and another and you may get a really good idea just from doodling dumb things.
Here’s a few things that can get you started on drawing better:
Dynamic poses | Dynamic clothes | Dynamic figure drawing
COMPOSITION | PERSPECTIVE | CONSTRUCTION
Anatomy:
Legs
Arms
Hands
Heads
Body (Female) (Male
Color Theory
Improving your sketchbook
Most importantly, don’t give up! You may not immediately get notes or followers but it’s more important you get better than to have popularity. How do you think those popular artists got to where they are now? To be good you’ve got to work at it.
do you have any tips for anatomy?? the way you draw bodies flows so well and looks so natural, but its also really detailed!!
Thank you!!! There is too much to say on the matter so I summarised some basics. The best way to learn is to draw nudes (looooots of nudes), but I hope those tips make the process easier ~


there we go! this is how i do it anyway fkfjskjd
for @yourfriendbird ;)

God this woman is amazing! What a queen!
http://monikazagrobelna.com
please give her tons of love!

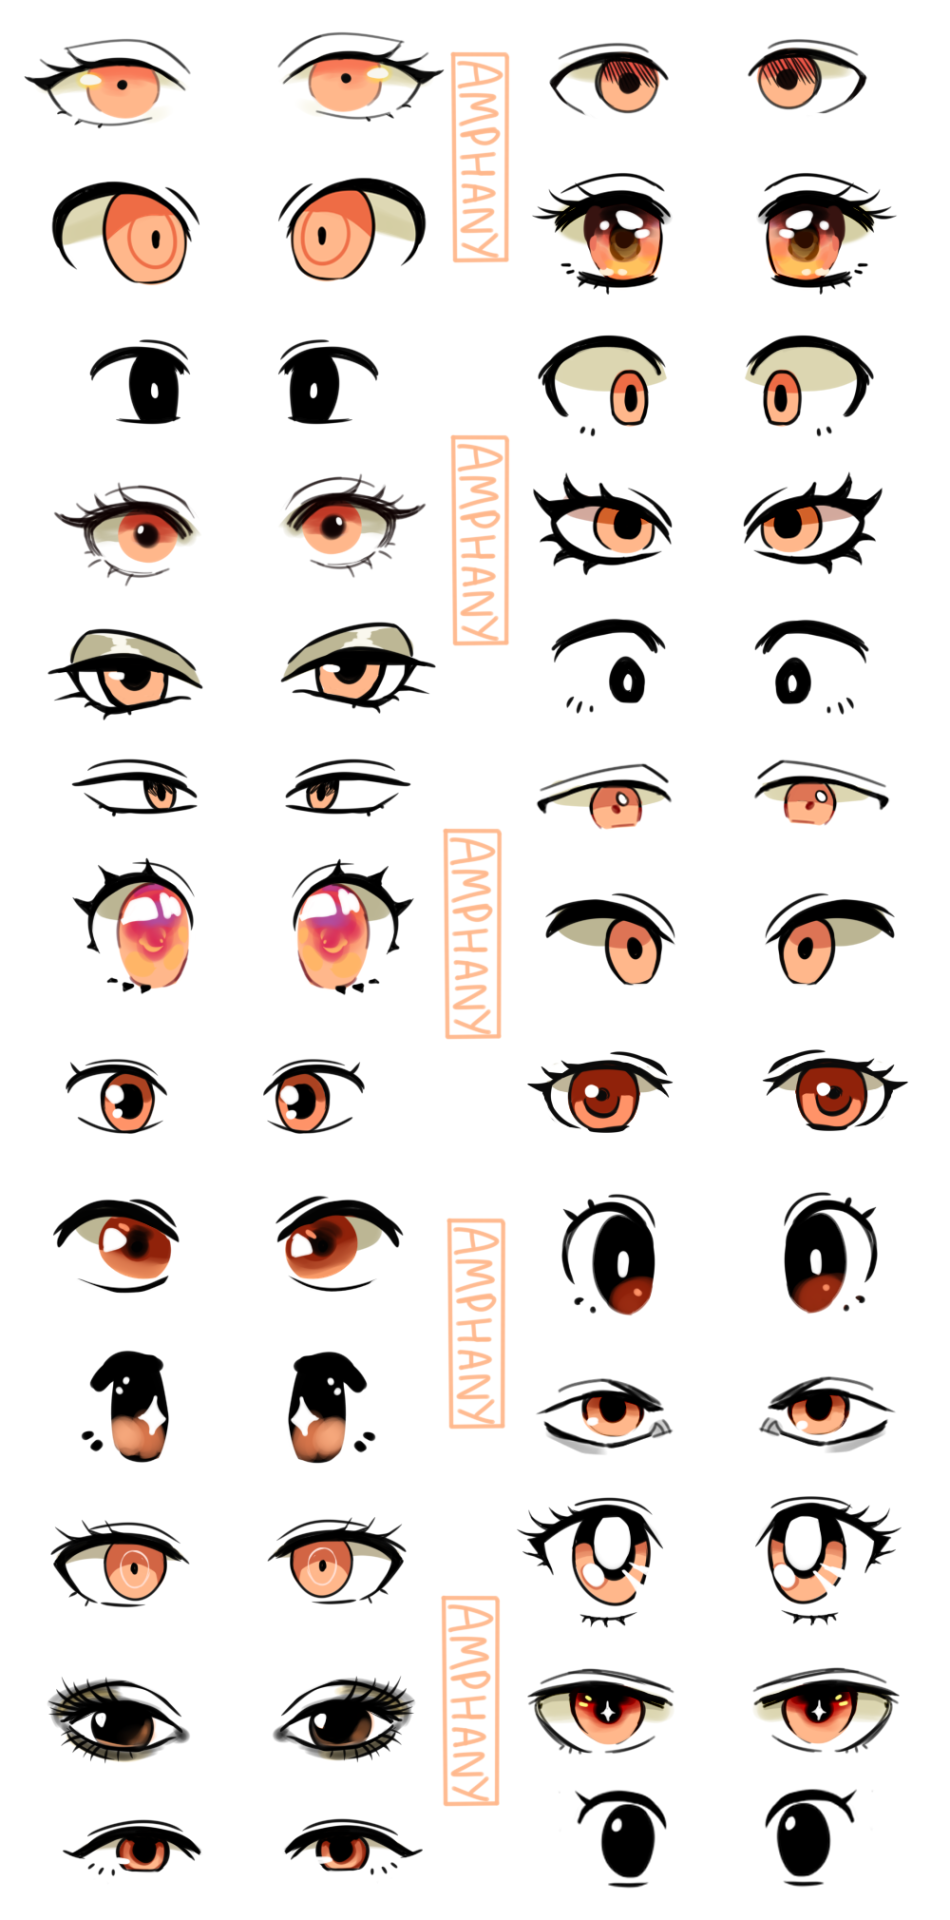
I made a tutorial! I hope it is helpful. Some of the styles of eyes are from Studio Ghibli,Sailor Moon, Pokemon, Dangan Ronpa, Fire Emblem, Ace Attorney.
Please ask me if you have any questions! <3
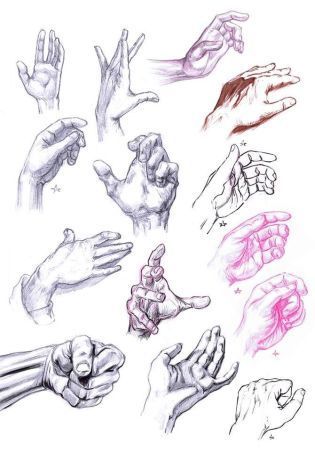
My hands... Cheats... Things...
How I draw hands?
Idk?
Hope this makes sense. I generally don't see myself as being very... Good at hands, BUT I'm gonna most some drawings with my thoughts on how I draw them.
Of course, since character art is my passion, I've been forced to draw hands for over a decade. SO most of my 'skill' with hands is just muscle memory, combined with reference, combined with practice practice practice. Which nobody wants to hear because it sucks. SO LET'S SEE IF I CAN HELP ANYONE CHEAT THEIR WAY TO BETTER HANDS!!! (Also I'm so sorry for the photo quality I hope you guys can see these clearly enough)

So the basic thing about hands for me is that the palm is one shape, the fingers are another and the thumb is there too. I showed the palm in red and you can see how the thumb adds to the shape of the hand, as does the side of the hand in the second drawing.

As you can see from the sad looking hand, the anatomy looks wonky if the thumb is too high. If you clearly make the distinction of 'Here's the palm. Here's where the fingers are and here's the thumb, who is separate, but important.' it'll look way more natural, even if you're not confident. Most of my skill is just the fact that I don't make the thumb ruin everything. Wonky fingers can be ignored, but if the thumb looks like a parasite rather than an appendage, everybody notices.

As I mentioned, fingers that are kind of just stumps of flesh can be ignored in some cases, but if your thumb ain't natural... It'll look weird. When the thumb is flexed (which is how I draw it 99% of the time) it has a distinct curve to it and isn't just straight.
BUT BE CAREFUL! When perfecting the foxy curves on that gorgeous thumb of yours, you may get too into it and make it about fifteen sizes too big. Compare it to the rest of the hand and adjust appropriately.

SPEAKING OF PROPORTIONS! Please... Measure the hands against the body. One thing I see a lot in 'bad hands' is that the artist works so hard on making the fingers look good and detailed... And they end up making the hands ridiculously small or way too large. If that's your style, that's cool, but... Sometime's it's obviously not a style choice. It's just oversight. Always make sure you know how big your hands need to be.

These are just some more sketches of mine, but I want to bring to attention something in the bottom hand, the forshortened one... The two middle fingers are almost fused together. This is an epic hack and will make your hand poses super natural looking. Just like it looks weird to draw each individual hair, if you draw each finger as its own unit, you're gonna get a wacky hand. Especially when posing and thumbnailing, grouping certain fingers together into one mass is a GREAT hack for clear, readable action which, in the end, is the goal of character art.
Tbh, the less detail and anatomy you can get away with, the better. If you can make something that is an anatomical disaster look expressive and pleasing to the human eye, then the best advice I can give you is to lean into that and embrace it. Art is abstraction at the end of the day and hands are not the hill anyone wants to die on.

When drawing the palm, remember to leave room for Jesus. You know how he was pierced in the middle of his hands? Make sure that part actually exists in your drawing. A lot of people sort of forget to draw the palm and make it very small or nonexistant. Just a gateway to the fingers. Your palms deserve better rep than that. Sure, the fingers are more popular, but the palm is like that one stable friend who owns the Netflix account. You think your ring finger is financially responsible? Hah. (What am I saying at this point? Have I cracked???)
And some tips for the road:
Look at references (sorry I needed to say this again)
Try copying hands from photos
Try copying hands from drawings (yeah, you're gonna learn a few awesome shortcuts from observing some non-irl hands)
Study your own hands. How do the shapes work? Draw that.
Forshortening sucks and will always suck, don't fear it. Fake it till you make it.
If you can hide the thumb or a finger behind the rest of the hand and it doesn't look like it's been chopped off... Do it. Take shortcuts if they won't damage the expression and readability.
Continuing that last one: If you can get away with not detailing hands, do it
A scribbled, low detail hand that carries a drawing's pose and purpose is a million times better than a hand that was shoved in a pocket because you don't know how to do that pose. If you're gonna destroy your awesome pose because the hand scares you, then why draw it anyway? You've already butchered the expression and composition. What's the point? All the hacks you could have used and you pick the 'spit on my own hard work' method?
Don't sacrifice composition, expression or clarity because you're afraid of a pose is all I'm saying
Try to remember your style and how many fingers your characters are supposed to have. This seems obvious, but I forget way too often.
Hands holding things... Suck. It'll be painful to draw. Look at reference, sketch it out, use your hacks... And pray.
But don't make an object smaller or oddly shaped because it's being held. If the hand looks wonky, that's fine, but if the IMMORTAL DRAGON SWORD wobbles at the handle IT IS OVER!
On that note: learn the proper hand positions for holding things like weapons and tools. Or at least make it semi-believable. That's a bit of a make-or-break thing right there.
Don't draw the hand without figuring out where the rest of the arm is going. Believe it or not, those two things are connected and if drawn without regard for one another, they look weird.
On that same note: Wrists are a thing that exist. Remember to draw them. I forget a lot, even in some of my examples here and it looks awkward. Especially in bent-wrist poses.
If anyone wants to add their own tips or sketches, PLEASE DO! I have no idea what I'm talking about! Most of this isn't from a real 'education', it's just stuff I picked up! So anyone else is perfectly qualified to give their two cents and I will thank them!
@the-inevitability-of-death Heard you needed drawings tips, but since I can't explain for the life of me, I decided to compile this list of posts for you. Hope it's helpful!
https://carquinny.tumblr.com/post/190084108171/people-ask-me-so-often-for-help-with-anatomy-but

https://chlowstix.tumblr.com/post/639484659109150720/an-art-guide-on-gestures-and-anatomy-that-i-hope

https://liongirlart.tumblr.com/post/173062179417/hair-tip-1-when-drawing-hair-start-with-the

https://amphany.tumblr.com/post/188304058211/i-made-a-tutorial-i-hope-it-is-helpful-some-of


TUTORIAL PARA DIBUJAR CUERPOS FEMENINOS
Chic@s! Les dejo hoy aquí un breve tutorial para dibujar cuerpos femeninos thicc xd estilo anime donde explico las proporciones básicas.
El tutorial está publicado en mi Wordpress y también tengo otros tutoriales que ya publiqué aquí en su momento, pero ahora los tienen ahí de forma más accesible y ordenada.
Si hay cualquier problema con el tutorial avísenme, si les ha servido no duden en compartir y si tienen cualquier duda, mi Ask está siempre abierto! >w<


Just sketchbook dumping stuff from the last day or so. Running into my folds slowing down my finished stuff, so just obsessively going to crush that lack of knowledge.
Including all the raw sketch stuff and notes to show younger artist how to quickly and efficiently study new topics🤷♂️


Pro-tips for baby artists
At the beginning of your artistic journey, everything feels confusing. You just have a colossal amount of ideas but you don’t know how to put them down. It doesn’t matter if you’re a painter or a digital artist, the question is still the same: “why does it have to be so damn difficult?!” On one hand, this question proves that you are maturing, as most baby artists tend to - and it’s perfectly normal! - feel like they are doing everything correctly, to ralise at the end that their ideas might be too many and too unorganised.
On the other, this problem can be resolved in various ways, that most artists learn with experience, but that I want to share with you in this post.

1. References, not copies: What I used to do, and I see a lot of baby artists making the same mistake as me, is basically coping others’ art. With this, I’m not saying that you can’t use references or you mustn’t do “draw in your artstyle” challenges, as it’s VERY important that artists know that references are important, photos and art pieces both. What I want to say, is that taking an artwork and completely coping every single detail in it blocks your creativity and your ability to follow anatomic structures in a real references. Using others’ artwork helps you when you “steal” from the other artist some techniques, like how they colour, how they draw bodies, or what kind of references they use.
2. Instagram account: if you are a beginner artist who was born in the internet era, one of the first things that come to your mind when you start improving with your artistic skills, is that you have to open an Instagram account where you post your art pieces. Sometimes, this helps artists to stay committed to their passion, but most of the time the result is the opposite. When you are in the first stages to become an artist, you have the possibility to be creative and do what you want with your art. If your sketchbook isn’t “aesthetically pleasing” it doesn’t matter, as only you and your friends are going to see it! You can experiment with new artforms and artstyles without judgement or deadlines. Now, I don’t want to say that opening an online art account ruins this, but having an art account certantly requires very thick skin - as we all know that on the internet people feel like they always know best - and costant care and precision, which sometimes dulls the positivity that making art normally brings.
3. Art supplies: One of the most popular phrases used by creators is “the art supply doesn’t make the artist”, which is completely true, but not quite accurate. Expensive art supplies won’t make your art any better, and they won’t make your work any easier, but using correct art supplies is very important. Spending 200$ for an art supply that you won’t be using is not worth it (a.k.a. me with brandy oil pastels that I refuse to use because it’s too difficult), but buying some, for example, inking pens at a fair price will help you improve. You have to experiment to know what works out for you or not, so using only a normal pencil won’t help you with your sperimentation and, automatically, your artistic growth. So spend money, but spend it with conscience.
4. OCs: If you don’t know, OC stands for Original Character, and it’s a common thing between a lot of artist to create an OC with their own personalities. Here’s my tip on them: USE THEM. They are extremely helpful for your creativity and for your anatomic studies. An OC provides the perfect opportunity to draw and learn through something you enjoy. By drawing the OC, your art skills will improve with ease, as you will be drawing them in different situations, expressions and poses. Apart from this, even only the part of the conception of the character will help you to organize and choose your ideas!
5. Experiment: As a beginner artist, I always thought that when you begin your artistic journey, you have to be sure of what “type” of artist you are going to be. Guess what? I was wrong, so very wrong. Let your curiosity get the best out of you: you want to give sculpting a try? Go for it! You want to pass to digital art instead of traditional? Awsome! Art is expressed in millions of forms, you just have to descover what you like best, but to find them, you have to try as many as possible. It doesn’t matter if you fail: it’s normal. Errors make the journey more interesting, and they make you want to be better the next time!


Clothing studies: March 25th 2021
The only thing to do now is actually remember all this 😔
How to train your hand
Sooo… I’m not dead, yay!!(●'◡'●)
I’m sorry for not being “present” these weeks but school sucks and I had tons of assignments to do…
Anyways! What I noticed as soon as I rose from the dead, was a reblog of one of my previous posts of someone saying how difficult and overwhelming it is to draw digitally when you are so accostumed to drawing in traditional. This got me thinking that a lot of baby artists tend to have the same problems, even when they start to draw normally. So, I wanted to give some tips on how to train your hand to draw in different situations and materials!

1. Sketchbooks (ONLY OF TRADITIONAL ARTISTS): okay, let me get this straight: your sketchbook is your training ground. This means, it has to be comfortable to draw into, but it must also be suitable for your artistic enhancement! So, choose a sketchbook that has papers made with materials that you are comfortable drawing on. It can be in spiral-form or bound (like, book-form), it doesn’t matter, it has to be comfortable for you. Here’s a tip: do not draw on ruled paper when you are starting to draw! Lined paper does not help your spatial reference or your anatomic study. Instead, you can use blank (even the printer ones!), dotted or squared (even if I don’t really like them either, because they make your drawing process a LOT more difficult) papers.
2. Ballpoint pen or pencil? (ONLY FOR TRADIOTIONAL ARTISTS) so, the eternal dilemma: is it better to use ballpoint pen or the normal pencil? for me, both are really good drawing materials. From my point of view, the ballpoint pen allows you to train your hand AND your brain without even realizing. In fact the ballpoint pen doesn’t allow you to erase, so you train yourself to fix errors without erasing and be more precise when you are drawing. On the other hand, the pencil enables you to work on your skills without the fear of making mistakes. So, what I suggest, is an healthy use of both so that you can use pencils to make precise works and ballpoint pens to doodle on your sketchbook.
3. Be constant (DIGITAL/TRADITIONAL ARTISTS): repeat after me: training is gaining! This means that through constant exercising you will be able to impove in your art very fast! Think of your artistic skills as if they were a muscle such as the ones you use to bike. If you learn how to bike but don’t exercise yourself for a long period of time, you will always know the theory and the base concepts, but your muscles won’t support the activity as long as they would if you did it every day! The same concept can be seen in the artistic world, but in this case the muscle is your brain! If you train your bain to do some gesture or draw in some specific way every day at leat for 10 or 15 minutes, you will be able to improve in your art in a very short period of time!
4. This also means: Do not rush! (DIGITAL/TRADITIONAL ARTISTS): Improvement will be seen, but you have to be patient and give you and your hand some time. Great artists are not the ones that improve faster, but the ones that have strong bases. There is no simple way, no tutorial that will help you become Leonardo Da Vinci in two days. My art journey is still on process, as the one of everybody, and to arrive to the point I am here now, I had to train myself for eight years.😊💕


These are some tips on how I draw toon Boris. I know other people have their own techniques, but this is usually how I go about it. Hope this helps.
Art Advice #3 - Drawing tips!
Hi everyone!
As you may know, every week or so I’m writing blog posts with art advice hints and tips for artists of any skill level in the hopes of helping some people out a bit! The tag is here so feel free to check out some of my other posts!
This week’s post is going to be some drawing tips I’ve picked up over the years that could hopefully be useful for beginner artists!
(this is about 1800 words altogether btw)
Seguir leyendo


PLEASE USE CREDIT WHEN REPOSTING
How to draw hair! This is just a small guide and doesn't cover everything, have fun drawing!

Some Figure Drawing practice and Using Shapes tips By me.
While practicing.. i thought i should share some tips to you. hope it helps!